Are you looking to improve your website’s performance or ensure it has the best possible security? Changing your Namecheap nameservers might be the solution you need.
Whether you’re aiming for faster loading times, enhanced security, or better control over your domain settings, updating your nameservers can be a simple yet powerful step. In this guide, you’ll discover just how easy it is to make these changes on Namecheap.
By following a few straightforward steps, you can unlock greater potential for your site and ensure it operates smoothly. Ready to take control and optimize your online presence? Let’s dive into the process and get your website running at its best.
Credit: kinsta.com
Preparation Steps
Changing your Namecheap nameservers requires preparation. Following certain steps ensures a smooth transition. This guide helps you organize everything needed before you make changes.
Check Domain Eligibility
First, confirm your domain supports nameserver changes. Some domains have restrictions. Use Namecheap’s support to verify eligibility.
Gather Account Information
Access your Namecheap account details. You’ll need login credentials. Keep this information handy for quick access.
Research Desired Nameservers
Identify the new nameservers you plan to use. Ensure they meet your hosting requirements. Double-check settings for compatibility.
Backup Dns Records
Save current DNS records. This prevents data loss during changes. Use Namecheap’s interface for easy backups.
Schedule Maintenance Time
Plan changes during low traffic periods. This minimizes impact on visitors. Choose a time when disruptions are least problematic.
Notify Stakeholders
Inform relevant parties about upcoming changes. This includes your team or clients. Clear communication avoids confusion.
Credit: www.hostinger.com
Accessing The Domain Settings
To change Namecheap nameservers, locate the domain settings in your account dashboard. Access the settings by selecting your domain, then find the option for nameservers. Adjust the nameservers to the desired ones and save your changes.
Accessing the domain settings on Namecheap is a crucial step if you want to change your nameservers. Whether you’re setting up a new website or redirecting an existing one, understanding how to navigate Namecheap’s interface is essential. This section will guide you through the process, ensuring you can manage your domains with confidence and ease.Logging Into Your Namecheap Account
First, head over to the Namecheap website and locate the login button at the top right corner. Enter your username and password to access your account dashboard. If you forgot your password, simply use the “Forgot Password?” link to reset it. Once logged in, you’ll see a list of all your domains.Navigating To The Domain List
In your account dashboard, you’ll find a menu on the left side. Click on the “Domain List” option. This will present you with all the domains you’ve registered with Namecheap. Here, you can see key details about each domain, such as expiration dates and current nameserver settings.Selecting The Domain To Update
Browse through your domain list and identify the domain you wish to update. Click on the “Manage” button next to it. This will take you to a detailed page where you can adjust various settings for that specific domain. It’s like opening the door to a world of customization options for your domain.Finding The Nameserver Settings
On the domain management page, look for the “Nameservers” section. It’s usually located in the settings tab, alongside other domain options. This section allows you to view and edit the current nameserver information. Are you ready to make some changes to steer your domain in the right direction?Understanding The Importance Of Nameservers
Nameservers are like the GPS for your domain, directing traffic to the correct server. Changing them might seem daunting, but it’s a straightforward process once you know where to look. By accessing the domain settings, you’re taking control of your digital presence. Isn’t it empowering to know you can direct your website traffic with just a few clicks? Remember, accessing these settings is the first step towards customizing your domain. With each click, you’re mastering the art of domain management.Updating Nameservers
Updating your domain’s nameservers is a crucial step in managing your website. This process ensures your domain points to the correct hosting service. For Namecheap users, changing nameservers is straightforward. Let’s break it down into simple steps.
Understanding Nameservers
Nameservers are part of DNS that direct internet traffic. They tell browsers where to find your website. Without proper nameservers, your domain won’t function correctly. Knowing how they work is essential for website management.
Accessing Your Namecheap Account
First, log into your Namecheap account. Use your registered email and password. Once logged in, navigate to the ‘Dashboard’. Here, you’ll find a list of your domains. Select the domain you want to update.
Finding The Domain List
In your Dashboard, look for the ‘Domain List’ section. This section displays all your registered domains. Click on the ‘Manage’ button next to the domain. This action will open the domain settings page.
Locating The Nameservers Section
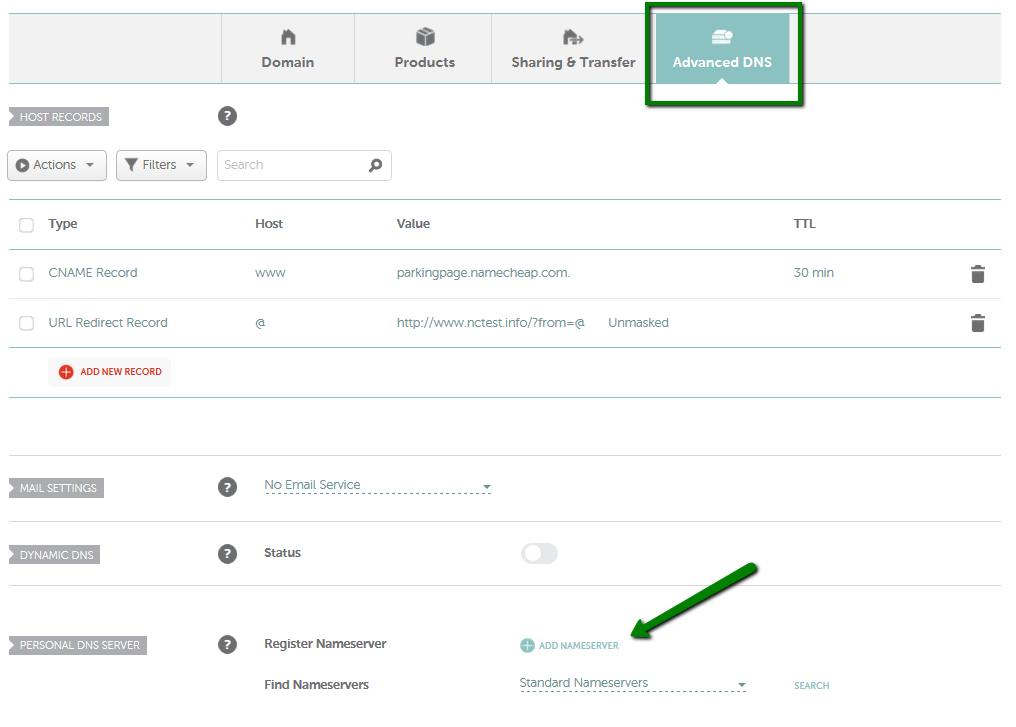
On the domain settings page, scroll to find the ‘Nameservers’ section. It is usually located under ‘Domain’ or ‘Advanced DNS’. This is where you will change your nameserver details.
Changing The Nameservers
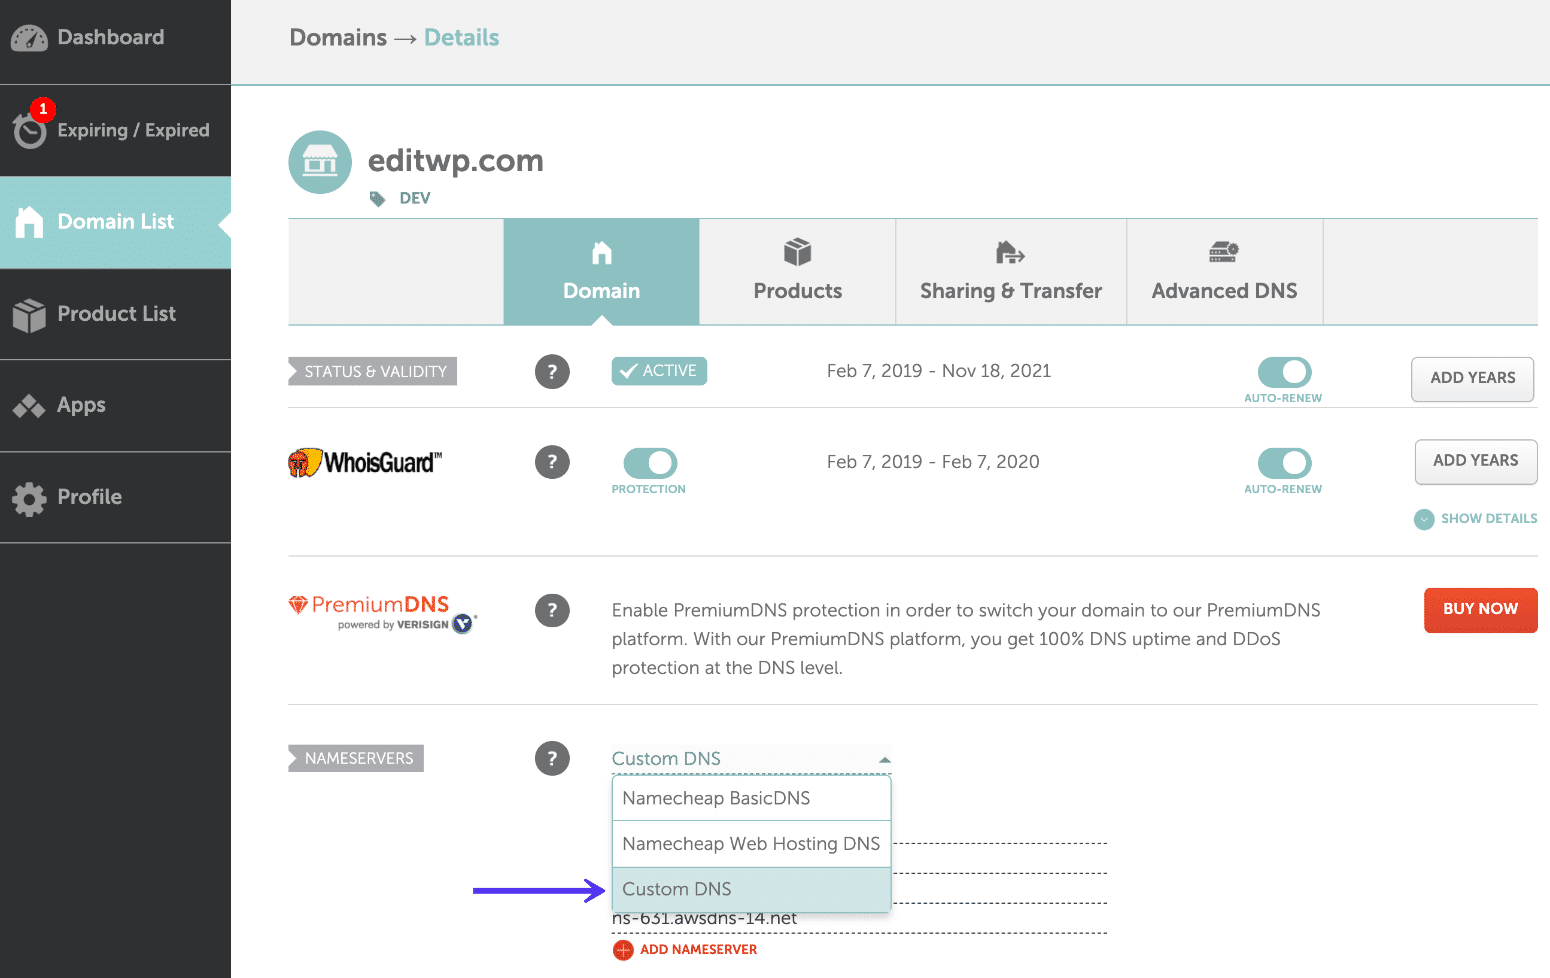
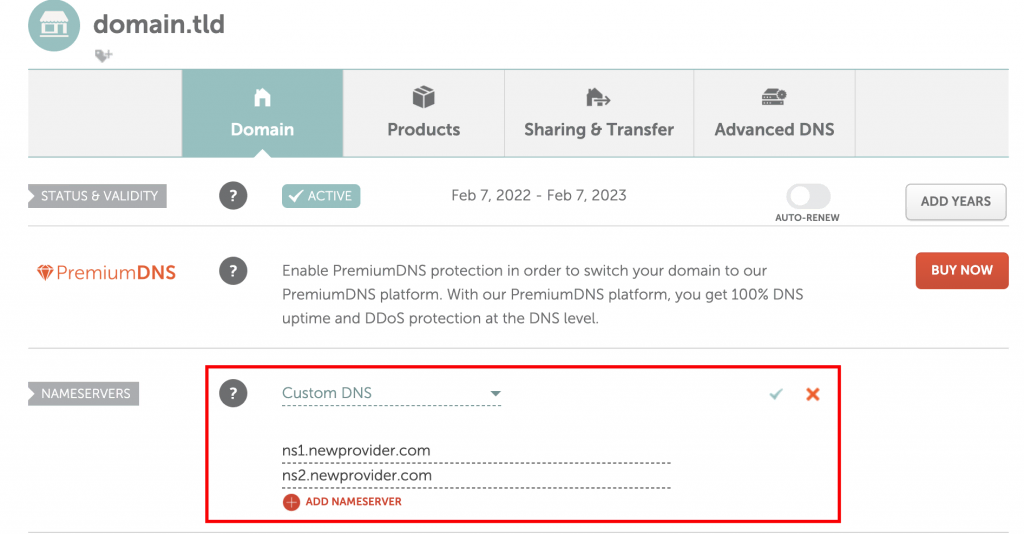
In the ‘Nameservers’ section, select ‘Custom DNS’ from the dropdown menu. Enter the new nameserver details provided by your hosting service. Ensure the information is accurate to avoid issues. After entering, click ‘Save’.
Verifying The Changes
Once saved, check for a confirmation message. It may take up to 48 hours for changes to propagate. During this time, your website may not be accessible. Patience is key during this waiting period.
Checking Website Functionality
After propagation, visit your website to ensure it loads correctly. Use online tools to verify DNS changes. Ensure all aspects of your website are functioning as expected. If issues arise, double-check the nameserver details.
Seeking Support
If you encounter problems, contact Namecheap support. They offer assistance in resolving DNS issues. Timely support helps maintain your website’s uptime and accessibility.
Credit: www.namecheap.com
Frequently Asked Questions
How Do I Change The Nameservers On Namecheap?
Log into your Namecheap account. Go to “Domain List” and select your domain. Click “Manage” and then “Advanced DNS. ” Under “Nameservers,” choose “Custom DNS” and enter your new nameservers. Save changes.
How Do I Find My Namecheap Nameservers?
Log into your Namecheap account. Go to the “Domain List” and click “Manage” next to your domain. Find the “Nameservers” section to view your current nameservers.
How Do I Change My Nameserver?
Log in to your domain registrar account. Navigate to the DNS or Nameservers section. Locate the option to update nameservers. Enter the new nameserver details provided by your hosting provider. Save the changes and allow up to 48 hours for DNS propagation.
How To Edit Dns Zone Namecheap?
Log in to your Namecheap account. Go to “Domain List” and click “Manage” next to your domain. Select the “Advanced DNS” tab. Edit the DNS records as needed. Save your changes by clicking the “Save All Changes” button.
Conclusion
Changing Namecheap nameservers is simple with the right steps. Following this guide ensures a smooth process. First, log into your Namecheap account. Next, locate your domain list. Then, select the domain to update. Finally, change the nameservers to the new ones.
Always double-check your entries for accuracy. This helps avoid potential issues. Nameserver changes might take up to 48 hours to update. Patience is key during this time. With practice, managing nameservers becomes straightforward. A few clicks, and you’re done! Keep this guide handy for future reference.
Happy domain managing!