
Are you ready to unlock the power of TortoiseHg and host your very own web server locally? Imagine having complete control over your projects, all from the comfort of your own machine.
By learning this skill, you not only enhance your technical prowess but also gain the freedom to experiment and innovate without limitations. This guide is crafted with you in mind, aiming to simplify complex processes and empower you with actionable steps.
Dive in and discover how easy it is to transform your computer into a local web server with TortoiseHg. Your journey to mastering this tool begins now, and by the end of this article, you’ll wonder how you ever managed without it. Let’s get started!
Tortoisehg Overview
TortoiseHg is a tool for version control. It works with Mercurial systems. This tool helps you manage your code easily. You can see changes in your files. It makes collaboration simple for teams.
TortoiseHg is easy to use. Its interface is user-friendly. Anyone can learn it quickly. It is available for Windows, Mac, and Linux. Installing it is straightforward. You download the setup file. Then, follow the instructions on your screen.
TortoiseHg supports many features. It includes branching and merging. These help keep your code organized. You can also create bookmarks and tags. It helps you find important code parts fast. Many developers choose TortoiseHg for its reliability.

Credit: en.wikipedia.org
Setting Up Tortoisehg
First, download TortoiseHg from the official website. Choose the version that matches your operating system. Run the installer file you downloaded. Follow the on-screen instructions carefully. Installation should only take a few minutes. Once installed, open the TortoiseHg Workbench. Now, you are ready to start using it.
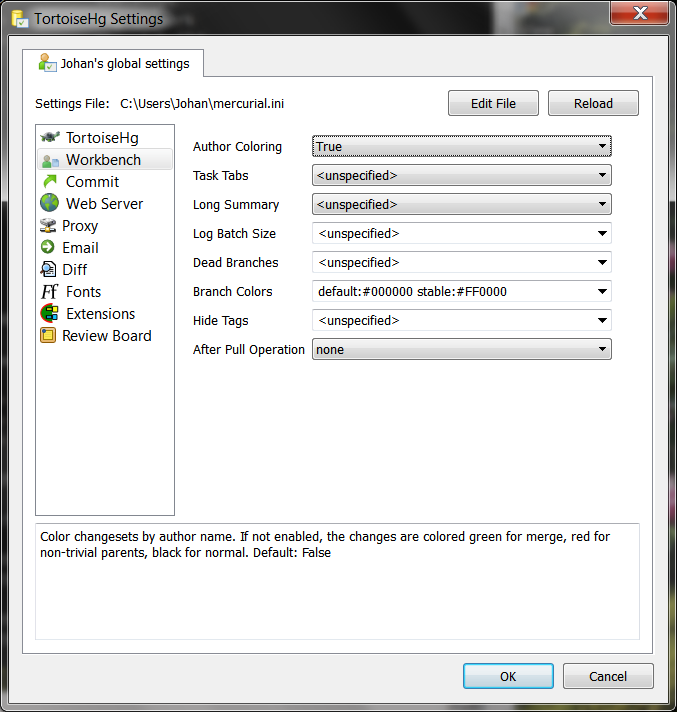
Open the TortoiseHg Workbench. Click on the “File” menu at the top. Select “Settings” from the dropdown list. Here, you can adjust your preferences. Set your username and email in the settings. This information is important for commits. Save your changes before closing the window. Now, your initial setup is complete.
Creating A Local Repository
Start by opening TortoiseHg on your computer. Choose the option to create a new repository. Select a folder where you want the repository. Click on the “Create” button. Now, your local repository is ready. You can add files to it.
To add files, open your repository folder. Drag and drop files into the folder. Open TortoiseHg and view the added files. Right-click on the files and select “Add”. This includes them in your repository. Remember to commit changes after adding files. This saves your work.
Credit: tortoisehg.readthedocs.io
Enabling Web Server Feature
Open Tortoisehg to start. Click on the Settings option. Find the Web Server section in the menu. This section holds all the settings you need. It is important to make sure it is enabled. This allows the server to run locally.
Choose the port number for your server. The default is often 8000, but you can change it. Remember to save your changes. Then, start the server to see your website live. You can access it by typing localhost followed by the port number in your browser. It is that easy to host your own website!
Starting The Local Web Server
First, open Tortoisehg on your computer. Find the option to start the server. Click on it. Wait a few seconds. The server will launch. You will see a message. It tells you the server is running. Local hosting is now ready.
Open your web browser. Type localhost in the address bar. Press enter. The web interface will appear. You can see your files. You can change settings. Easy access from your browser. The interface is simple. Navigate with ease.
Managing Repositories Via Web Interface
The web interface shows all repository details. You can see the name, size, and last update. It also shows the number of commits. This helps in understanding the repository quickly.
Common actions are easy with the web interface. You can clone a repository with one click. Pushing and pulling changes is simple too. Viewing logs and checking history helps track changes. These actions keep your work organized.
Security And Access Control
User authentication is crucial for a safe web server. Create a strong password for each user. Make passwords hard to guess. Use a mix of letters, numbers, and symbols. Change passwords often to keep accounts secure. Install two-factor authentication for extra safety. This adds a second layer of protection. With these steps, users stay safe.
Access permissions control who sees what on your server. Limit access to important files. Only allow trusted users to change them. Use read-only permissions for most users. This stops changes to files. Block access to sensitive areas. Protect your server by controlling permissions carefully. Keep everything secure and organized.
Troubleshooting Common Issues
Hosting a web server locally with TortoiseHg often involves troubleshooting common issues. Check network settings and ensure your firewall allows necessary ports. Verify TortoiseHg’s configuration for accurate paths and permissions.
Web Server Not Starting
Sometimes the web server refuses to start. This can be frustrating. First, check your internet connection. Make sure it is stable. Next, verify your server settings. Settings must be correct. Look for any error messages. These messages help find the problem. Restart your computer. This can fix small errors. If the issue persists, consult the software documentation. It has helpful tips.
Access Denied Errors
Access denied errors are common. They block entry to the server. Check your permissions first. Ensure you have proper access. Sometimes files are locked. Unlock them if needed. Adjust your firewall settings. Firewalls can block server access. Always save changes before testing. If problems remain, contact support. They provide specific solutions.
Best Practices For Hosting
Fast servers make users happy. Always use the latest software versions. They have better speed and security. Choose the right hardware for your needs. More RAM and faster CPUs help. Minimize the number of requests. Fewer requests mean faster responses. Use caching to store data temporarily. It speeds up data retrieval. Compress files to make them smaller. Smaller files load quicker. Monitor server load regularly. Find and fix bottlenecks promptly. Check server logs often. They can show problems.
Data loss can be a big problem. Back up your data often. Use an external drive for backups. Cloud storage is also a good choice. Test your backups regularly. Make sure they work. Keep copies of backups in safe places. If one fails, you have others. Automate backup processes. Set and forget them. Always encrypt sensitive data. Protect it from theft. Document your backup process. Others can follow it easily.

Credit: geekthis.net
Frequently Asked Questions
How To Use Localhost As Web Server?
Install a web server software like XAMPP or WAMP. Launch the software, and place your website files in the designated folder. Start the server, and access your site by typing “localhost” in your browser’s address bar. Ensure your server is running for local development and testing.
What Is Tortoisehg Used For?
TortoiseHg is a user-friendly tool for managing Mercurial repositories. It provides a graphical interface for version control tasks. Ideal for both beginners and advanced users, it simplifies cloning, committing, and managing code changes effectively. TortoiseHg enhances productivity with its intuitive features and seamless integration into various development environments.
How To Start Tortoisehg Web Server Locally?
To start TortoiseHg’s web server locally, open your repository. Click on the “View” menu and select “Web Server”. This will launch a local server, typically on port 8000. You can access it by navigating to “http://localhost:8000” in your web browser.
What Are The Requirements For Hosting Locally?
To host TortoiseHg locally, ensure you have Python and Mercurial installed. TortoiseHg is a GUI for Mercurial, so both are necessary. Also, verify your firewall settings to allow communication through the designated port, usually 8000, for smooth server operation.
Conclusion
Hosting a web server locally with TortoiseHg is straightforward. Follow the steps to configure your system. Use simple commands to set up the server. Test your server to ensure it works correctly. Local hosting gives you control over your projects.
You can experiment without external pressures. TortoiseHg makes the process simple and efficient. It’s a great tool for developers. Keep learning and exploring new features. Make adjustments as needed for your projects. Enjoy the flexibility of local web hosting.


