
Are you ready to take your website hosting to the next level? Imagine having the power to manage your own server, customize your hosting environment, and ensure your site runs smoothly—all without needing to be a tech wizard.
That’s exactly what Plesk VPS offers. Whether you’re a small business owner, a blogger, or someone who’s just tired of the limitations of shared hosting, learning how to host your website on a Plesk VPS can be a game-changer. In this guide, you’ll discover how easy it is to set up and manage your website with Plesk VPS, giving you the control and flexibility you need to make your online presence truly shine.
Get ready to unleash the full potential of your website by diving into the world of Plesk VPS hosting.
Choosing The Right Vps For Plesk
Think about your website’s size and traffic. Does your site have many visitors? More traffic needs more power. Are there many images or videos? Bigger files need more space. Decide what your site needs.
Check the VPS specifications. Look at RAM and CPU. More RAM means faster speed. CPU helps with processing. Storage is also important. Choose SSD for quick access. Bandwidth affects data transfer. Make sure it’s enough for your site.
Look at different VPS providers. Compare prices and features. Some offer better support. Others might have more reliable uptime. Check reviews from other users. See what they say about performance and customer service. Choose wisely.

Credit: www.plesk.com
Installing Plesk On Your Vps
Set up your VPS before installing Plesk. Ensure your server has the needed resources. Check the memory and CPU. Confirm the operating system is compatible. Update all existing packages. Secure your server with firewalls. Backup your data to prevent loss.
Follow these steps to install Plesk. Download the Plesk installer. Run the installer on your VPS. Choose the components you need. Enter your license key. Select a default site language. Review your choices and confirm installation. Wait as Plesk installs.
Installation can face issues. Check for error messages. Verify your VPS meets all requirements. Ensure you have enough disk space. Restart your VPS if needed. Look for solutions in Plesk forums. Contact support if problems persist.
Configuring Plesk For Website Hosting
First, access your Plesk dashboard. Click on “Domains” to add your domain. Enter your domain name and confirm. Next, set up DNS by navigating to the DNS section. Add the necessary records for your domain. Ensure you save all changes. This connects your domain to your hosting.
Visit the settings menu. Adjust server preferences to suit your needs. Change default email settings if needed. Modify PHP and database options to enhance performance. Select the best security settings to protect your site. Save each setting as you go.
Enable firewall settings to block threats. Use SSL certificates for secure connections. Regularly update Plesk software. Check for security patches. Use strong passwords for all accounts. Back up data frequently to avoid loss.

Credit: www.plesk.com
Creating And Managing Websites In Plesk
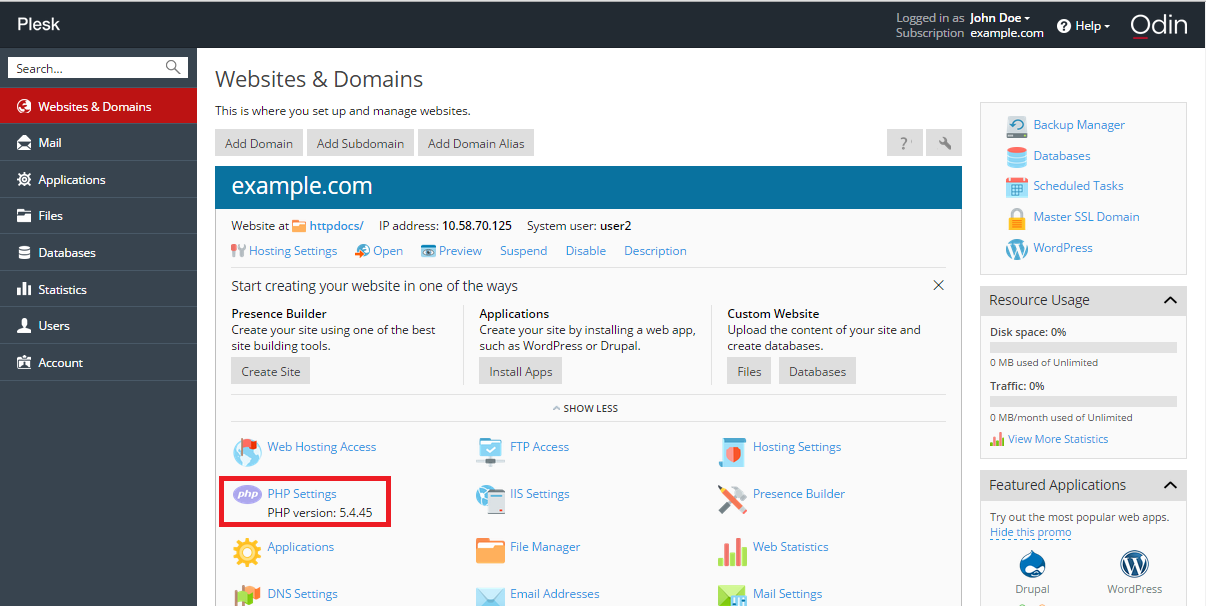
Start by logging into your Plesk control panel. Click on the “Websites & Domains” tab. Then, choose the “Add Domain” option. Enter your new website name. Set up the hosting type and click “OK”. Your new website is now added. Easy, right?
Handle multiple websites with ease. Use the Websites & Domains tab. Here you can see all your websites. Click on any to manage settings. Update content or settings quickly. Keep track of each site’s performance.
Boost your website’s speed using caching. Enable the caching feature in Plesk. It reduces load times. Regularly check website traffic. Ensure your server resources are enough. Use tools like Google PageSpeed Insights to check speed. Make improvements based on suggestions.
Implementing Security Measures
Ensure your website’s safety with Plesk VPS by setting strong passwords and enabling firewalls. Regular updates keep security tight. Backup your data frequently to prevent loss or damage.
Enabling Ssl Certificates
SSL certificates keep data safe. They secure the connection between users and your website. Install them to protect user information from hackers. Many hosting providers offer easy SSL setup. Check if your provider offers free SSL. Use HTTPS for better security and trust. This improves your site’s reputation. Users feel safe when they see the padlock symbol.
Configuring Firewall And Security Policies
A firewall blocks bad traffic. It stops hackers from reaching your server. Configure it for best protection. Set rules to allow good traffic and block bad ones. Security policies help keep your server safe. They set guidelines for what is safe and what is not. Update policies regularly for better protection. New threats appear often. Stay ahead by updating.
Regular Security Audits
Security audits check for problems. They find weak spots in your setup. Run audits often to keep your site safe. Fix issues quickly when audits find them. Audits help prevent data loss and hacks. Use tools to automate audits. Automated audits save time and catch more problems. Regular checks ensure your site remains secure.
Backing Up And Restoring Websites
Plesk VPS offers a straightforward way to host websites, ensuring data protection through regular backups. Restore your site effortlessly using Plesk’s intuitive tools, minimizing downtime. This reliable solution supports website security and performance with ease.
Setting Up Automated Backups
Automated backups are very important for your website. They help keep your data safe. Plesk VPS makes this easy. You can set up a schedule. Decide how often to back up. Daily, weekly, or monthly. Choose a time when the website is not busy. This saves server resources. Make sure you have enough space for backups. Check this often. Keep backups in a safe place. This protects against data loss.
Manual Backup Procedures
Sometimes you need a manual backup. This can be done through Plesk. First, log into the Plesk panel. Go to the ‘Backups’ section. Click ‘Create Backup’. Choose what to back up. Files, databases, or both. Start the process. Wait for it to finish. Download the backup to your computer. Store it safely. Manual backups are useful before big changes.
Restoring From Backups
Accidents happen. Files get lost. No need to worry. You can restore your website. Go to the Plesk panel. Open the ‘Backups’ section. Pick the backup you need. Click ‘Restore’. Follow the steps. The website will be back. Make sure everything works. Check the site after restoring. It’s like magic.
Monitoring And Maintaining Your Vps
Many tools help you keep an eye on your VPS. Using these tools helps track the performance. They show CPU usage, memory, and disk space. Grafana and Nagios are popular choices. They offer detailed reports. These help in improving the server’s health. A healthy server means a fast website. Always use reliable tools for monitoring.
Updating your system is very important. Updates fix bugs and improve security. Always check for updates regularly. Set automatic updates if possible. This way, the server stays secure. New updates also bring new features. Keep your VPS updated to ensure smooth functioning.
Downtime can happen anytime. Be prepared for it. Use monitoring tools to get alerts. Fix issues quickly when they arise. Backup your data regularly. This helps in recovery after downtime. A good plan reduces the impact of downtime. Keep your users happy by handling downtime efficiently.
Credit: www.plesk.com
Frequently Asked Questions
Can I Host A Website On My Vps?
Yes, you can host a website on your VPS. It provides control and flexibility for custom configurations. Ensure you install necessary software like a web server, database, and security measures. VPS hosting suits websites with moderate traffic and offers scalability as your needs grow.
How To Set Up A Vps For Web Hosting?
To set up a VPS for web hosting, install a Linux OS. Secure your server with a firewall and SSH keys. Install a web server like Apache or Nginx. Set up a database server, e. g. , MySQL. Finally, upload your website files and configure DNS settings.
How To Create A Website In Plesk?
Log in to Plesk and select “Websites & Domains. ” Click “Add Domain” and follow the setup instructions. Choose a template and customize it. Configure DNS settings and publish your website. Ensure all settings align with your website’s requirements for optimal performance and security.
How To Host A Domain On Vps?
To host a domain on VPS, first purchase a VPS plan and domain name. Install a web server like Apache or Nginx. Configure DNS settings to point the domain to your VPS IP. Upload website files to the server. Ensure proper security measures and test your site for functionality.
Conclusion
Setting up a website on Plesk VPS is straightforward. Follow the steps and watch your site go live. Plesk offers an intuitive interface, making management easy. Secure your site with SSL certificates. Regular updates keep your site running smoothly. Don’t forget to back up data often.
Troubleshooting becomes simpler with Plesk’s tools. Enjoy hosting your site efficiently on a VPS. Happy hosting!


