
Are you looking to secure your website hosted on IIS 8.5? Installing an SSL certificate is your first step towards enhancing your site’s security and boosting your visitors’ trust.
But where do you start, and what steps should you follow? You’re in the right place. You’ll discover the straightforward process of installing a certificate for web hosting on IIS 8. 5. Imagine your peace of mind knowing your website is protected against potential threats, while your users enjoy a safe browsing experience.
Stay with us to unlock the secrets of a seamless installation and gain the confidence that comes with a secure site.
Prerequisites
Owning the domain is very important. You must prove you own it. Use a service like WHOIS. It shows who owns the domain. Or use a verification email. This email will be sent to the domain owner. Once verified, you can get a certificate.
Install IIS 8.5 on your server. This helps you host websites. Use the Server Manager to add the IIS role. Follow the steps on your screen. Ensure all components are installed. This is crucial for smooth operation.
Having administrative access is key. You need this to manage IIS. Without it, changes can’t be made. Log in as an administrator. This gives you full control over settings. Always keep your admin password safe.
Credit: www.thesslstore.com
Choosing A Certificate Authority
Trust is key. Pick a trusted authority for your certificate. It keeps your website secure. Some well-known authorities are DigiCert and GlobalSign. They offer reliable certificates. Check if they are recognized globally. This ensures your site is secure everywhere. Always verify the authority’s reputation. Read reviews and ratings. A good authority gives peace of mind.
Certificates have different costs and features. Some are cheap, others are pricey. Compare before buying. Check the features each offers. Do they provide warranty? Is there customer support? Look for easy installation processes. Some certificates are easier to install. Make sure it fits your needs. Don’t just pick the cheapest. Sometimes, more features are worth the cost.
Generating A Certificate Signing Request
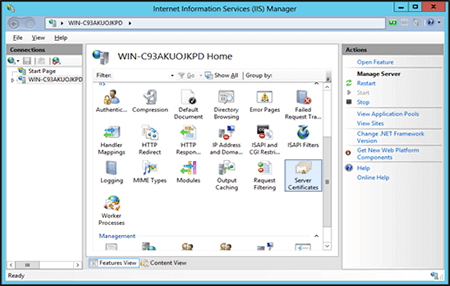
Open the IIS Manager on your computer. Look for the server name in the left panel. Click on it. This opens more options for you. Find the option Server Certificates. Double-click on it. You are now ready to create a new CSR.
Click on the Create Certificate Request link. A new window will pop up. This is the Request Certificate window. It will guide you through the CSR process. Follow each step carefully. You will need to fill in some details. These details are important for your certificate.
Enter your Organization Name in the first box. Next, type your Organizational Unit. This could be the department name. Fill in your Common Name. This is usually your website’s domain name. Complete the City, State, and Country fields. Make sure everything is correct. Click Next to proceed. The CSR will be saved on your computer. You can use it to request a certificate from a trusted authority.

Credit: www.web.com
Submitting The Csr
Use the online form to submit the Certificate Signing Request (CSR). Enter details carefully. Ensure all information is correct. The form guides you step by step. Follow the instructions closely. Double-check your entries before submission. This avoids mistakes. Submit the form once completed. Wait for confirmation. This is important. Confirmation means your CSR is accepted. It starts the process. Keep a record of your submission.
After submitting, check your email. Look for a verification message. Click the link in the email. This verifies your identity. Verification is crucial. Without it, the process halts. Ensure your email is correct in the form. If not, you won’t receive the message. Keep checking your inbox. Sometimes, emails land in spam. If so, mark as not spam. Follow the link promptly. Delay can cause problems. Verification completes your submission.
Receiving And Downloading The Certificate
Email Confirmation is crucial for certificate delivery. Check your email after purchase. Look for a message from the certificate authority. The email contains the download link. Click the link to start downloading. Save the file on your computer. Ensure it’s in a secure location.
File Formats are important. Certificates come in different formats. Common formats include .cer, .crt, and .pfx. Each format has its own use. Choose the right format for your needs. Usually, .pfx is for IIS. Double-check the format before proceeding. It ensures proper installation.
Installing The Certificate In Iis 8.5
Open the IIS Manager on your computer. Find the Server Certificates option. It’s in the Features View. Click on Import from the right panel. You will see a dialog box. Choose the certificate file. Enter the password if it asks. Click OK to finish the import.
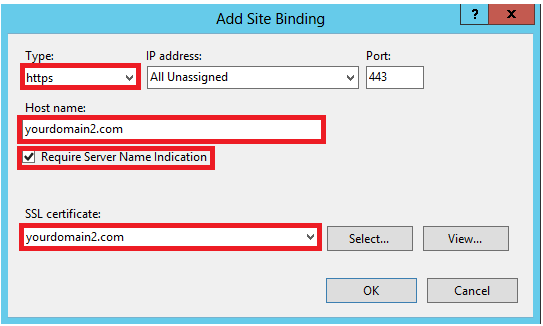
Go to the Sites in IIS Manager. Pick your website from the list. Click on Bindings from the right panel. A new box will show up. Click Add to create a new binding. Choose https from the type dropdown. Select your certificate from the list. Click OK to assign it.
Configuring Ssl Settings
HTTPS keeps your data safe. It encrypts the connection. First, ensure your SSL certificate is valid. Check its expiry date. Install the certificate on your server. Next, configure your website to use HTTPS. Redirect all HTTP traffic to HTTPS. This is crucial. It prevents data from being stolen. Test your website after setup. Make sure all pages load with HTTPS.
Security protocols protect your website. Use strong protocols like TLS 1.2 or 1.3. Avoid outdated ones like SSLv2 or SSLv3. Configure your server to use these protocols. Disable weak ciphers. They make your website vulnerable. Test your server’s settings often. Ensure it’s secure. Use online tools for testing. They help find weak spots. Strong protocols make your site safer.
Credit: www.thesslstore.com
Testing The Ssl Certificate
Online tools help check your SSL certificate. They are easy to use. Enter your website URL. The tool shows if your certificate is secure. It also tells if it’s up to date. Look for errors or warnings. Fix them to keep your site safe. Good tools are SSL Labs or SSL Checker. They are free and quick to use.
Browsers must trust your SSL certificate. Open your website in different browsers. Check if the lock icon shows. If it does, your site is secure. If not, there might be a problem. Fix any errors you see. Some browsers to try are Chrome, Firefox, and Edge. Always keep your SSL certificate updated. This helps protect your site.
Troubleshooting Common Issues
A certificate may not be trusted for many reasons. Ensure that the certificate comes from a trusted authority. Check if the root certificate is installed correctly. Sometimes, the intermediate certificate is missing. You need to install it too. Make sure the date and time on your server are correct. Wrong time can cause trust issues.
Mismatch errors occur when the domain does not match the certificate. Always check if the domain name is correct. It should match the name on the certificate. Look for any typos in the domain name. Ensure that www and non-www versions are included. Subdomains must also be listed if needed. Correcting these details can fix mismatch errors.
Frequently Asked Questions
How To Install Ssl Certificate In Iis 8?
To install an SSL certificate in IIS 8, open IIS Manager. Select your server, then click ‘Server Certificates’. Choose ‘Import’ to upload your SSL certificate. Bind the certificate to your website under ‘Sites’. Select ‘Edit Bindings’, then add HTTPS binding using your SSL certificate.
How Do I Add A Certificate To My Website Iis?
Access IIS Manager and select your site. Click on “Bindings,” then “Add. ” Choose “https” and select your SSL certificate from the dropdown. Save changes to apply the certificate to your website.
How To Install Client Certificate On Iis Server?
Open IIS Manager. Select your server, then click “Server Certificates. ” Click “Import” and choose the client certificate file. Enter the password if required. Click “OK” to install the certificate. Bind the certificate to your desired site by selecting “Bindings,” then choose “https,” and assign the certificate.
How Do I Manually Install An Ssl Certificate?
To manually install an SSL certificate, first purchase one from a trusted provider. Upload the certificate files to your server. Configure your web server settings to use the new certificate. Verify installation by accessing your website with HTTPS. Ensure your server supports the SSL version you installed.
Conclusion
Installing a certificate on IIS 8. 5 boosts site security. It ensures encrypted connections, keeping user data safe. This process might seem complex, but following steps helps. Double-check settings to avoid common errors. Secure websites gain trust and enhance user experience.
Regularly update certificates to maintain security standards. Explore further resources for detailed guidance. Keep learning to improve your web hosting skills. Your site’s security matters, and your efforts make a difference. Stay proactive in protecting online data. Happy hosting!


