
Unlock the secrets to creating your own web hosting tutorial that truly engages and educates. Imagine having the power to guide others through the maze of web hosting, making complex concepts simple and accessible.
You don’t have to be a tech guru to craft a compelling tutorial. All you need is the right approach and a dash of creativity. You’ll discover step-by-step strategies and practical tips that will transform your knowledge into an invaluable resource.
Feel the thrill of empowering others while boosting your own skills and credibility. Don’t miss out on the opportunity to captivate your audience and make a lasting impact. Dive in, and let’s create something amazing together!
Choosing The Right Hosting Plan
Shared hosting means your website shares a server with others. It’s like sharing a room with friends. It’s cheap and easy to use. But, your site might slow down if others use too much space. It’s good for small websites or beginners. You don’t need to know a lot about servers.
With dedicated hosting, you get a whole server to yourself. No sharing with others. This means faster speed and better control. It’s like having your own house. This type is best for big websites. It’s more costly but offers great benefits. You can customize it as you need.
VPS stands for Virtual Private Server. It’s like having your own room in a big house. You get more control than shared hosting. It’s cheaper than dedicated hosting but still powerful. You can install different apps and software. Good for medium-sized websites.
Cloud hosting uses many servers together. If one server fails, others help out. This makes your website safe and fast. It’s like having many backup plans. You pay for what you use. This is good for growing websites. It can handle lots of traffic.
Setting Up A Domain
First, visit a domain registrar website. Examples include GoDaddy or Namecheap. Enter your desired domain name. The site will tell you if it’s available. If taken, try another name. Once you find an available name, you can register it. Registration usually requires a small fee. Complete the process by providing necessary details. Then, pay the fee.
Choose a name that is simple and easy to remember. Short names are often better. Avoid using numbers or hyphens. These can confuse people. Try to use keywords related to your site. This helps people find you online. Make sure the name is unique. It should not be similar to other sites.
After registering, log into your hosting account. Look for the domain management section. Here, you’ll find DNS settings. Update these with the information from your registrar. This process links your domain to your hosting. Save the changes. It might take a few hours to complete. Once done, your domain is ready to use.
Installing A Content Management System
Choosing a Content Management System (CMS) is important. WordPress is the most popular. Joomla and Drupal are also good choices. Each CMS has unique features. WordPress is easy for beginners. Joomla is more flexible. Drupal is powerful for big sites. Think about what your site needs. Choose the best option.
First, download the CMS files. Then, upload them to your web server. Create a database for your CMS. Next, open the installation page in your browser. Follow the steps on the screen. Enter database details. Choose a site name and username. Install and set up.
After installation, log in to your CMS. Set up basic settings. Choose a theme or template. Add necessary plugins or extensions. Customize your site. Make it look good. Test your site. Check if everything works. Make changes if needed. Enjoy your new site!

Credit: m.youtube.com
Customizing Your Website
Start with a theme that fits your style. Check if it is responsive and looks good on phones and tablets. Make sure the theme is easy to customize. Some themes let you change colors and fonts. Choose a theme that has good customer reviews.
Plugins add extra features to your site. Find plugins for contact forms, SEO, and security. Install plugins from trusted sources only. Too many plugins can slow down your site. Choose plugins that suit your needs.
Change fonts and colors to match your brand. Add a logo to make your site unique. Use images that are clear and high quality. Make sure your site looks good and is easy to read. A personal touch makes visitors feel welcome.
Ensuring Website Security
SSL Certificates keep your data safe. They create a secure connection. This stops hackers from stealing information. Websites with SSL certificates show a padlock icon. Users feel safe when they see the padlock. Google likes sites with SSL certificates. They appear higher in search results. SSL certificates are important.
Software needs regular updates. Updates fix bugs and improve security. Patches close security holes. Websites without updates are easy targets for hackers. Always update your website software. Check for updates often. This keeps your site safe. Protect your site by staying updated.
User data is very important. Websites collect data like names and emails. This data must be kept safe. Use strong passwords for protection. Encrypt data to keep it safe. Do not share user data with others. Users trust you with their data. Keep their trust by securing it well.
Credit: www.hostinger.com
Optimizing Website Performance
Faster websites are better. Users like fast websites. Begin by reducing image sizes. Smaller images load quicker. Use tools to compress them. Also, remove unused plugins. Too many plugins slow down websites. Choose only the necessary ones. Use a Content Delivery Network (CDN). CDNs deliver content faster. They have servers around the world. This makes your site load quickly everywhere.
Regular checks are important. Use tools like Google PageSpeed Insights. This tool shows your site’s speed. You can see if it’s fast or slow. It also suggests improvements. Track your site’s uptime too. A site that goes down often is bad. Use uptime monitoring tools. They alert you when your site is down. Fix issues quickly to keep your site running smoothly.
Caching improves speed. It saves web pages for later use. This means users don’t load everything again. Use browser caching. Browsers store some files. Next time, they load these files fast. Install caching plugins. These plugins help WordPress sites a lot. They keep your website fast. Choose a plugin that’s easy to use.
Managing Website Backups
Using automated backups saves time. These tools create copies of your site. You don’t have to do it by hand. Many hosting providers offer this feature. It runs on a schedule. Daily or weekly, the choice is yours. Set it up once, then relax. Your files stay safe without extra effort. Always check the backup settings. Make sure they match your needs. This way, you protect your hard work.
Restoring a website is easy with backups. First, locate the backup file. Next, use the restore option in your hosting dashboard. Follow the steps shown. Your site comes back to life. It takes just a few clicks. Always check your site after restoring. Make sure everything works well. Keep your site’s health in check.
Offsite backups offer extra safety. Store your files away from your main server. Use cloud services like Google Drive or Dropbox. This way, even if one fails, you have a backup. It’s like a double shield. These services often have easy-to-use apps. Uploading your files is simple. Protect your data from being lost forever.
Troubleshooting Common Issues
Struggling with web hosting issues can be frustrating. Learn to tackle common problems with this tutorial. Gain clear, step-by-step guidance to ensure your website runs smoothly.
Resolving Downtime
Websites can go down. Downtime means users can’t visit your site. Check your server status first. Is it running? Sometimes, maintenance causes downtime. Contact your hosting provider if needed. They can help fix it. Monitor your site regularly. Use tools like Uptime Robot. It alerts you if your site goes down. Keep your site running smoothly.
Fixing Error Pages
Error pages show when something is wrong. Common errors include 404 and 500. 404 means a page is missing. Double-check URLs. Make sure they are correct. 500 means server issues. Restart your server. Clear your cache. Sometimes plugins cause errors. Disable them one by one. Find the one causing the issue. Fix it promptly.
Addressing Security Breaches
Security breaches are serious. They can harm your site. Hackers steal data. Update your software regularly. Use strong passwords. Change them often. Enable firewalls. They protect against attacks. Backup your data frequently. If breached, contact your provider immediately. They can assist in securing your site. Keep your site safe from threats.
Credit: wegic.ai
Frequently Asked Questions
How To Web Hosting Step By Step?
Choose a reliable hosting provider and select a suitable plan. Register your domain name. Configure DNS settings. Upload website files using FTP. Test the website to ensure everything works correctly.
Can I Create My Own Web Hosting?
Yes, you can create your own web hosting. Start by setting up a server and installing hosting software. Choose a reliable internet connection and secure your server. Manage domains and ensure regular backups for data safety.
How Do I Start Webhosting?
Choose a reliable hosting provider, sign up, select a hosting plan, and register a domain name. Install necessary software and manage your website through the hosting control panel. Ensure security and regularly update your site.
What Are The Basics Of Web Hosting?
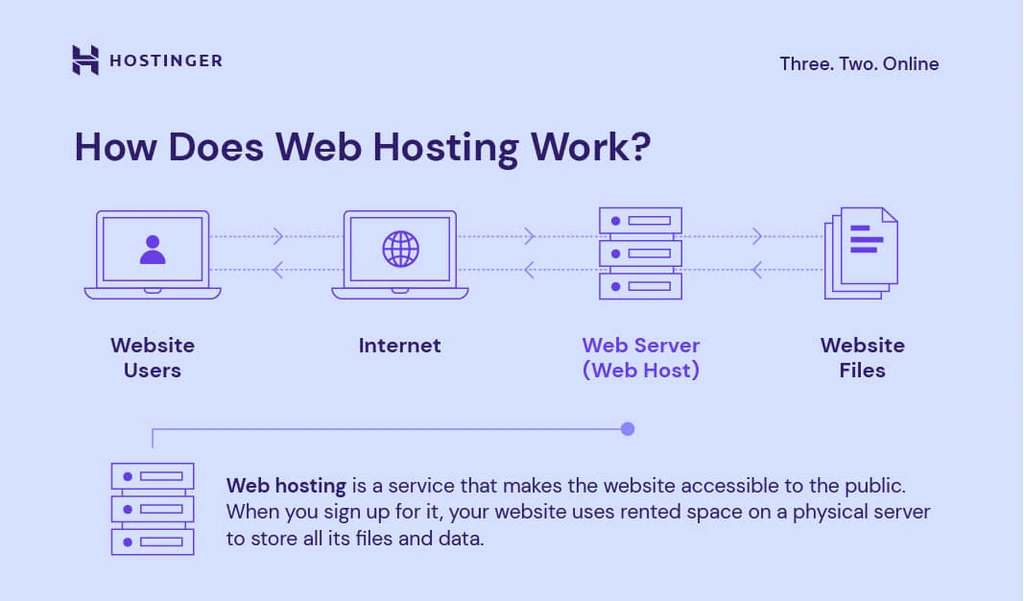
Web hosting stores website files on servers, enabling online accessibility. Choose between shared, VPS, or dedicated hosting based on needs. Important factors include bandwidth, uptime, security, and support. Hosting providers offer control panels for website management. Select reliable providers for optimal performance and security.
Conclusion
Creating a web hosting tutorial can be a rewarding experience. It helps others learn and grow. Share knowledge clearly. Use simple steps and real examples. Engage your audience with easy explanations. Break tasks into small parts. Each step matters. Encourage questions and feedback.
Foster a community of learning. Keep the content updated. Stay relevant. Adapt to new trends and technologies. Make sure your tutorial is accessible. Reach wider audiences. Inspire confidence. Helping others succeed online is fulfilling. With patience and practice, anyone can build and host a website.
Start today.


