
Have you ever spent hours perfecting your Visual Studio project only to wonder how you can share your masterpiece with the world? You’re not alone.
Uploading your files to a web host can seem daunting, but it doesn’t have to be. Imagine effortlessly sharing your work with others, receiving feedback, and even showcasing your skills to potential employers. It’s all possible, and easier than you might think.
This article will guide you through each step, breaking down complex processes into simple tasks. You’ll learn how to choose the right hosting service, upload your files, and ensure everything runs smoothly. Feel the excitement as you watch your project go live, ready for anyone to explore. By the end of this guide, you won’t just know how to upload your Visual Studio files; you’ll be empowered to confidently share your creations online. Keep reading, and unlock the potential to turn your digital dreams into reality.
Credit: devblogs.microsoft.com
Preparing Visual Studio Files
Keep all your files in one main folder. This makes it easy to find them. Check that all necessary files are there. Important files include HTML, CSS, and JavaScript files. Do not miss any image files too. These are important for your project. Having a well-organized folder helps avoid mistakes. It also speeds up the uploading process. Remember, neatness is key in organizing.
Ensure all libraries and tools are updated. Double-check any third-party packages you use. Make sure they are compatible. Compatibility avoids errors during upload. Use Visual Studio’s package manager for this. This tool helps manage dependencies. Dependencies are things your project needs to work. Keeping them updated ensures smooth operation. Missing updates can cause issues later.
Credit: learn.microsoft.com
Choosing A Web Host
Choosing the right web host is important. Start by checking different hosting options. Compare prices and features. Look for good customer support. Some hosts offer free plans. Others might need payment. Read reviews online to know more. Ask friends for suggestions. Make sure the host fits your needs. Think about storage and bandwidth. These are crucial for your website. Don’t rush your decision. Take your time to choose well.
Before uploading, know your host’s needs. Check if they support Visual Studio files. Some hosts may not. Find out about their file size limits. This helps avoid problems later. Ensure your files are in the right format. Convert them if needed. Also, learn about their security features. Keeping your files safe is vital. Make sure your host offers regular backups. This protects your work. Understanding these needs helps you upload smoothly.
Configuring Ftp Client
Choosing an FTP Client is the first step. Some popular choices include FileZilla and Cyberduck. Both are easy to use and free. Make sure your choice supports your operating system.
Download the client from its official site. Install it on your computer. Open the client after installation. You are now ready for the next step.
Open your FTP client. Find the area to enter connection details. You need the host name, which is often your website’s address. Enter your username and password given by your web host.
Choose port 21 for FTP connections. Some clients may ask you to choose connection type. Select FTP if asked. Click connect. If all details are correct, you will see your web host files.
Uploading Files
First, open your FTP client on your computer. FileZilla is a good choice. Enter the server address, username, and password. These details come from your web host. Find the button to connect. Click it to link up with the server.
Look at your computer files on the left side. Find your Visual Studio files. Choose the files you need to upload. Drag them to the right side. This side shows the server files. Drop your files here. Watch them upload onto the server.
Setting Up Database
First, log into your web host account. Find the database section in the control panel. Click to create a new database. Choose a database name that is easy to remember. Write down your username and password. You will need them later. Use strong passwords to keep data safe. Database setup is now complete.
Export data from Visual Studios as a SQL file. This file holds all your data. Open the database you created on your host. Find the import option and select your SQL file. Click import to move the data. Wait for the process to finish. Data migration is successful when you see no errors. Check your host for all data files.
Credit: learn.microsoft.com
Testing The Website
Ensure all links and buttons work. Click each one. See if they lead to the right place. Test forms by filling them. Check if you receive the data. Make sure the website loads quickly. Slow sites lose visitors. Check on different devices. Phones, tablets, and computers. Each should display correctly. Test in different browsers. Chrome, Firefox, Safari. The site should work the same.
Fix any broken links found. Check your code for mistakes. Errors cause problems. Update any outdated parts. Use the latest versions. Correct any spelling errors. They look unprofessional. Check images. Ensure they display properly. Fix any missing ones. Adjust sizes if needed. Test again after fixes. Make sure everything works. Repeat if necessary. Do this until perfect.
Managing Updates
Make sure to save your files often. This keeps your work safe. Use external drives or cloud storage for backups. These methods help avoid losing data. If a problem occurs, backups are your safety net. Weekly backups are a good habit. Monthly backups work too. Never skip a backup.
Keep your website content fresh. This attracts visitors and keeps them engaged. Refresh old posts every month. Add new images to your site. Update information that is outdated. This makes your site look good. People like new information. Regular updates show you care about your site.
Frequently Asked Questions
How Do You Upload Files To A Web Server?
Use an FTP client to upload files to a web server. Connect using server credentials. Drag and drop files from your local system to the server directory. Ensure proper file permissions are set. Alternatively, use a web hosting control panel to upload files directly through a file manager interface.
How Do I Upload A File In Visual Studio?
To upload a file in Visual Studio, go to “Solution Explorer. ” Right-click on the project. Choose “Add” and then “Existing Item. ” Select the file you want to upload, and click “Add. ” The file will now be part of your project.
How To Host A Website From Visual Studio?
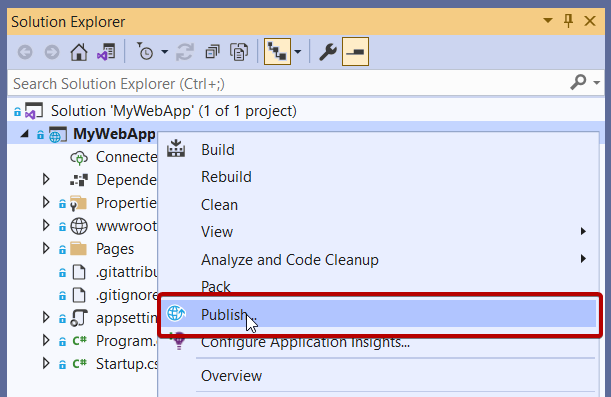
Host your website by deploying it to Azure directly from Visual Studio. Use the “Publish” option in Solution Explorer. Connect to your Azure account and select your web app. Follow prompts to configure settings and complete the deployment process. Ensure your Azure subscription is active for hosting.
How Do I Publish From Visual Studio?
Open Visual Studio. Select your project. Click on “Build” then “Publish”. Follow the on-screen instructions. Choose your publish target, configure settings, and complete the process.
Conclusion
Uploading Visual Studio files to a web host is straightforward. Follow the steps carefully. First, prepare your files for upload. Next, select a reliable web host. Use FTP or a web interface to transfer your files. Ensure your web host supports the necessary technologies.
Double-check your configuration settings. Test your website to confirm everything works. Address any issues promptly. Regularly update your files for security. Keep backups to prevent data loss. With practice, it gets easier. Enjoy your website and its new possibilities. Happy hosting!


