
Are you looking to improve your website’s performance or tackle connectivity issues? Updating your nameserver settings at Web Hosting Hub could be the solution you need.
This process can seem daunting if you’re unfamiliar with technical jargon, but don’t worry—it’s simpler than you might think. Imagine having the power to direct online traffic efficiently and enhance your site’s reliability. By following a few straightforward steps, you’ll gain control and peace of mind knowing your website is optimized for success.
Dive into this guide to discover how updating your nameserver can transform your website’s functionality and give you the edge in the digital landscape.

Credit: wpmudev.com
Nameserver Basics
Nameservers are like internet traffic cops. They tell computers where your website lives. Without them, finding websites would be hard. Every domain name has nameservers. They help connect web addresses to their IP addresses. This is important for your website to work. Without it, visitors can’t reach your site. Nameservers are part of the Domain Name System (DNS). The DNS is a big network that guides traffic to the right places. It keeps the internet organized and running smoothly.
Web hosting needs nameservers to function. They are the link between your domain and the server. Without them, your website won’t be online. They help manage website traffic. They tell browsers where to find your site. They keep websites accessible and reliable. If nameservers are wrong, your site won’t load. Correct nameservers ensure good performance. They are vital for any web hosting service.
Credit: www.webhostinghub.com
Accessing Your Web Hosting Hub Account
First, open your browser. Type the Web Hosting Hub URL. Press enter. See the login page? Enter your username. Then, add your password. Click the login button. Now you are in your account. Easy, right?
Inside your account, look at the top menu. Find Domains. Click it. A new page will open. This is the Domain Management page. Here, you see all your domains. Want to change something? Click the domain name. Options will appear. Choose what you need.
Locating Current Nameserver Settings
Finding Domain Settings is the first step. Open your web hosting account. Look for the domain section. This section shows all your domain details. Check carefully to find the option for nameservers. This is where your current settings are displayed.
Reviewing Current Nameservers is simple. In the nameserver section, you will see a list. These are your current nameservers. They may have names like “ns1” or “ns2.” Write them down if needed. This helps when making changes. Always ensure to double-check these entries.

Credit: www.a2hosting.com
Updating Nameserver Information
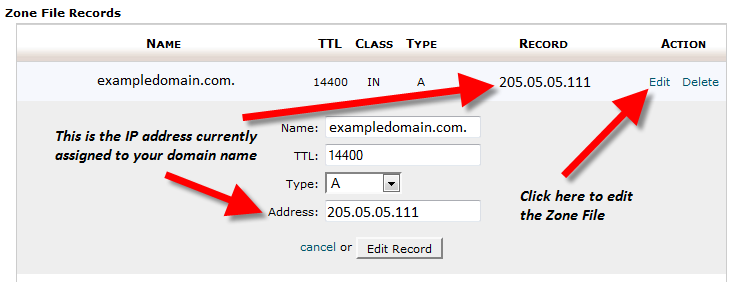
First, log in to your Web Hosting Hub account. Find the domain you want to update. Click on Manage next to it. Locate the Nameservers section. You will see two fields here. These fields hold the current nameserver details. Delete the old nameserver entries. Now, enter the new nameserver details. Make sure they are correct. Double-check each letter and number.
After entering the new nameserver details, find the Save button. It is usually at the bottom of the page. Click on it to save your changes. It might take a few minutes. Your domain will start using the new nameservers soon. Sometimes it takes up to 24 hours for changes to update. Be patient and check back later if needed.
Verifying Nameserver Update
After updating the nameserver, it is important to check the propagation status. This process can take up to 48 hours. Use online tools like DNS Checker to verify if the nameserver update is complete. These tools show where the nameserver is active globally. Ensure the nameserver is showing correct information. This confirms the update is successful. Patience is key during this step.
Checking Propagation Status
Check the propagation status using online tools. Enter your domain name in the tool. The tool will display the nameserver update status. It helps to see if the update is active worldwide. This is a crucial step to ensure everything is working fine.
Testing Domain Accessibility
After the nameserver is updated, test if your domain is accessible. Try visiting your website in a browser. If the site loads without errors, the update is successful. Ensure all pages are working. This confirms the nameserver update is complete. Make sure your site is visible to everyone.
Troubleshooting Common Issues
Update failures can be very frustrating. Sometimes, changes don’t apply right away. Always check your internet connection first. Slow connections can cause issues. Clear your browser cache too. Old data might be causing problems. Double-check your nameserver entries. They must be correct. A small typo can cause big issues. Use the right DNS servers. Wrong servers won’t work.
Resolving Update Failures
If updates fail, try again. Wait a few minutes, then retry. Contact your hosting provider if problems persist. They might have more solutions. They can check for server issues. Sometimes, updates take longer than expected.
Consulting Support Services
Consulting support is a good idea if you’re stuck. Support teams are there to help. They know the system well. Explain your problem clearly. Provide details like error messages. This helps them understand your issue. They can give step-by-step help. Follow their instructions carefully. Ask questions if you don’t understand. They are there to help you.
Frequently Asked Questions
How Do I Update My Nameserver?
Log into your domain registrar account. Find the DNS or nameserver settings. Enter new nameserver details provided by your web host. Save changes and wait for propagation.
How Do I Update My Custom Nameservers In Godaddy?
Log in to GoDaddy. Go to “My Products. ” Click “DNS” next to your domain. Select “Change” next to “Nameservers. ” Enter your custom nameservers and save changes.
How To Update Nameservers In Cpanel?
Log in to cPanel. Navigate to “Domains” and select “Zone Editor. ” Choose your domain, then click “Manage. ” Update nameservers, save changes, and ensure DNS propagation.
How To Change Dns Hosting Provider?
To change your DNS hosting provider, first choose a new provider. Update DNS settings in your domain registrar’s control panel. Save changes and wait for propagation. Confirm successful switch by checking website accessibility.
Conclusion
Updating nameservers on Web Hosting Hub is straightforward. Follow each step carefully. Double-check your entries to avoid mistakes. Proper nameserver configuration ensures your website runs smoothly. This process enhances connectivity. It also optimizes site performance. A few simple changes can make a big difference.
Always seek help if unsure. Check support resources for guidance. With practice, managing web hosting becomes easier. Remember, accurate settings are crucial. Stay informed and vigilant. Your website deserves the best setup. Happy hosting!


