
Are you ready to take your Java web application live on a Linux server with SSL? You’re in the right place.
Hosting your application securely is crucial to protect data and build trust with your users. This guide will walk you through each step, ensuring your app is not only up and running but also safe from potential threats. Imagine the peace of mind knowing your application is secure, and the satisfaction of seeing it perform seamlessly.
Dive in to learn how you can transform your web hosting experience and elevate your application’s security to new heights.
Setting Up The Linux Server
Selecting a Linux distribution is crucial. Ubuntu and CentOS are popular choices. They offer stability and support. Ubuntu is user-friendly. It’s great for beginners. CentOS is secure and robust. Ideal for enterprise needs. Choose based on your requirements.
Start by installing essential packages. Use the package manager of your distribution. For Ubuntu, use apt. For CentOS, use yum. Install Java Development Kit (JDK). It’s necessary for running Java apps. Also, install a web server like Apache or Nginx. These servers help serve your application. Install SSL support for secure connections. This is important for protecting user data. After installation, configure each package properly. This ensures your server runs smoothly.
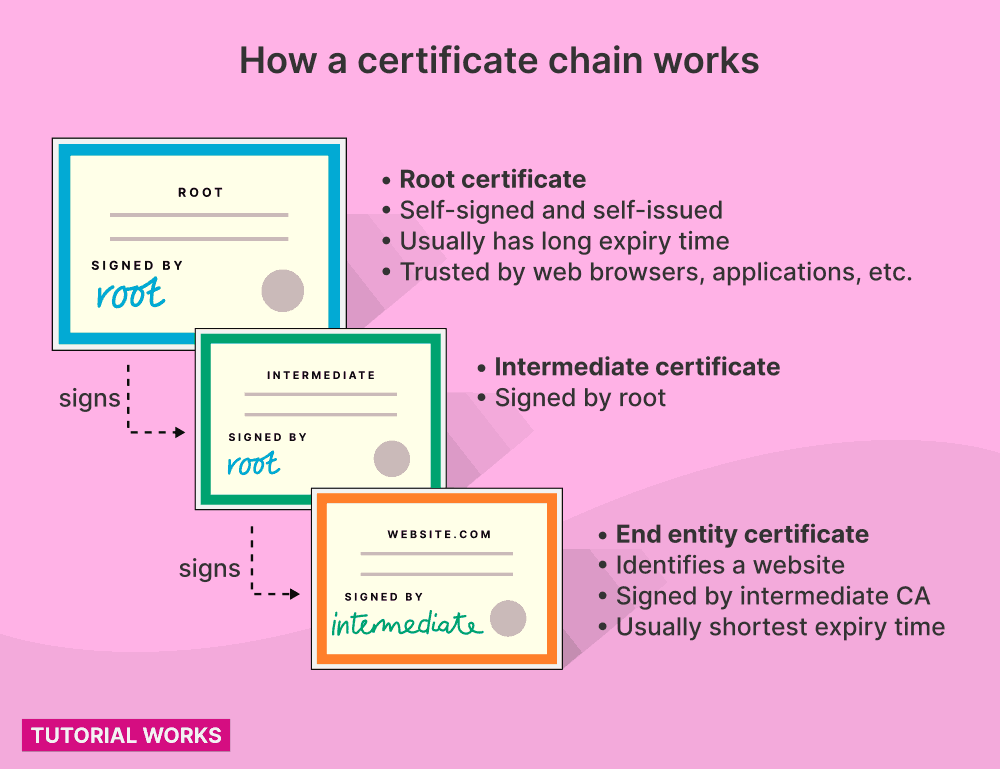
Credit: www.tutorialworks.com
Preparing The Java Web Application
Start by creating your Java web application. Use a reliable Java IDE like IntelliJ or Eclipse. Ensure your code is free of errors. Compile the code to create a .war or .jar file. This file will be used for deployment. Test the application locally. Make sure it runs smoothly and performs as expected.
Environment variables are crucial. They help your application run correctly. Use the Linux terminal to set these variables. Commands like export VAR_NAME=value are useful. These variables store important settings. For example, database connection strings or API keys. Keep them secure. Never expose them in the code.
Configuring The Web Server
Choosing the right web server is crucial. It helps in handling your web application’s traffic. Apache Tomcat is a popular choice for Java applications. It is open-source and easy to use. Tomcat supports Java Servlet and JavaServer Pages. These help in building dynamic websites. You can manage Tomcat with a simple control panel. This makes it user-friendly. Other options include Jetty and WildFly. They also support Java applications. But Tomcat is often preferred for its simplicity.
First, download the Apache Tomcat package. You can find it on the official website. Next, extract the package to your server. The bin folder contains the startup script. Run it to start Tomcat. Make sure you have Java Development Kit (JDK) installed. It is necessary for Tomcat to run. Open your browser and type localhost:8080. This checks if Tomcat is working. You will see the Tomcat welcome page if it is running. Always keep your Tomcat updated for security.
Deploying The Java Application
First, prepare your Java application files. Use a tool like FTP to upload them. Connect to your Linux server using your credentials. Drag the files from your computer. Drop them into the right folder on the server. Always check the file paths. They should match the server’s directory structure.
Create the necessary directories for your application. Use the command line to make these folders. Navigate to the root directory. Type mkdir followed by the folder name. Ensure the folders have the correct permissions. This ensures your app runs smoothly. Adjust permissions with the chmod command. Check each folder carefully.
Setting Up Ssl Certificates
SSL stands for Secure Socket Layer. It protects data between browser and server. This keeps information safe from hackers. Every website needs SSL for security. It helps in building trust with users. Users see a padlock symbol in the browser. This means the website is secure. SSL is important for private data like passwords.
First, make a certificate request. Use tools like OpenSSL. This tool helps create certificate files. The files are needed for SSL setup. Next, send the request to a Certificate Authority. They will verify your information. They will give you the SSL certificate. Install the certificate on the server. This makes your website secure. Check if the installation works. Look for the padlock symbol.

Credit: www.openpr.com
Configuring Ssl On The Web Server
Open the server’s configuration files. These files control how the server behaves. Locate the section for SSL settings. It might be named differently based on your server. Look for lines starting with “SSLCertificate” and “SSLCertificateKey”. Insert the paths to your SSL certificate and key files. These files ensure your site is secure. Save changes and exit the editor. Restart the server to apply changes. This step activates SSL on your server.
Use a web browser to check your site. Type “https://” before your domain name. The browser should show a padlock symbol. This means SSL works. No padlock? Check settings again. Use online SSL checkers for detailed reports. These tools help find configuration errors. They also suggest fixes. Ensure all links on your site use “https://”. This keeps the site secure.
Monitoring And Maintenance
Regular security updates keep your server safe. Hackers can attack old systems. Update regularly to fix security holes. Use the latest security patches. Check for updates weekly. Schedule automatic updates if possible. Regular checks ensure your server stays protected.
Performance monitoring tools help track your server’s health. Tools can show CPU and memory usage. They help find problems early. Use tools like Nagios or Zabbix. They send alerts if something goes wrong. Monitoring keeps your server running smoothly. Always know how your server is doing.

Credit: aws.amazon.com
Frequently Asked Questions
How To Host A Java Web Application On A Linux Server?
Install Java Development Kit (JDK) on your Linux server. Deploy your Java web application using Apache Tomcat. Transfer your application files to the server. Configure Tomcat to recognize your application. Start the Tomcat server to run your application.
How To Configure Ssl On The As Java?
To configure SSL on AS Java, access the NetWeaver Administrator. Navigate to “Configuration” > “Certificates and Keys”. Import the SSL certificate and configure the SSL Provider Service. Save changes and restart the Java server for the configuration to take effect.
How To Add Ssl Certificate To Java Project?
Install the SSL certificate in the Java keystore. Use the `keytool` command to import it. Update your project’s configuration to use the keystore for SSL connections. Ensure correct paths and passwords in your configuration files. Verify the SSL setup by testing the connection.
How To Host A Java Web Application In An Iis Server?
Install IIS on Windows Server. Use IIS Manager to configure the server. Install Tomcat for Java support. Integrate Tomcat with IIS using ISAPI Redirect. Deploy your Java web application on Tomcat. Test the application in a browser to ensure proper functionality.
Conclusion
Hosting your Java web application on a Linux server can be simple. Follow the steps to install SSL for better security. Ensure your server meets the required specifications. Use SSH for secure connections. Regularly update your software. Monitor performance to catch issues early.
Remember, secure hosting improves user trust. With these tips, your Java application can run smoothly on Linux. Practice these methods to enhance your web hosting skills. Keep learning and adapting for the best results. Enjoy the benefits of a secure and efficient hosting environment.
Happy coding!


