
Are you ready to take control of your website and explore the tech world with confidence? Setting up web hosting with Putty might sound daunting, but it’s simpler than you think.
Imagine the power of managing your server directly, ensuring your website runs smoothly and securely. This guide is here to walk you through every step, making sure you understand and master the process. You’ll discover how to connect, configure, and optimize your hosting environment with ease.
By the end, you’ll not only achieve a new skill but also feel empowered to handle your web hosting like a pro. Dive in and unlock the potential of your online presence!
Credit: hostupon.com
Choosing The Right Web Hosting Provider
Picking the best web hosting provider is important. It affects your site’s speed and safety. Look for reliable companies with good customer reviews. Check if they offer 24/7 support. This helps when you face problems. Pricing is also key. Some services are cheap but limit features. Consider your site’s needs and traffic volume. Big sites may need more resources. Compare different providers before deciding. Make sure they offer easy setup options. This saves you time and effort. Ensure they support SSH access for Putty. SSH access is crucial for secure connections. Always read the terms of service. Know what you are agreeing to. This helps avoid hidden fees and surprises.
Installing Putty On Your Computer
First, you need to download Putty from the official website. Look for the download button and click it. The file will start downloading. After the download finishes, open the file. Follow the instructions on the screen to install Putty. It’s simple and quick.
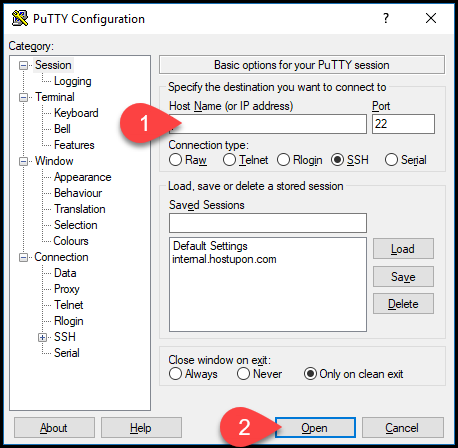
Once installed, find the Putty icon on your desktop. Click to open it. Putty helps you connect to your web server. You will need your server’s IP address. Type it in the field named ‘Host Name’. Make sure you select SSH as the connection type. Now, click ‘Open’ to start the connection.
Accessing Your Server With Putty
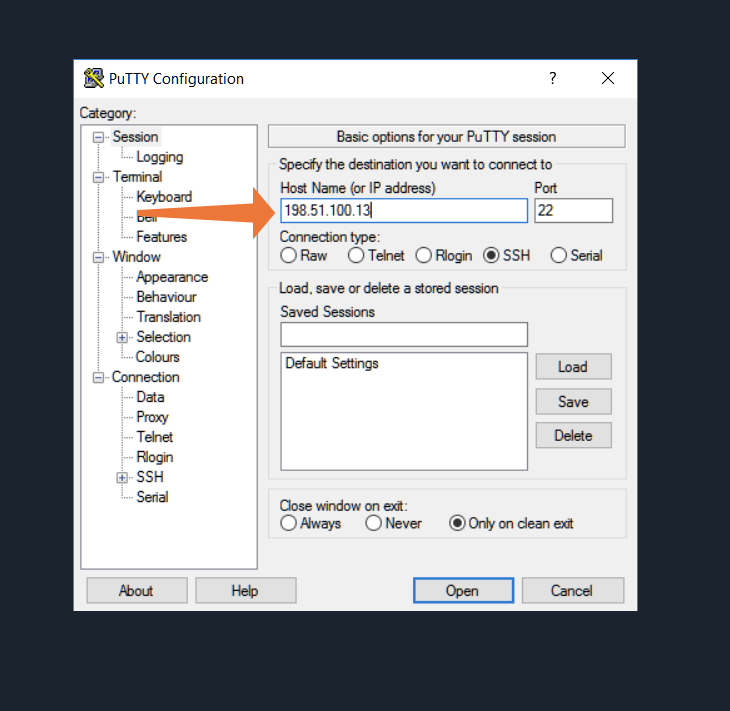
First, open the Putty application on your computer. Look for the Putty icon. Click on it to start. You will see a window with many options. Ignore them for now. Focus on the Host Name field. This is important. Type your server’s IP address here.
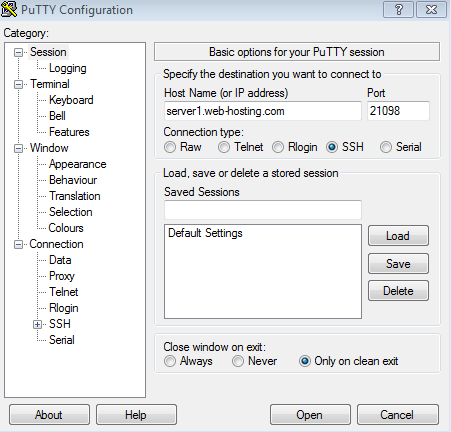
After entering the IP address, check the Port number. It should be 22. This is the default for SSH. Now, click on Open. A black window will appear. This is the terminal. It will ask for a username. Type it and press Enter. Then, it will ask for a password. Type it carefully. You are now connected. You can start working on the server.
Configuring Server Settings
SSH keys help to keep your server safe. Create a pair of keys: a public key and a private key. Save the private key on your computer. Upload the public key to the server. This way, only your computer can access the server. Use Putty to connect with these keys. It’s more secure than a password.
Firewalls keep bad traffic away. Open ports that your web server needs. Close other ports to stay safe. Putty helps you check which ports are open. It’s good to keep the important ones open. Protect your server by keeping the firewall strong.
Different users need different access. Add users for each person who needs access. Set permissions so they can only do their tasks. Remove users who no longer need access. Keep accounts clean and secure. Use Putty to manage these user accounts easily.
Uploading Files Using Putty
SCP stands for Secure Copy Protocol. It helps move files safely. Use it with Putty.
Type the command in Putty’s terminal. Start with scp.
Then add source path. Next, write destination path.
Watch as files transfer securely.
Security matters. SCP uses encryption. This keeps files safe. No one can see them during transfer. Always check paths. Ensure accuracy. Secure transfers are possible with SCP. Reliable and safe for everyone.
Credit: cpanel.net
Managing Your Website Via Command Line
Use Putty to connect to your server. You will need to enter the IP address. Then, click Open. Once connected, type commands to install web server software. Common software includes Apache and Nginx. Each has different features. Choose the one that fits your needs. Follow the instructions on the screen. It might take a few minutes. Make sure the software is installed correctly.
Databases store important information. Use commands to create and manage databases. Popular choices are MySQL and PostgreSQL. These tools help organize data. Keep your databases updated. Regular updates prevent errors. Backup your data often. This protects your data from loss. Always check database logs for issues. Logs show what happened in the database. Fix problems quickly to avoid bigger issues.
Troubleshooting Common Issues
Setting up web hosting with Putty can seem tricky. Encountering common issues? Follow simple steps to resolve them. Ensure smooth hosting by checking connection settings and server configurations carefully.
Connection Problems
Putty often faces connection problems. Check your internet connection first. Ensure your host details are correct. Double-check the IP address and port number. Sometimes, the firewall blocks Putty. Disable it temporarily to test. Look at the server status. Verify it is online. Restart your router if needed. Many issues resolve after a restart. Use SSH keys correctly. Wrong keys cause access problems.
File Transfer Errors
File transfer errors frustrate many users. Ensure correct file paths. Wrong paths lead to errors. Check permissions on both ends. Files need correct permissions. Use binary mode for non-text files. Sometimes files corrupt in text mode. Verify file size limits. Large files may fail to transfer. Check available disk space. Full disks cause transfer issues. Restart the transfer process if it stalls.
Enhancing Security Measures
Passwords keep your data safe. Create passwords with at least 12 characters. Mix uppercase, lowercase, numbers, and symbols. Avoid using common words or sequences. Change passwords every few months. Use a password manager to store them safely.
Updating software improves security. Check for updates weekly. Install updates as soon as possible. Updates fix bugs and security issues. Keep all tools and systems updated. Outdated software can be vulnerable to attacks.
Credit: www.namecheap.com
Frequently Asked Questions
How Do I Add A Host In Putty?
Open PuTTY, enter the host’s IP address or domain name in the “Host Name” field. Save the session settings by clicking “Save” under “Saved Sessions. ” Ensure you select the correct connection type, usually SSH. Click “Open” to connect to the host.
How To Use Putty To Connect To A Server?
Open PuTTY and enter the server’s IP address in the “Host Name” field. Choose the connection type, usually SSH. Click “Open” to establish the connection. Log in using your username and password when prompted. You’re now connected to the server using PuTTY.
How Do I Connect To Cpanel With Putty?
To connect to cPanel with PuTTY, launch PuTTY, enter your server IP as the hostname, and select SSH as the connection type. Click “Open” and enter your cPanel username and password when prompted. Ensure SSH access is enabled in your cPanel settings for successful connection.
How To Connect To An Ip Address Using Putty?
Open PuTTY and enter the IP address in the “Host Name” field. Select the connection type, usually SSH. Click “Open” to connect.
Conclusion
Setting up web hosting with Putty is straightforward and efficient. You need a computer, internet, and Putty software. Follow simple steps to connect securely to your server. Command line might seem daunting, but practice helps. Troubleshooting tips are vital for smooth setup.
Always keep your software updated. This ensures security and performance. Remember, patience and practice make perfect. With Putty, managing your web hosting becomes easier. You gain control over your hosting environment. Explore and experiment to improve your skills. Enjoy the process of learning and growing with Putty!


