
Are you ready to take control of your web presence? Hosting a web page in Tomcat might just be the solution you’ve been searching for.
Imagine the thrill of seeing your very own site live, accessible to anyone around the globe. You don’t need to be a tech wizard to make it happen; with a few simple steps, you can set up your web page using Tomcat, a robust and reliable web server.
In this guide, you’ll discover how to harness the power of Tomcat, making your web hosting dreams a reality. Whether you’re looking to showcase your portfolio, launch a blog, or start an online business, understanding how to host a web page in Tomcat is a crucial skill that will empower you. Dive in, and let’s demystify the process together!

Credit: www.virtuozzo.com
Setting Up The Environment
First, make sure you have Java on your computer. You need to download Java Development Kit (JDK). Go to the official Java website. Find the download link. Choose the version for your system. Install it by following the steps. After installation, open a command prompt. Type java -version to check if Java is installed. You should see a version number. This means Java is ready to use.
Next, get Apache Tomcat. Visit the Apache Tomcat website. Find the latest version. Click the download link. Choose the ZIP file. Save it to your computer. Extract the downloaded file. This will create a new folder. Inside, you’ll find Tomcat’s files. These are important for hosting web pages. Keep this folder safe.
Credit: www.codejava.net
Configuring Tomcat
Hosting a web page in Tomcat requires proper configuration. Start by downloading Tomcat and installing it on your server. Deploy your web application by placing it in the ‘webapps’ directory, and ensure your server. xml file is correctly configured to handle requests.
Adjusting Configuration Files
Tomcat needs some files changed. Configuration files are important. They tell Tomcat what to do. The files are found in the conf folder. Edit the server.xml file. This file sets up the server. Change the port number if needed. Check the web.xml file. It controls web applications. Make sure the paths are correct. Proper settings help Tomcat work well.
Setting Environment Variables
Environment variables are needed for Tomcat. They tell the computer how to run Tomcat. Set the JAVA_HOME variable. This points to the Java installation. Set the CATALINA_HOME variable. It points to the Tomcat installation. Use the system settings to add these variables. Correct variables make Tomcat run better.
Deploying The Web Page
First, gather your web application files. These files are important. They include HTML, CSS, and JavaScript files. Make sure all files are in one folder. This folder is your web application folder. It is the main folder for your site. Be sure to check each file. Ensure there are no errors. All files should work well together.
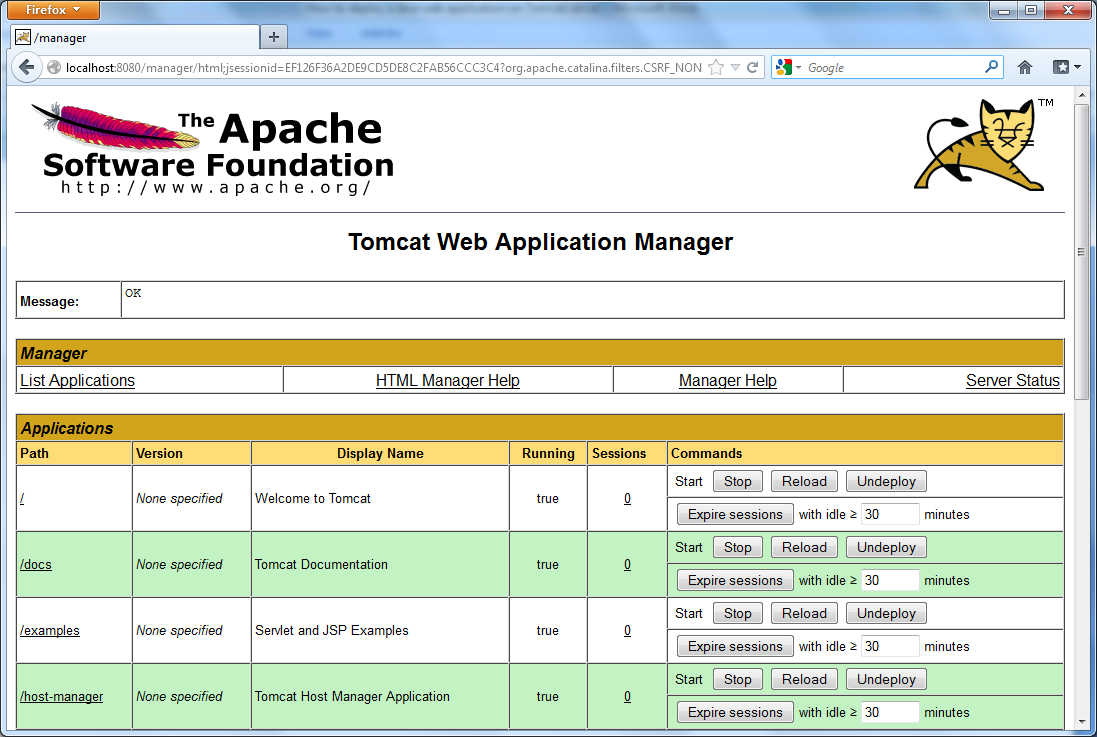
Tomcat Manager helps you deploy your web page. Log in to the Tomcat Manager. Use your username and password. Once inside, look for the deploy section. Upload your web application folder here. Follow the prompts on the screen. The manager will guide you. Once deployed, your page is live. Check it by visiting the URL. Make sure everything looks right. Fix any problems you see.

Credit: serverfault.com
Testing The Deployment
Check your web page by opening a browser. Type the URL of your server. Press Enter. Your page should appear. If it does not, check the address. Make sure it is correct.
Sometimes things go wrong. The page may not load. Check your server settings. Look at the logs for errors. Restart your Tomcat server. Ensure your files are in the right place. These steps fix most problems.
Enhancing Security
SSL makes your website secure. It uses encryption to protect data. Hackers cannot read encrypted data. Install an SSL certificate on your server. This is the first step. Next, configure Tomcat to use SSL. Modify the server.xml file. Set the port number to 443. This is the SSL port. Add the path to your SSL certificate. Restart Tomcat to apply changes. Check if SSL is working. Use a browser to test. Look for the padlock symbol. It shows your site is secure.
User roles control access. Only authorized users can access certain areas. Create roles in the web.xml file. Define which roles can access which pages. Use role names like admin and user. Assign users to these roles. Modify the tomcat-users.xml file. Add usernames and passwords. Specify their roles. This keeps unauthorized users out. Regular updates are crucial. Change passwords often. Review user access regularly. Keep your site safe.
Optimizing Performance
Adjusting server settings can make Tomcat run better. Change the memory limits for smoother operations. Use the right thread count to handle many users. Set the correct connection timeout to improve speed. These tweaks help Tomcat work faster and use less power.
Check how much memory and CPU Tomcat uses. Use tools to watch resource consumption. Spot any heavy tasks that slow things down. Regular checks keep Tomcat healthy and efficient. Simple monitoring can help catch problems early. This saves time and keeps users happy.
Maintaining The Server
Regular updates keep your server safe. Update the software often. This helps protect from viruses. New versions fix bugs too. They make the server better. Check for updates weekly. Use automatic updates if you can. This saves time. Keeps the server strong. Updates help it run fast. They stop problems before they start. Regular updates are easy. They are important for safety.
Backing up data is vital. Make copies of files often. Use a secure place for backups. Cloud storage is a good option. It keeps data safe. Recovery helps when things go wrong. You can get back lost files. Plan for recovery steps. Practice recovery sometimes. It makes sure you can do it. Quick recovery saves time and stress. Backups and recovery are key. They protect important data.
Frequently Asked Questions
How To Host A Website On Tomcat?
To host a website on Tomcat, first install Apache Tomcat. Deploy your web application by placing the WAR file in the “webapps” directory. Start the Tomcat server and access your website via the server’s IP address and designated port. Ensure proper configuration for security and performance.
Where To Put Html Files In Tomcat?
Place HTML files in the “webapps” directory of your Apache Tomcat installation. This directory is the default location for web applications. Ensure your HTML files are within a specific project folder for organization. Tomcat will automatically deploy these files, making them accessible via browser.
How To Create A Virtual Host In Tomcat?
To create a virtual host in Tomcat, modify the server.xml file. Define a new element with a unique name. Set the appBase attribute to point to your application directory. Restart Tomcat to apply changes. Ensure DNS settings match the virtual host configuration.
How To Start A Tomcat Web Server?
To start a Tomcat web server, open the terminal. Navigate to the ‘bin’ directory of Tomcat. Execute ‘catalina. sh start’ (Linux/Mac) or ‘catalina. bat start’ (Windows). Ensure Java is installed and configured properly. Access Tomcat via ‘http://localhost:8080’ in your browser.
Conclusion
Hosting a web page in Tomcat is straightforward. Follow the steps carefully. Install Tomcat. Configure your server settings. Deploy your web application. Test your page to ensure it loads correctly. Troubleshooting helps fix common issues. Regular updates keep your server secure.
Explore Tomcat’s documentation for additional tips. Practice makes the process easier. Hosting becomes second nature with experience. Remember, patience is key. With time, you’ll manage web pages effortlessly. Your journey with Tomcat just started. Embrace learning and experimentation. Soon, you’ll feel confident hosting web pages independently.


