
Are you eager to enhance your Java skills by learning how to host a REST web service? You’re in the right place.
Imagine transforming your Java applications into powerful, web-accessible services that can communicate seamlessly over the internet. This is not just a skill for developers; it’s an opportunity for you to expand your technical toolkit and make your applications more versatile and scalable.
As you read on, you’ll discover straightforward steps that will guide you through setting up and hosting your REST web service in Java. Your journey to mastering this process starts here, promising not only knowledge but the satisfaction of unlocking new capabilities for your projects. Dive in to find out how you can elevate your programming expertise and create impactful services that stand out.
Credit: learn.microsoft.com
Setting Up The Development Environment
Java Development Kit (JDK) is needed to write Java programs. Start by downloading the latest version of JDK from the official Oracle website. Choose the right version for your computer’s operating system. Follow the installation steps. It’s simple. You just click “next” a few times. Once installed, open the command prompt. Type java -version to check. This checks if JDK is installed correctly. If you see the version number, you’re all set.
An Integrated Development Environment (IDE) makes coding easier. Eclipse or IntelliJ IDEA are popular choices. Download your preferred IDE from its official site. Install it by following the prompts. Open the IDE after installation. Create a new project. Set the project’s Java version to match your installed JDK. This helps in avoiding errors. Look for tutorials online for your specific IDE. These tutorials will help you learn faster. Now you are ready to code in Java!
Credit: massorestaurant.com
Understanding Restful Web Services
REST stands for Representational State Transfer. It uses simple HTTP. REST does not need complex protocols. It is based on stateless communication. Each request from a client contains all needed information. REST can be easily used with multiple formats. JSON and XML are common formats. REST APIs are simple. They can be understood easily. This makes REST popular among developers.
REST is easy to use. It works with many platforms. REST is also flexible. It allows changes without breaking clients. REST can handle a lot of data. It supports caching. This makes REST fast. REST APIs are easy to scale. They can grow with your needs. REST is a good choice for web services.
Creating A Java Restful Web Service
Selecting the right framework is crucial. JAX-RS and Spring Boot are popular choices. Both are easy to use. JAX-RS is part of Java EE. Spring Boot is lightweight and flexible. Choose based on your project needs.
Organizing the project is important. Create directories for source code and resources. Use Maven or Gradle for dependency management. This helps in building and running the project smoothly.
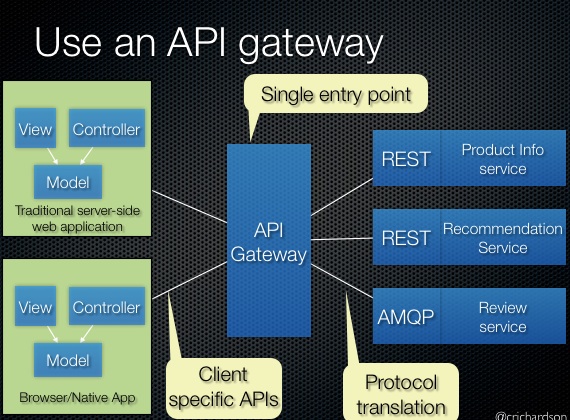
REST endpoints are like doors to your service. Each endpoint is a URL. It performs a specific action. Use HTTP methods like GET, POST, PUT, and DELETE. These methods help in data manipulation. Start by defining endpoints for common tasks.
Credit: microservices.io
Implementing Crud Operations
First, we need a database. It stores data. Use SQL for this task. Next, write a Java method. This method adds data to the database. Use HTTP POST request. The request sends data to the server. The server stores it. Always check for errors. Handle exceptions properly. Proper error handling keeps the app stable.
To read data, use HTTP GET request. This request fetches data from the server. Java method retrieves data from the database. Display this data to users. Keep it clear and simple. Always ensure data accuracy. Use filters for specific data. Filters help find data easily.
Updating data requires an HTTP PUT request. This request changes existing data. Java method updates data in the database. Identify the data to update. Use unique IDs for this. Check for errors during updates. Proper validation avoids mistakes.
Deleting data needs an HTTP DELETE request. This request removes data from the server. Java method deletes data from the database. Confirm before deletion. Always double-check data to delete. Handle errors carefully. Proper checks prevent accidental data loss.
Managing Data Persistence
Databases store information for your web services. They keep your data safe. You can use SQL or NoSQL databases. SQL databases are good for structured data. NoSQL databases work well for unstructured data. Choose a database based on your needs. Connect the database to your REST service. Make sure the connection is secure. This keeps data safe.
Data Access Objects (DAOs) help manage data. They make it easy to use databases. DAOs are like bridges between your code and the database. They handle all data operations. Create DAOs for each data type. This makes code clean and organized. Use Java Persistence API (JPA) for DAOs. JPA is powerful and easy to use. It helps manage data without much code.
Securing The Rest Service
Protecting your REST service is important. Using authentication checks who is trying to access it. There are several ways to do this. One way is Basic Authentication. Here, users give a username and password. Another method is Token-Based Authentication. Users get a token after logging in. They use this token for future requests. These methods help keep your service safe.
Authorization decides what a user can do. After checking their identity, the system checks their permissions. Role-Based Access Control (RBAC) is a common way. It gives users roles like admin or viewer. Each role has specific permissions. This ensures users only access what they should.
Testing Restful Web Services
Hosting RESTful web services in Java involves setting up a server to handle HTTP requests. Use frameworks like Spring Boot for easy configuration. Ensure endpoints are well-defined for seamless interaction with clients.
Using Postman For Testing
Postman is a tool for testing web services. It helps in sending HTTP requests. You can see the responses easily. First, open Postman and enter the API URL. Next, choose the HTTP method like GET or POST. Then, click send to view the response. You can also add headers and body if needed. This tool helps in checking if your service works well.
Automating Tests With Junit
JUnit is a tool for automating tests. It helps in checking code quality. First, write test cases for your service. Use assertions to check results. Run the tests to see if they pass. If any test fails, fix the code. JUnit makes testing easy and fast. It helps in ensuring your service is reliable.
Deploying The Rest Service
Prepare your Java REST service for deployment. Check if all files are ready. Make sure the code is error-free. Compile the code into a WAR file. Use a tool like Maven or Gradle. Follow the right steps for building your project. This makes deployment easier.
Apache Tomcat is a popular choice. Install Tomcat on your server. Place the WAR file in the webapps folder. Restart Tomcat to deploy the service. Access the service via a browser. Check if the service works as expected. This process is simple and efficient.
Troubleshooting Common Issues
Debugging helps find and fix errors in your code. Print statements are simple and effective. Place them in your code to check values. Breakpoints pause your program at points you choose. This helps see what is happening step by step. Use debugging tools in your IDE. They offer features like watching variables and stepping through code.
Exceptions are errors that happen during program execution. Java has ways to handle them. Use try-catch blocks to manage errors. This lets your program keep running. You can print error messages for better understanding. Finally blocks run code even if an error occurs. They are useful for cleaning up resources. Handle specific exceptions for better control.
Frequently Asked Questions
How To Create A Rest Web Service In Java?
To create a REST web service in Java, use Spring Boot or JAX-RS framework. Configure your project, define endpoints, and implement HTTP methods like GET, POST, PUT, DELETE. Annotate classes with @RestController or @Path. Test the service using tools like Postman or Swagger for functionality verification.
How To Host A Java Web Server?
To host a Java web server, install a Java Development Kit (JDK) and Apache Tomcat. Deploy your Java application to Tomcat’s webapps directory. Configure server. xml for your app. Start Tomcat using the startup script. Access your server via browser using your server’s IP address and port.
How To Deploy Java Rest Api On Server?
Deploy Java REST API by packaging it in a WAR file. Use a web server like Apache Tomcat. Configure server settings and database connections. Upload the WAR file to the server. Start the server, ensuring the API endpoints are accessible.
Monitor logs for errors and optimize performance.
How To Automate Rest Api In Java?
Automate REST API in Java using frameworks like RestAssured or HTTP client libraries. Set up test scripts to validate endpoints. Integrate with CI/CD tools for continuous testing. Ensure efficient error handling and logging to streamline debugging processes.
Conclusion
Hosting a REST web service in Java is simple and rewarding. Start by setting up your development environment. Use a reliable Java framework like Spring Boot. Write your RESTful API endpoints clearly. Test your service thoroughly to ensure it works well.
Deploy it on a secure server for better performance. Keep your code clean and efficient. Stay updated with the latest Java practices. This ensures your service remains robust and flexible. With practice, hosting becomes easier. Begin your journey today. Experience the power of Java in web services.


