
Are you ready to take your ASP.NET skills to the next level by hosting your very own web service? Imagine the possibilities: streamlining your applications, enhancing communication between different systems, and offering robust solutions to your users.
Whether you’re a seasoned developer or just dipping your toes into the world of web services, understanding how to effectively host a web service in ASP. NET is crucial. This guide will walk you through the process step-by-step, demystifying the technical jargon and empowering you to create efficient, scalable web services.
So, if you’re ready to unlock new potential in your web development toolkit, read on to discover how you can master hosting web services in ASP. NET.
Credit: public.support.unisys.com
Setting Up The Development Environment
Visual Studio is a tool for coding. First, download Visual Studio from its website. Open the installer and follow the steps. Choose the ASP.NET option when asked. This is important. Wait for the installation to finish. It might take some time. Once done, open Visual Studio. You are ready to code. Keep it updated for best results.
ASP.NET Framework helps create web apps. Start by opening Visual Studio. Create a new project. Choose ASP.NET Web Application. Select the version of ASP.NET. Make sure it’s compatible. Set up the project settings. This includes naming and location. Save the project once configured. Now, you can begin building your web service.
Credit: learn.microsoft.com
Creating A Web Service Project
First, you select the project type in Visual Studio. Choose ASP.NET Web Application. This choice is important. It sets up your project correctly. You see many templates. Pick the Web API template for services. It helps create RESTful services. It makes your work easy and clean.
Next, define the service contract. This is like a promise. It tells what the service will do. Use interfaces for this. Write methods inside. Name them clearly. They show the service’s actions. This helps others understand your service. It’s the first step in creating a reliable web service.
Implementing Web Service Logic
Start by creating a new method for the service. This method handles requests from users. It should be simple and clear. Use basic logic to complete tasks. Make sure the method returns a response. This lets users know their request was handled. Test the method to ensure it works well. Correct any errors you find.
Data serialization converts data into a format for sharing. Use it to send data over the web. Choose a format like JSON or XML. These formats are easy to read and write. Serialize the data before sending it. This helps keep data safe and organized. Deserialize the data when you receive it. This turns it back into a usable format. Always check data for errors during this process.

Credit: stackoverflow.com
Testing The Web Service
Setting up a web service in ASP. NET involves configuring the server and deploying your application. Ensure the service is accessible by testing endpoints with tools like Postman. Efficient hosting enhances performance and reliability.
Using Localhost For Testing
Testing your web service on localhost is a good first step. It lets you see how things work without going online. Start by opening your web browser. Type localhost followed by your port number. This should show your web service. If it loads, that’s a good sign. You can test different parts of your service this way. Remember to check for any errors.
Debugging Common Issues
Sometimes things go wrong. It’s normal. The first thing to do is check your code. Look for any red lines or warnings. These can show mistakes. Also, check your settings. Make sure the server is running. If nothing works, restart your computer. This can fix small bugs. Keep calm and try each step.
Deploying To A Web Server
Setting up a web service in ASP. NET involves uploading your application to a web server. This process ensures your service is accessible online, requiring a hosting plan and proper configuration. Understanding these steps helps in efficiently deploying and managing your web service.
Selecting A Hosting Provider
Choose a reliable hosting provider for your web service. Consider the bandwidth and storage you need. Check if they support ASP.NET applications. Look for 24/7 customer support. Some providers offer free trials. Compare pricing plans to fit your budget. Ensure they offer scalable options. Check for security features. SSL certificates are important. Read user reviews for feedback.
Configuring Iis For Deployment
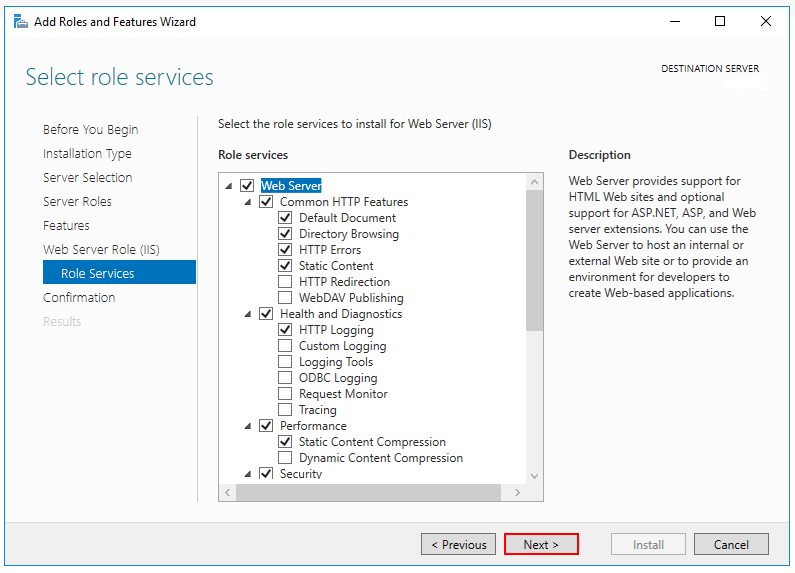
Install Internet Information Services (IIS) on your server. Open the IIS Manager tool. Create a new website in IIS. Set the physical path to your web app files. Configure bindings for your site. Use HTTPS for security. Check the permissions for web app folders. Set the application pool for your site. Ensure the pool is running. Test your site after setup. Make sure all pages load correctly.
Securing The Web Service
Protecting your web service is very important. Authentication is a key step. Users must prove who they are. This keeps bad people out. Use username and password for this. You can also use tokens. Tokens are like special keys. They let users in safely.
HTTPS makes your web service safe. It hides information from others. This is like sending secret messages. SSL certificates help with this. They are needed for HTTPS. Install them on your server. This makes sure data stays safe. Always use HTTPS for all parts of your service.
Monitoring And Maintenance
Monitoring and maintaining your ASP. NET web service ensures smooth operation and quick issue resolution. Regular checks help identify performance bottlenecks early. Timely updates safeguard against security vulnerabilities, keeping your service reliable and efficient.
Setting Up Logging
Logging helps track web service activities. It records errors, warnings, and information. Logs are stored in files or databases. Review logs regularly to find issues. Fix errors quickly to keep services running well. Good logging improves service reliability.
Regular Updates And Patches
Software needs updates for security and performance. Patches fix bugs and vulnerabilities. Apply updates often to protect data. Check for new patches monthly. Keep software current to avoid problems. Regular updates ensure smooth operation. A well-maintained service is a safe service.
Frequently Asked Questions
How Do I Host A Webservice?
To host a web service, choose a reliable hosting provider. Set up a server, install necessary software, and deploy your service. Ensure security and monitor performance. Consider cloud solutions for scalability and flexibility. Optimize for speed and reliability to enhance user experience.
How To Publish A Web Service In C#?
To publish a web service in C#, create a new ASP. NET Web Service project. Implement the desired methods. Build the project and deploy it to a web server like IIS. Ensure proper configuration for security and access. Test the service endpoint to verify functionality.
How To Run A Web Service In Visual Studio?
Open Visual Studio, select “New Project,” choose “ASP. NET Web Application,” and click “Create. ” Configure settings, then press F5 to run the web service.
What Is Asp.net Web Service Hosting?
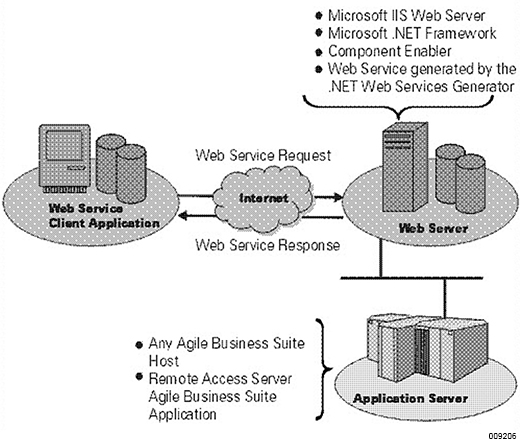
ASP. NET web service hosting involves deploying web services on a server. This allows applications to interact over the internet. ASP. NET provides tools and frameworks to simplify this process. It supports various protocols like HTTP and SOAP. Hosting ensures your web service is accessible to users globally.
Conclusion
Hosting a web service in ASP. NET can be straightforward. Follow the steps and guidelines shared above. You’ll ensure a smooth deployment. Pay attention to security and performance. These aspects are crucial for successful hosting. Practice makes perfect, so keep experimenting.
Use the tools available in ASP. NET. They simplify the process significantly. Stay updated with the latest features. They can enhance your web service. Remember, every challenge is a learning opportunity. Keep refining your skills and knowledge. This will help you host web services efficiently.
Your efforts will surely pay off. Happy hosting!


