
Are you ready to take your web development skills to the next level? Hosting a web service in ASP.NET can open up a world of possibilities for your projects.
Whether you’re building a simple application or a complex enterprise solution, understanding how to host a web service is crucial. Imagine seamlessly connecting different platforms, enhancing user experience, and providing dynamic content with ease. In this guide, you’ll discover step-by-step how to efficiently host a web service using ASP.
NET. By the end, you’ll be equipped with the knowledge to impress your clients or colleagues with a robust and scalable service. So, are you excited to unlock the potential of your applications? Let’s dive in and transform your ideas into reality.
Setting Up The Environment
First, download and install Visual Studio. It is essential for coding. Choose the Asp.Net workload during installation. This includes all needed tools. Next, install SQL Server. This is the database. You can use the Express version. It is free and easy to use. Make sure to also install the SQL Server Management Studio. It helps manage databases. Finally, check if you have the .NET Framework. Install it if missing. It is crucial for Asp.Net.
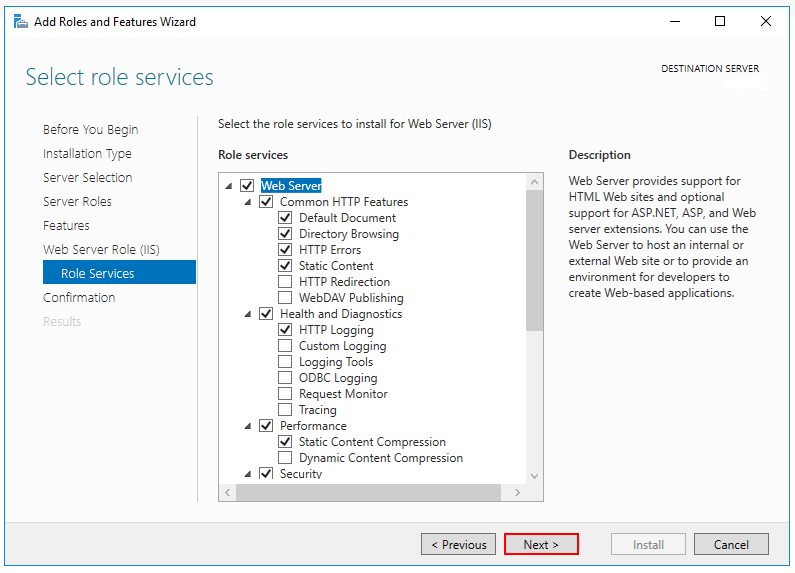
Open the Control Panel on your computer. Look for Programs and Features. Click on it. Then, click on Turn Windows features on or off. A window will appear. Find Internet Information Services (IIS). Check the box next to it. Click OK. Wait for the installation to finish. Open the IIS Manager. This is where you configure settings. Create a new site in IIS. Set the physical path to your web service folder. Assign a port number. Now, your web service is ready to host.
Credit: learn.microsoft.com
Creating The Web Service
Begin by opening Visual Studio. Click on File and select New Project. Choose ASP.NET Web Application. Name your project and click OK. Select Web API template and create the project. Your project setup is now complete.
Use interfaces to define your service contracts. Create a new interface file. Define your methods inside this interface. These methods describe what your service will do. It is like a contract for your service.
Now, create a class to implement the interface. This is where you write the logic for your service. Each method in your interface gets code here. Make sure to test your logic. Your service should work as expected.
Publishing The Web Service
First, open your Asp.Net project in Visual Studio. Click on Build in the menu. Choose Build Solution. This will create the necessary files. These files are important for your web service. Make sure there are no errors during the build. Errors can cause problems later.
Open Internet Information Services (IIS) Manager. Right-click on Sites. Choose Add Website. Enter your site’s name. Set the physical path to your project files. Select a port number. Click OK to create the site. Your web service will now be ready to use.
In IIS, find Application Pools. Right-click to create a new one. Choose a name for it. Set the .NET version to match your project. Click OK to save. Assign this pool to your web service. This ensures it runs smoothly.
Testing The Web Service
Postman is a helpful tool for testing web services. It sends requests to your service. You can check if the service works. First, open Postman and enter the service URL. Then, choose the request type. For example, GET or POST. Click send and see the response. Is it correct? If yes, your service works well. If not, you might need to fix it.
Each endpoint must be tested. Check if they return the right data. Use different inputs to test them. Look for errors or wrong data. Make sure each endpoint meets its purpose. Testing helps in finding issues early.
Sometimes things go wrong. Errors can happen. Look at error messages carefully. They tell what is wrong. Check for typos in URLs. Ensure your server is running. Make sure you have internet. These checks help fix many problems.
Securing The Web Service
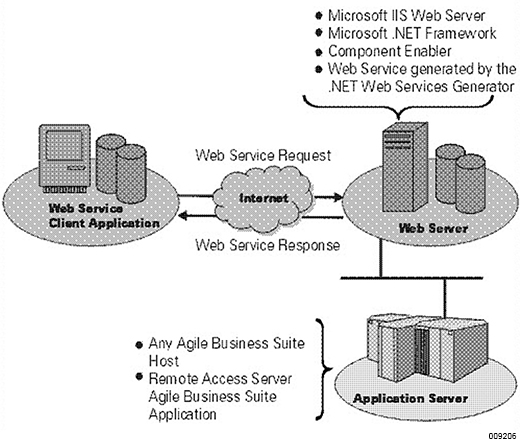
Hosting a web service in ASP. NET involves setting up a secure server environment. Begin by configuring your web service with SSL certificates for encrypted communication. Regularly update your software to protect against vulnerabilities and ensure safe data transfer.
Implementing Authentication
Authentication keeps your web service safe. Use strong passwords. Add two-factor authentication for extra safety. Make sure users prove who they are. This stops bad people from getting in.
Setting Up Ssl
SSL is very important. It makes data safe and private. SSL encrypts information. This means only the right people can read it. Install an SSL certificate on your server. Your web service will show a padlock icon. This tells users their data is safe.
Handling Authorization
Authorization tells who can do what. Give permissions to users. Make sure they can only see what they need. Use roles to manage what they can do. Roles help control actions on your web service. Keep data safe by limiting access.
Credit: public.support.unisys.com
Monitoring And Maintenance
Keep track of all requests to your web service. Use a logging tool to store details. This helps find problems fast. Check logs often. Look for any errors or unusual activities. Fix them quickly to maintain service quality.
Optimize your service for better performance. Check the response time regularly. Make sure it is quick. Use caching to reduce load times. Improve database queries for faster results. Regular tuning keeps users happy.
Keep your service up-to-date. Install the latest software patches. Update your code with new features. This ensures security and smooth operations. Always test updates before applying them. This prevents unexpected issues.

Credit: stackoverflow.com
Frequently Asked Questions
How Do I Host A Webservice?
Choose a reliable hosting provider and select a plan. Upload your webservice files using an FTP client. Configure server settings and domain name. Ensure the webservice runs smoothly by testing it. Regularly update and maintain your server for optimal performance.
How To Publish A Web Service In C#?
To publish a web service in C#, create a new ASP. NET Web API project. Implement your service logic and build the project. Deploy the project on IIS (Internet Information Services) by publishing it from Visual Studio. Ensure your web service is accessible by configuring the correct bindings and endpoints.
How To Run A Web Service In Visual Studio?
Open Visual Studio and create a new project. Choose “ASP. NET Web Application” from the templates. Configure your application settings and click “Create”. Build the project and use “Start” to run the web service. Test it using the built-in browser or Postman.
How To Start Hosting In Asp.net?
To start hosting a web service in ASP. NET, you need to create a project in Visual Studio. Configure your service settings, and deploy it to IIS. Ensure your server environment supports ASP. NET, and verify the service is running correctly by accessing its URL in a web browser.
Conclusion
Hosting a web service in Asp. Net is straightforward. Follow the steps carefully. Ensure your server is configured correctly. Test your web service thoroughly. Make adjustments as needed. Keep security in mind. Update regularly to improve performance. Debugging tools can help resolve issues.
Documentation is your friend. Stay informed about Asp. Net updates. Share your experience with others. Hosting enhances your web application capabilities. It opens doors to new possibilities. Now, you can host web services confidently. Continue learning and exploring Asp. Net features.
Happy coding!


