
Have you ever wondered how to seamlessly host your Web API using IIS 10? If you’re looking to make your web applications more accessible and scalable, you’ve come to the right place.
Hosting your Web API in IIS 10 can seem daunting at first, but it doesn’t have to be. By mastering this skill, you can improve the efficiency and reach of your applications. Imagine having the power to manage your APIs with ease, ensuring they’re always running smoothly and effectively.
In this guide, we’ll break down the process into simple, manageable steps. You’ll gain the confidence to get your Web API up and running in no time. Keep reading to discover how you can transform your hosting experience and unlock the full potential of your web services.
Prerequisites For Hosting
Ensure your computer has a modern processor. At least 4 GB of RAM is needed. Your operating system should be Windows 10 or newer. A fast internet connection is also recommended. Check your system for enough disk space. At least 10 GB free is good. Keep your system updated with the latest patches.
Download and install IIS 10 from the Microsoft website. Make sure you have .NET Framework installed. Version 4.5 or higher is best. Install any necessary database software. SQL Server is a popular choice. You might also need a text editor. Notepad++ is simple and free. Finally, make sure all software is up-to-date.
Preparing The Web Api
First, ensure your Web API project is ready. Open your project in Visual Studio. Check all dependencies are added. Also, ensure there are no missing files. Next, build your project. This will create all necessary files. Make sure there are no errors or warnings. These can cause problems later. Now, configure your project for release mode. This is important for deployment. Finally, create a folder for the published files. Name it something easy to remember.
Open your project in Visual Studio. Click on the Build menu. Select “Publish”. Choose “Folder” as the publish target. This will allow you to choose a folder for the files. Select the folder you created earlier. Now, click “Publish”. Visual Studio will create the files in your folder. Check the folder to ensure all files are there. These files are now ready for deployment. You can host them on IIS 10.
Configuring Iis 10
First, open the Control Panel. Click on Programs. Choose Turn Windows features on or off. A window will pop up. Find Internet Information Services. Check the box next to it. Expand it by clicking the plus sign. Make sure Web Management Tools and World Wide Web Services are checked. This enables the needed features for hosting.
Visit the official IIS website. Download the URL Rewrite Module. Run the installer. Follow the prompts and accept the terms. The module helps in rewriting URLs. This is useful for search engine optimization. Once installed, restart IIS. This ensures the module works properly.
Credit: www.ssl.com
Deploying Web Api To Iis
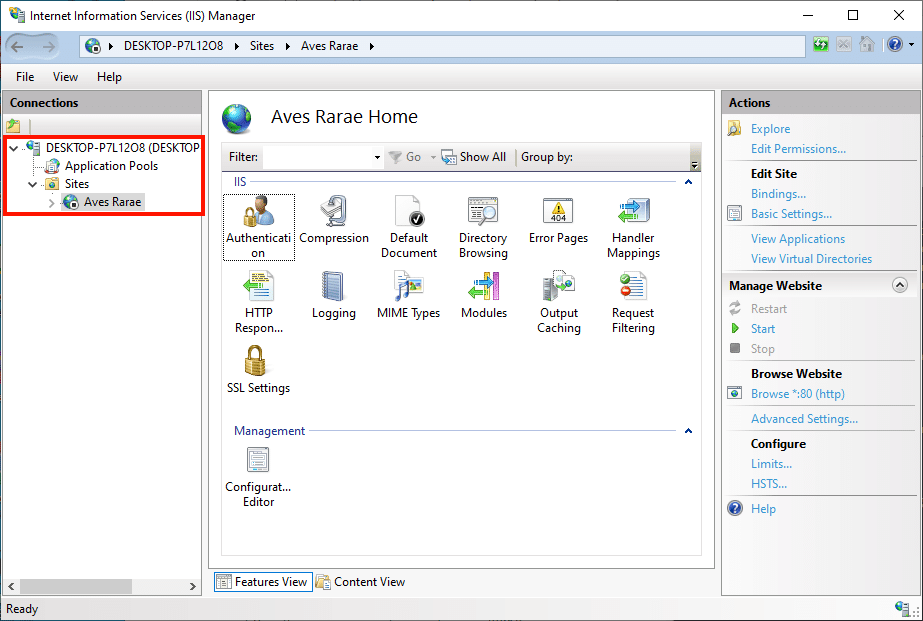
Start by opening IIS Manager on your computer. Right-click on Sites and select Add Website. Enter a name in the Site name box. Choose a folder path where your Web API files are stored. Select OK to create the site. Now, your site is ready to use.
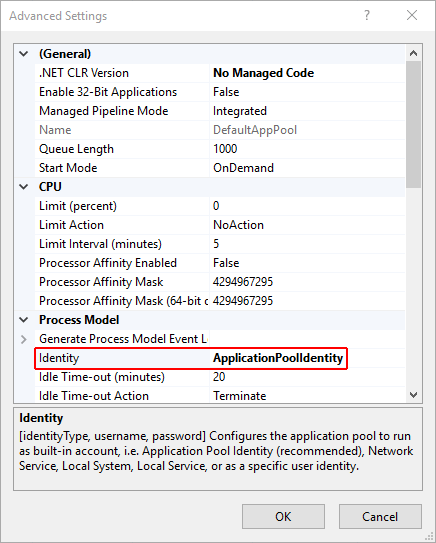
Go to Application Pools in IIS Manager. Right-click and select Add Application Pool. Give it a name, and choose the .NET CLR Version. Set the Pipeline Mode to Integrated. Click OK to create the pool. Assign the pool to your site for better performance.
Go to the folder where your Web API files are stored. Right-click and select Properties. Click on the Security tab. Press Edit to change permissions. Add the IIS_IUSRS group. Give it Read & Execute permissions. Press OK to save changes. Your site can now access the files it needs.
Configuring Application Settings
The Web.config file is important. It holds settings for your application. Adjusting this file helps your app run well.
You must check the authentication settings. Make sure they are correct. Security is key. Set the correct authorization rules. They protect your data.
Next, inspect the error handling settings. Proper settings help find problems. Fix them easily. Keep the application running smoothly.
Connection strings link your app to databases. They are crucial. You must keep them safe. Never share them with anyone. The Web.config file holds connection strings.
Edit the connection strings carefully. Ensure they match your database. Use correct server names and credentials. Mistakes can cause errors. Check them twice.
Binding And Url Management
Host headers help direct web traffic. They tell the server which website to show. IIS 10 needs these headers set up right. Open the IIS Manager and choose your site. Click on Bindings. Add a new binding. Type in your host name. Make sure it’s the right one. Click OK to save. Now, your site listens to the right name.
SSL certificates keep web data safe. First, get a certificate from a trusted place. Install it on your server. Go to IIS Manager and select your site. Open Bindings and choose Add. Pick https from the type list. Select your certificate from the drop-down. Press OK to apply. Now, your site is secure with SSL.
Testing The Deployment
Deploying a Web API in IIS 10 ensures reliable access for users. Test the deployment to verify functionality. This helps identify and fix potential issues, ensuring smooth operation.
Accessing The Api
Open a browser and type the API URL. This checks if the API is working. Make sure the server is running. If the page loads, your API is live. If not, check the server settings. Ensure the firewall allows access. Test with different devices. This helps identify any network issues.
Debugging Common Issues
Sometimes APIs don’t work as expected. Check the error logs for details. They show what went wrong. Verify the IIS configuration. Ensure all settings are correct. Problems often arise from wrong settings. Review the API code. Look for any bugs or mistakes. Fix them to ensure smooth operation. Restart the server if needed. This can resolve many issues.

Credit: learn.microsoft.com
Optimizing Iis Performance
Compression makes web pages load faster. It reduces the size of data sent. Enable compression in IIS for better speed. Go to the IIS Manager. Find the Compression option. Turn it on for faster web delivery. Compressed files are smaller. Smaller files mean less data. Less data means faster loading times. Users will have a better experience.
Caching saves time. It stores data for quick access. Use caching in IIS to improve speed. Set up caching to keep pages ready. Cached pages load without delay. This saves server resources. It also reduces wait times. Users see information faster. Caching helps websites run smoothly. Users stay happy with quick access.
Security Best Practices
Setting up authentication keeps your data safe. Choose the right method. Basic authentication is easy to use. But it is not very secure. Use Windows authentication for better security. It works well with Active Directory. Always enable SSL to encrypt data. It makes sure no one else sees your data. Check your settings often. Make sure they are correct and updated.
Authorization controls who can access what. Use roles and permissions. They define user access levels. Least privilege principle is important. Give users only what they need. No more, no less. Check user access regularly. Remove access when it is no longer needed. This helps keep the system secure. Keep an eye on logs. They show who accessed what and when.
Credit: learn.microsoft.com
Monitoring And Maintenance
Ensuring smooth operation of Web API in IIS 10 involves regular monitoring and maintenance. It helps identify issues early, ensuring optimal performance. Keep the server updated and conduct periodic checks to maintain security.
Using Iis Logs
IIS logs are helpful for tracking your Web API. They record visits and errors. Check logs regularly to see how your API is doing. Look for any patterns of errors. This can help find issues early. Logs can show if your API is slow. You can see if users have problems. Use logs to make your API better. Keep them safe to protect user data. Logs are useful for security checks too. They help you see suspicious activity. Always review them to keep your system safe.
Regular Updates And Patches
Web APIs need updates to stay safe and fast. Install patches from IIS often. They fix bugs and security holes. Your API stays secure with updates. Check for updates monthly. This keeps your API running well. Old versions have weak points. New updates fix them. Patches make sure your API is reliable. They help it work better. Don’t wait too long to update. Regular updates keep your API healthy.
Frequently Asked Questions
How To Host Web Api In Iis Step By Step?
To host a Web API in IIS, first install IIS via Windows Features. Next, deploy your Web API project to a folder. Open IIS Manager, create a new site, and point it to your project’s folder. Configure application pool settings, then test the API in a browser to ensure it’s running.
How Do I Host A Website In Iis Windows 10?
To host a website in IIS on Windows 10, install IIS via Control Panel. Open IIS Manager, add a new site, configure bindings, and select your site’s folder. Ensure the site is running by clicking “Start” in the IIS Manager.
Adjust firewall settings to allow traffic.
How To Host A Web Api?
Choose a hosting provider that supports Web APIs. Deploy your API using Docker or a cloud service like AWS. Configure the server and secure it with SSL. Set up API endpoints and test functionality. Ensure scalability and monitor performance for optimal results.
How To Host .net Core Web Api As Windows Service?
Install. NET Core Windows Service using Visual Studio. Publish the Web API project. Use “sc create” command to register the service. Configure startup in Program. cs using HostBuilder. Run the service using “net start” command. Ensure appsettings. json is correctly configured for production environment.
Conclusion
Hosting a Web API in IIS 10 is straightforward. Follow each step carefully. Your Web API will function smoothly. Configuration settings are crucial. Ensure they match your requirements. Security settings protect your data. Always double-check them. Keep IIS updated for best performance.
Troubleshooting tips can resolve issues quickly. Practice makes perfect. Try hosting a test API first. Soon, you’ll host APIs confidently. IIS 10 offers robust features. Perfect for managing Web APIs effectively. Remember, patience and attention to detail help. You can achieve success with persistence.
Happy hosting!


