
Are you ready to bring your Flask web app to life and share it with the world? If you’ve been tinkering with Flask and created an app you’re proud of, the next exciting step is getting it online.
Hosting your Flask web app might seem daunting at first, but with the right guidance, it’s easier than you think. Imagine the satisfaction of seeing your creation live on the internet, accessible to anyone, anywhere. This guide will walk you through the process step by step, ensuring you feel confident and empowered.
Whether you’re a seasoned developer or just starting out, you’ll find practical tips and insights to make hosting your Flask app a breeze. Let’s unlock the potential of your web app and get it out there for the world to see!
Setting Up Your Environment
First, ensure Python is on your computer. Go to the official Python website. Download the latest version. Follow the instructions to install it. Check Python is installed by typing python --version in the command line. If you see the version number, you’re good to go.
A virtual environment keeps your projects tidy. Use python -m venv env to create one. Replace “env” with your preferred name. Activate it using source env/bin/activate on Mac/Linux or .envScriptsactivate on Windows. Your command prompt will show the environment name.
Now, install Flask. Use the command pip install Flask. This installs Flask inside your virtual environment. Check Flask is installed by typing flask --version. If you see the version number, Flask is ready to use.
Developing Your Flask App
Start by installing Flask using pip. Open your terminal. Type pip install Flask. This command installs Flask. Next, create a new file called app.py. This file will hold your Flask app. Inside app.py, write the following code:
from flask import Flask
app = Flask(__name__)

@app.route('/')
def hello_world():
    return 'Hello, World!'
Run your app using the command python app.py. Visit http://127.0.0.1:5000/ in your browser. You will see “Hello, World!”. Your basic Flask application is now running.
A well-organized project is essential. Create a folder named my_flask_app. Inside, place the app.py file. Create two new folders: static and templates. Put your CSS and JavaScript in static. Place HTML files in templates. This structure keeps your project tidy. It helps you find files quickly. It also makes collaboration easier.
Configuration is important for flexibility. Create a file named config.py. Store all settings here. For example, add a secret key:
import os
SECRET_KEY = os.urandom(24)
Use this secret key in your app. Import config.py in app.py. Call app.config.from_object('config'). This loads settings into your app. Modify settings easily in one place. It is efficient and saves time.
Testing Your Flask App Locally
Start your Flask app by using the Flask development server. This server is easy to use. Simply open your terminal. Type flask run and press enter. Your app will start running locally. Check the output. It shows the URL where your app is live.
Debugging helps fix errors in your code. Enable debug mode for better error messages. Add app.debug = True in your Flask app. Use tools like Flask Debug Toolbar. It shows detailed error reports. Always check your logs for errors. Logs give clues on what’s wrong.
Preparing For Deployment
Use a file named requirements.txt to manage dependencies. List all needed packages here. Run pip install -r requirements.txt to install them. Always check your versions. This helps avoid conflicts. Keep your packages updated for best performance. Testing your app after updates is crucial. It ensures everything works well together.
Environment variables store important settings. They keep sensitive data safe. Use a file named .env for these variables. Keep it out of public view. Use the os module to read them in Flask. This method is safe and simple. Always double-check variable names. They must match in your code. These steps help keep your web app secure.
Choosing A Hosting Service
Cloud providers offer easy ways to host Flask apps. Popular ones include Amazon Web Services (AWS), Google Cloud Platform (GCP), and Microsoft Azure. These companies offer reliable services. They also provide scalable solutions. This means your app can grow with users.
Each provider has unique features. AWS offers a free tier for beginners. GCP gives trial credits for new users. Azure provides a pay-as-you-go plan. Costs depend on the services used. It’s important to compare prices. Look at storage, bandwidth, and support options. Some plans have hidden fees. Always read the fine print.
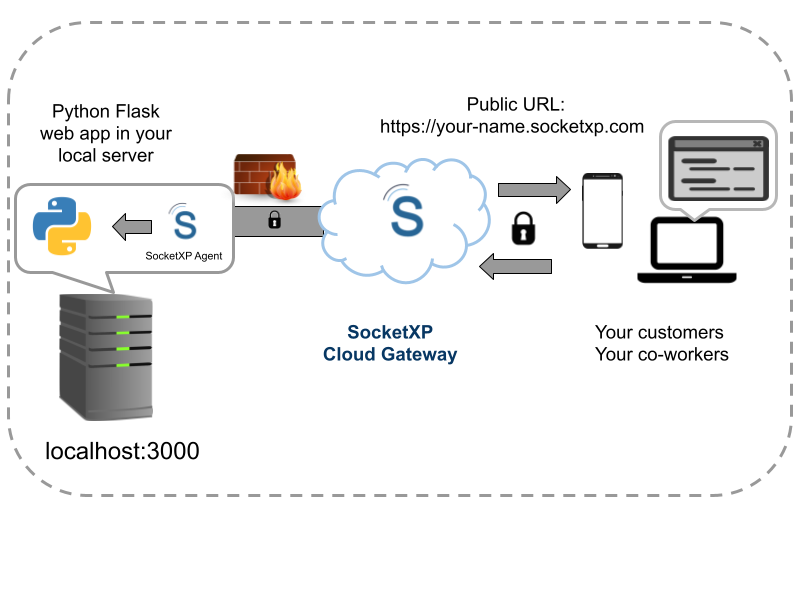
Credit: www.socketxp.com
Deploying Your Flask App
Gunicorn is a tool to help your app work. It manages many users at once. This makes your app fast. Gunicorn uses WSGI to talk to your app. Your code stays the same. But it works better. Install Gunicorn with pip. Write a small command to start it. Your app is now ready to serve many people. This is great for small and big projects.
Nginx helps direct traffic to your app. It’s like a traffic cop. It makes sure everyone goes the right way. Nginx also helps with security. You can set it to only allow good traffic. This protects your app. Setting up Nginx is simple. Use a few lines of code. Your app will be faster and safer. Nginx is a smart choice for any web app.
Docker makes your app easy to move. It packages your app into a small box. This box has everything your app needs. You can run this box anywhere. It makes deploying fast. Docker keeps your app the same. It works the same on any computer. This is great for teams. Everyone sees the same thing. Using Docker saves time and trouble.
Securing Your Flask App
Deploying a Flask app securely involves careful planning and execution. Start by choosing a reliable hosting service that supports Flask. Set up HTTPS to protect user data, and regularly update your app and dependencies to patch vulnerabilities.
Implementing Https
HTTPS protects data between users and your app. Use a SSL certificate to enable HTTPS. Most hosting providers offer SSL certificates for free. Install the certificate on your server. This process encrypts user data.
Setting Up Firewall Rules
Firewalls block unwanted access. Set up firewall rules to protect your app. Allow only necessary traffic. Block suspicious connections. This keeps your app safe from attacks.
Regular Security Updates
Security updates fix vulnerabilities. Check for updates often. Apply them promptly. Update your Flask app dependencies. Secure coding practices prevent many issues.

Credit: www.linkedin.com
Monitoring And Scaling
Logging is important for any app. It helps track issues. Use Flask’s built-in logging tools. Start by importing the logging module. Then, set the logging level. Levels like DEBUG or ERROR help filter messages. Save logs to files. This helps in checking problems later. Rotate log files to avoid space issues. Use a library like logging.handlers for this. Proper logging makes debugging easier.
Good monitoring helps keep your app fast. Flask-Monitor is a useful tool. It shows how your app performs. You can track response times and errors. Set alerts for high response times. Use APM tools like New Relic. They give deep insights into app health. Always keep an eye on server usage. This helps prevent slowdowns. Regular monitoring avoids big problems.
Scaling means handling more users. Flask can scale well. Use Gunicorn for better handling of requests. It works with Flask to manage loads. Consider adding more servers. Load balancers distribute traffic evenly. Docker helps in scaling apps easily. It packages apps for quick deployment. Always test scaling changes. This ensures your app remains stable. Scaling keeps your app ready for growth.

Credit: realpython.com
Frequently Asked Questions
How Do I Run Flask On My Website?
Install Flask using pip. Create a Python file, import Flask, and initialize it. Define routes and views. Run the app locally using `flask run`. Deploy the app on a web server with support for Python, like Gunicorn or uWSGI, and configure it using a WSGI server.
Can We Use Flask For A Web Application?
Yes, Flask is suitable for web applications. It is a lightweight, flexible Python framework. Developers prefer Flask for its simplicity and scalability. Flask supports extensions, making it adaptable to various projects. Its modular design enhances performance, making it ideal for small to medium-sized web applications.
What Is The Best Flask App Host?
DigitalOcean, Heroku, and AWS are top hosts for Flask apps, offering scalability and ease of deployment. Choose based on your budget and technical needs. Consider factors like server control, pricing, and support to find the perfect host for your Flask application.
Does Flask Need A Web Server?
Flask requires a web server for production deployment. It includes a built-in server for development and testing. Use a robust server like Gunicorn or uWSGI for production. Proper server configuration ensures security and performance.
Conclusion
Hosting a Flask web app is simpler than it seems. By following the steps, your app will run smoothly online. Start by setting up your environment. Next, configure your server carefully. Deploy your app using tools like Docker or Heroku.
Test everything to ensure it works perfectly. Troubleshoot any issues early. Keep learning and improving your skills. With practice, hosting becomes easier. Your Flask app can now reach many users. Share your web app with the world confidently. It’s a rewarding experience that boosts your web development journey.
Happy hosting!


