
Are you ready to launch your website but feeling overwhelmed by the technicalities of web hosting and DNS setup? Setting up Namecheap web hosting DNS might seem daunting, but with the right guidance, it’s a straightforward process.
Imagine the satisfaction of seeing your website live, accessible to anyone around the world. By following a few simple steps, you can achieve this. In this guide, we’ll walk you through each step, ensuring you have a seamless experience and avoid common pitfalls.
So, let’s dive in and get your website up and running smoothly!
Credit: www.hostinger.com
Getting Started With Namecheap
First, go to the Namecheap website. Click the Sign Up button. Fill in your details. Use a valid email address. Choose a strong password. Agree to the terms and conditions. Click Create Account. Check your email for a confirmation link. Click the link to verify your account. You’re now ready to use Namecheap.
Log into your Namecheap account. Enter your username and password. Click the Login button. You will see your dashboard. The dashboard shows your domains and services. It’s easy to navigate. Look for the Domain List on the sidebar. This is where you manage your domains.
Credit: www.namecheap.com
Choosing The Right Hosting Plan
Choosing a hosting plan can be simple. Shared hosting is a good start. It is cheap and easy to use. Many websites share one server. This keeps costs low. It is perfect for small sites or blogs. You get unlimited bandwidth and storage. But the speed might be slow if too many sites use it.
VPS hosting gives more power and control. It is like having your own part of a server. It is faster than shared hosting. But costs more. Good for medium-sized sites. Dedicated servers are the best. You get a whole server to yourself. High speed and great security. Ideal for big sites. But it is the most expensive option. Choose wisely based on your needs.
Domain Registration Process
Choose a short and simple name. Avoid using numbers and hyphens. Make sure it is easy to spell. A good name is easy to remember. Check if your name is available. You can use Namecheap’s search tool. This tool helps find available names. Choose a name that fits your website’s theme.
Keep your personal details safe. Use domain privacy services. These services hide your information. They protect your name, address, and phone number. Privacy services cost a small fee. But they offer valuable protection. Protecting your data helps prevent spam and unwanted contacts.

Credit: thedigitalmarketingprofessor.com
Configuring Dns Settings
DNS stands for Domain Name System. It helps connect a domain to a server. Imagine DNS as the phonebook of the internet. It translates domain names to IP addresses. Without DNS, browsers can’t find websites. It’s vital for website operation. Every domain has its own DNS settings.
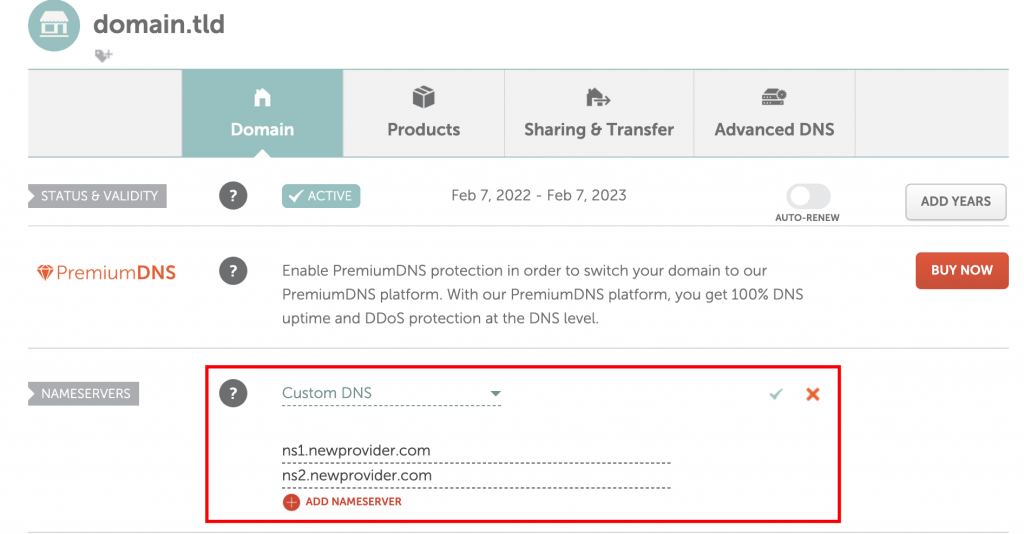
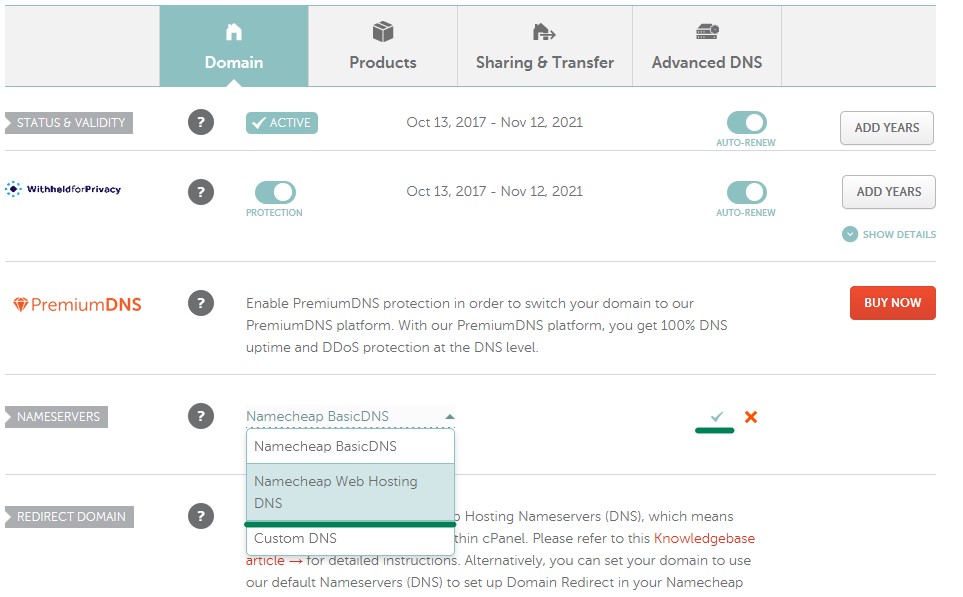
First, log into your Namecheap account. Find the domain you want to manage. Click on “Manage” next to the domain. Look for the DNS tab in the dashboard. This is where you change DNS settings. You might see options like CNAME and A Record. These are types of DNS records. Set them to point to your server’s IP.
Setting Up Custom Dns Records
Creating A Records helps your domain point to an IP address. This makes your website visible online. Log into your Namecheap account. Find the DNS settings. Enter the IP address in the A Record section. Save changes.
CNAME Records are for aliases. Use them for subdomains like “www” or “mail”. Instead of an IP, it points to another domain name. Enter the alias in the CNAME section. Save changes to update the records.
MX Records direct emails to your mail server. These are important for receiving emails. Enter the mail server name in the MX section. Save the changes after inputting the priority value.
TXT Records hold text data. They verify domain ownership and improve security. Add the required text in the TXT section. Save your updates to make it live.
Testing And Verifying Dns Changes
Setting up Namecheap web hosting DNS involves configuring domain settings for effective site management. Ensure DNS changes are tested and verified for smooth website performance. Proper setup guarantees your site is accessible and functions correctly across the internet.
Using Dns Propagation Tools
DNS changes need time to update. This process is called propagation. It might take a few hours or even days. To check the status, use DNS propagation tools. These tools show if the changes are live. Enter your domain name. You can see if it updates globally. If it doesn’t, just wait a bit longer.
Troubleshooting Common Issues
Sometimes, things don’t work as planned. Errors can occur when DNS records are incorrect. Double-check your records in the DNS settings. Ensure each detail is correct. Another issue could be cache. Clear your browser cache to see real-time updates. If problems persist, contact your hosting support. They can guide you further.
Enhancing Security And Performance
Setting up Namecheap DNS improves security and performance. Begin by accessing your Namecheap account. Navigate to the “Domain List” section, select your domain, and choose “Advanced DNS” to configure records efficiently. Proper DNS settings enhance website speed and safeguard against threats.
Implementing Ssl Certificates
SSL certificates keep websites safe. They make sure data is secure. Namecheap offers easy ways to get SSL certificates. First, log into your Namecheap account. Find the SSL Certificates section. Choose the type you need. Fill in the required details. Finally, complete the purchase. Once installed, users see a padlock in their browser. This means the site is safe.
Optimizing Dns Performance
A fast DNS makes websites load quickly. Use Namecheap’s DNS settings to improve speed. Go to your domain’s DNS settings. Change the TTL value to a lower number. This ensures faster updates. Use Namecheap’s Premium DNS for better performance. It offers more features. These steps help your site work better. Users enjoy a smoother experience.
Managing Dns For Multiple Domains
Keeping your domains organized is important. Use a clear system for your DNS settings. This helps you find things fast. Make a list of all your domains. Write down their settings. This can be in a notebook or on your computer. Make sure each domain has its own page or section. This will keep things neat. When settings change, update your list. This avoids confusion later.
Switching between domains should be easy. Go to your Namecheap account. Click on “Domain List” in the sidebar. You will see all your domains. Click the domain you want to manage. Now, you can change its DNS settings. Always double-check which domain you are working on. Mistakes can happen if you are not careful. Save your changes before moving to another domain.
Frequently Asked Questions
How To Setup Dns With Namecheap?
Login to Namecheap, go to “Domain List,” select your domain, click “Manage,” then “Advanced DNS. ” Add or edit DNS records as needed. Save changes to update DNS settings.
How To Point To Basic Dns Namecheap?
Log in to your Namecheap account. Navigate to “Domain List” and select your domain. Click “Manage,” then choose “Advanced DNS. ” Input your DNS settings and save changes.
How Do I Setup A Dns For My Website?
Log into your domain registrar’s account. Access DNS settings. Add A records pointing to your server’s IP. Save changes to update.
Is Namecheap Basic Dns Free?
Yes, Namecheap Basic DNS is completely free. It provides reliable DNS services for your domain. Use it to manage DNS settings without additional costs. This service ensures your website remains accessible. Enjoy seamless domain management with Namecheap’s free Basic DNS.
Conclusion
Setting up Namecheap DNS is simple and quick. Follow the steps carefully. Double-check each detail. Ensure the nameservers are correct. Wait for changes to take effect. It may take up to 48 hours. Keep your domain and hosting information handy.
It helps in troubleshooting. Enjoy your site’s improved performance. Reliable DNS settings boost site access. Visitors appreciate fast and stable connections. Remember, practice makes perfect. Try it out, and gain confidence. Your website deserves seamless operation. With Namecheap DNS, you can achieve it.
Make your online presence stronger and more reliable.


