
Are you looking to host your Web API in a Windows Service but not sure where to start? You’re in the right place!
Hosting a Web API in a Windows Service can be a game-changer, offering you the flexibility and reliability you need for your applications. Imagine having your API run seamlessly in the background, providing uninterrupted service to your users. With our step-by-step guide, you’ll discover how easy it is to set up and manage your Web API in this robust environment.
Dive into this article to unlock the secrets of efficient hosting, ensuring your API is always ready to serve your needs and those of your users. Don’t miss out on these insights that could transform the way you manage your Web API!
Benefits Of Hosting Web Api In Windows Service
Hosting Web API in a Windows Service offers many benefits. It runs in the background, always ready to serve. This means no need for a logged-in user. Your API can work day and night without stopping. This setup provides better security and control.
Windows Services can start automatically. This ensures your API is up after reboots. No manual start needed. Resource usage is also efficient. Windows Services use less memory and CPU. This helps your computer run smoothly.
Debugging is easier. Windows logs help find issues quickly. Developers love this feature. It saves time and effort. Overall, using Windows Service for hosting is a smart choice.
Setting Up The Development Environment
Visual Studio is essential for creating web APIs. It’s a tool for building applications. Download and install it on your computer. .NET Framework is also needed. This helps run your application. You can get it from the Microsoft website. Git is useful for version control. It helps track changes in your code. Install Git from its official site.
Ensure your computer has enough space. At least 5 GB of free space is good. Make sure your operating system is updated. This helps avoid errors. Check your internet connection. A stable connection is important. It makes downloading tools easier. Set your system environment variables. This helps your tools work together.
Creating A Web Api Project
Start with Visual Studio. Open it on your computer. Click on “Create New Project”. Choose “ASP.NET Core Web Application“. Name your project. Pick a folder to save it. Click “Create”. Choose “API” when asked for a template. Click “Create” again. Your project is ready now.
API endpoints let apps talk. Open the Controllers folder. Add a new file. Call it “MyController.cs“. Inside, write simple code. Use [HttpGet] for getting data. Use [HttpPost] for sending data. Each one is an endpoint. Test your endpoints. Make sure they work well.
Building The Windows Service
Hosting a Web API in a Windows Service allows seamless integration with system processes. This setup provides reliable background execution, ensuring your API runs independently of user sessions. Efficient management of resources and consistent performance are key benefits.
Project Setup
Start by creating a new project in Visual Studio. Choose the Windows Service template. Name your project something easy to remember. This will help you find it later. Set the target framework to .NET Framework 4.5 or later. This ensures compatibility.
Add necessary references to your project. Include System.ServiceProcess and System.Configuration. These libraries are crucial for your service.
Servicebase Class Implementation
Create a class that inherits from ServiceBase. This is the main part of your service. Override the OnStart method. This method starts your service. Use it to initialize resources. Override the OnStop method too. This method frees resources when stopping.
Remember to include error handling. This keeps your service running smoothly. Good error handling prevents crashes. Test your service thoroughly to ensure everything works.
Integrating Web Api With Windows Service
OWIN helps in hosting Web API in a Windows Service. It provides a lightweight and flexible solution. You can self-host your API easily. Ease of integration is a key benefit. No need for IIS. It’s perfect for small applications. OWIN supports multiple protocols. HTTP is one of them. This makes it suitable for Web APIs. You can start, stop, and restart your service. All without affecting other applications. Configuration is simple. Use Startup.cs for this. It helps initialize your service. OWIN is a good choice for developers. It simplifies the process of hosting Web API.
Configuring the service startup is crucial. This involves setting up Startup.cs. You define routes and middleware here. It acts as a central configuration point. It is important to use WebApp.Start. This starts the OWIN server. You need to specify the listening address. Also, configure logging. This helps in tracking requests. Error handling is also essential. Make sure to include it. Proper configuration ensures smooth operation. It helps in handling client requests effectively. Keep your setup simple and clear. This avoids confusion. A well-configured service is reliable.
Credit: www.c-sharpcorner.com
Installing And Running The Service
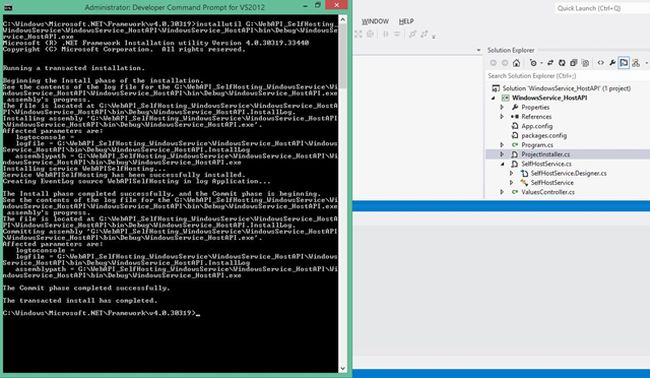
The InstallUtil Tool helps set up services. First, open the command prompt.
Navigate to the folder with your service file. Type the command: InstallUtil.exe YourService.exe.
Press enter. This command starts the service installation process.
Look for messages in the command prompt. They tell you if the installation worked.
If you see “Success”, the service is installed. If not, check the error messages.
Command line helps you control the service. Use net start YourServiceName
to start the service. To stop it, type net stop YourServiceName.
These commands are simple. They help you manage the service easily.
If you need to delete, use sc delete YourServiceName.
Remember to replace YourServiceName with your actual service name.
Always check for messages after each command.
Testing The Hosted Api
Postman and Curl are great tools for testing. Send requests easily. Postman has a simple interface. Curl uses command line. Both can check if your API works. They show response data clearly. Make sure your API is running. Check for errors in responses. Look for status codes. Ensure you get 200 OK. If not, review your setup. Try different request types. Test GET, POST, PUT, DELETE. Verify all endpoints. Confirm data is correct.
Debugging Common Issues
Errors happen often. Debugging is important. Check your logs first. Logs show errors and warnings. Look for missing files. Make sure all paths are correct. Verify your network settings. Ensure firewall allows traffic. Double-check your code. Small mistakes cause big issues. Restart your service if needed. Sometimes a reset helps. Test your API again. Confirm fixes work. Ask for help if stuck. Reach out to forums or groups. Many people face similar problems.
Security Considerations
Authentication keeps your data safe. It checks who is accessing the API. Use passwords or tokens for users. Tokens are like keys. They open the door to your API. Without them, no entry. Keep these tokens secret. Never share them.
Data encryption is like a secret code. It protects information while traveling. Use SSL for encrypting data. SSL stands for Secure Sockets Layer. It makes data unreadable to outsiders. Only intended users can read it. Choose strong encryption methods. Weak methods are easy to break.
Best Practices For Deployment
Setting up monitoring tools can help track performance. Use logging to record events. Logs show errors and help find issues. Look at logs regularly. Check for unusual activity. This keeps the service running well. Good logs are clear and detailed. Use tools like Event Viewer. It shows logs quickly.
Plan updates carefully. Ensure the service is not interrupted. Use backup systems before updates. This protects data if something goes wrong. Test updates in a safe environment first. Ensure all features work after updates. Schedule upgrades during low-traffic times. This minimizes impact on users. Inform users about changes. Clear communication keeps them happy.
Credit: github.com

Credit: learn.microsoft.com
Frequently Asked Questions
How To Run Web Api As Windows Service?
Convert your Web API to a Console Application. Use a service wrapper like NSSM to run it as a Windows Service. Ensure proper configuration and testing for seamless operation.
How Do I Host My Web Api?
Host your Web API on platforms like AWS, Azure, or Google Cloud. Use a server or cloud service. Deploy using containers like Docker for scalability. Ensure proper configuration and security measures. Consider using a hosting provider that supports your preferred programming language and framework.
How To Host Web Api Without Iis?
Host Web API using Kestrel, a cross-platform web server. Configure it in the application settings. Deploy using Docker or self-contained. NET applications. Use reverse proxy like Nginx or Apache for better performance. Ensure your firewall settings allow external access to your API.
How To Host Asp.net Core Web Application On Windows Service?
Host your ASP. NET Core app on Windows Service by creating a Worker Service project, then install the app using PowerShell commands.
Conclusion
Hosting a Web API in a Windows Service offers many benefits. It ensures stability and reliability. Your applications can run smoothly without interruptions. Set up is straightforward and requires minimal effort. This approach supports seamless integration with existing systems. It provides a secure environment for your data.
Plus, it helps maintain consistent performance levels. So, consider using Windows Service for your Web API needs. It’s a practical choice for developers seeking efficient solutions. Start today and see the difference it makes in your projects.


