
Are you struggling with adding images to your WordPress theme? You’re not alone.
A captivating image can transform your website, making it more engaging and visually appealing. But figuring out how to seamlessly insert that perfect image can be a challenge. Whether you’re a seasoned blogger or a WordPress novice, mastering this skill is essential for enhancing your site’s design and user experience.
Imagine the impact that a well-placed image can have on your reader’s journey, capturing their attention and conveying your message more effectively. In this guide, you’ll discover simple, step-by-step instructions to effortlessly insert images into your WordPress theme, ensuring that your content not only looks great but also resonates with your audience. Ready to elevate your website’s visual appeal? Let’s dive in and unlock the secrets to stunning imagery on your WordPress site.
Choosing The Right Image
High-resolution images look clear. Blurry images are not good. Choose images with high quality. They make your website look professional. Good quality images attract visitors.
JPEG and PNG are common formats. JPEG is smaller. It is good for photos. PNG is larger. It is good for logos. Keep image sizes small. Large files slow down your site. Optimize images for quick loading. This helps improve site speed.
Credit: codex.wordpress.org
Preparing Your Image
Make images small. Big files take long to load. Use tools like Photoshop. These tools help reduce image size. Keep it clear. Don’t lose quality. JPEG is good for photos. PNG is better for logos. Use GIF for animations. Choose the right format. This helps your site run fast.
Name files clearly. Use simple names. Names should show what the image is. Use dashes not spaces. Example: “red-car.png”. Keep files in one folder. Make it easy to find. Use folders for categories. This keeps your site neat. Organizing helps you find files fast.
Uploading To The Media Library
First, find the WordPress dashboard. Click on ‘Media’ in the left menu. This opens the Media Library. You will see all your uploaded files here. You can view, edit, or delete them. Use the search bar to find specific files.
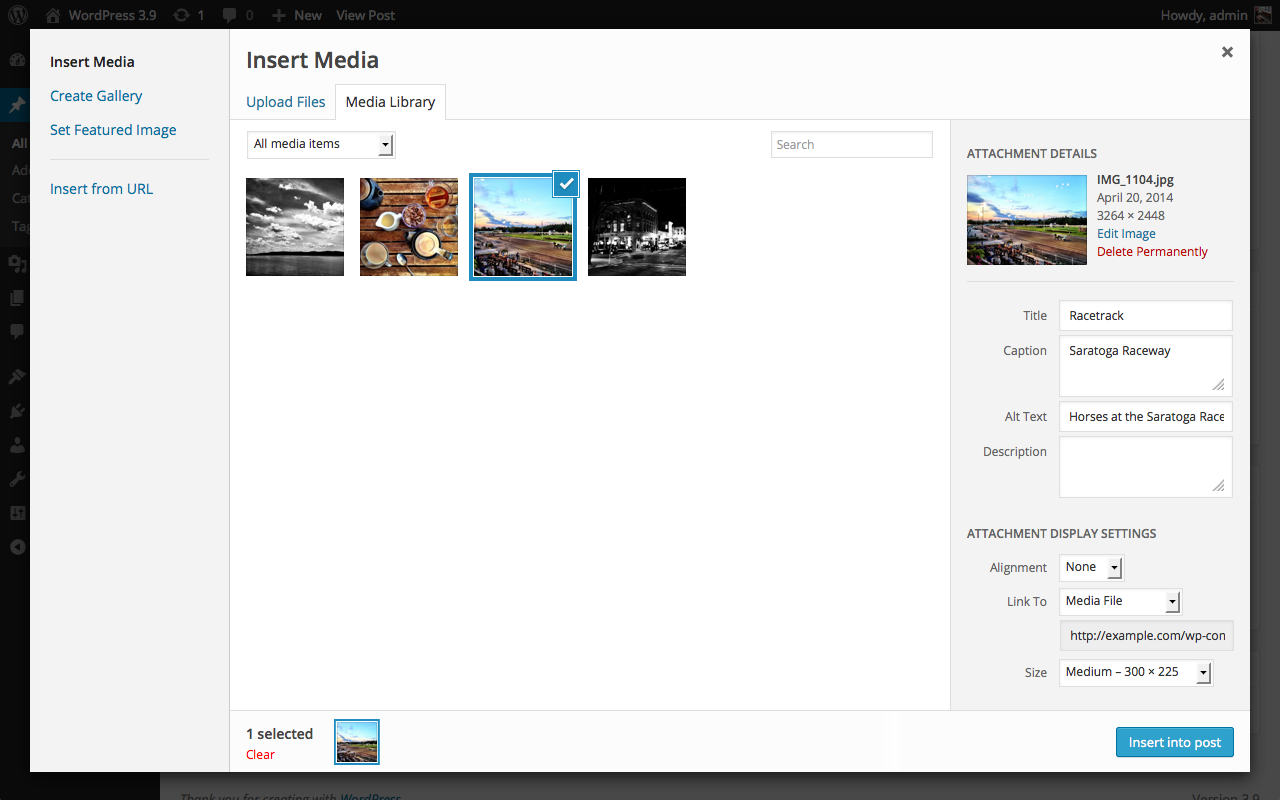
To add a new image, click ‘Add New’. Choose the file from your computer. It will start uploading. After upload, you can see the image in the library. Click on the image to edit details. You can change the title, caption, or alt text. These help users understand the image better.
Inserting Images Into Posts And Pages
WordPress Editor makes adding images easy. Click the “Add Media” button. Choose an image from your library or upload a new one. After selecting, click “Insert into post”. Your image appears where your cursor is.
To align your image, click it. You’ll see alignment options: left, center, and right. Choose one that fits your layout. Resizing is simple too. Click the image and drag the corners to make it bigger or smaller.
For precise size, click the “Edit” icon. Enter your desired dimensions. Save changes to update your post. These steps help your images look neat and fit well.
Adding Images To Theme Files
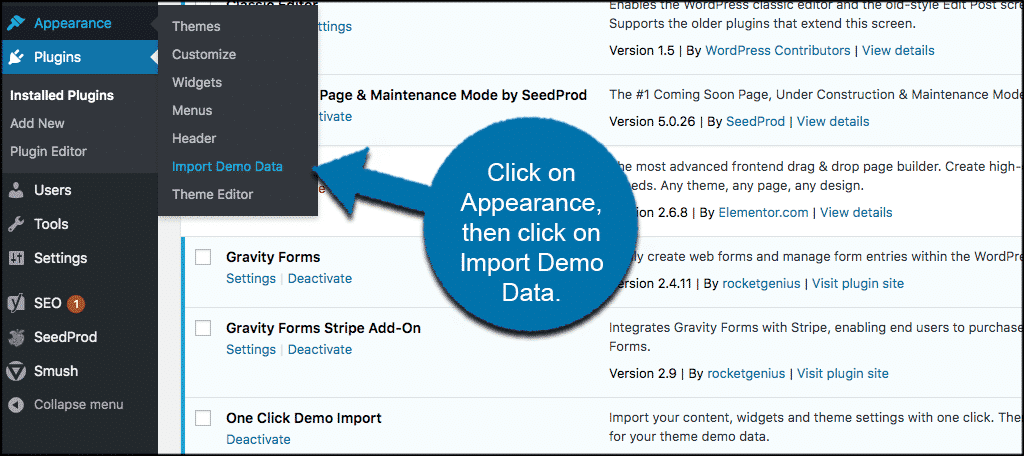
First, find your theme files. They are in the WordPress dashboard. Go to Appearance and then click Theme Editor. Here, you can see all the files. Each file has a special job. Look for files named header.php or footer.php. These are common places to add images. Be careful when changing these files.
Use HTML to add an image. Write . This code will show your image. Use the alt tag to describe your image. It helps people who can’t see the image. To add PHP, use php echo get_template_directory_uri(); ? before your image URL. This helps to find your image file in the theme folder.
Credit: www.greengeeks.com
Using Image Widgets
Easily enhance your WordPress theme by inserting image widgets. Navigate to the widgets section in the dashboard. Drag and drop the image widget to your desired location. Upload your image and save changes. This simple process allows for quick and effective visual customization.
Adding Widgets To Sidebars
To add an image, first find the Widgets section in your WordPress dashboard. Select the Image Widget from the list. Drag it to your desired sidebar. This is where you want your image to appear. You can also use the Add Widget button. This places the widget in the sidebar automatically.
Configuring Widget Settings
Click on the Image Widget to open its settings. You will see options to add an image. Use the Upload button to choose an image from your computer. You can also select from the Media Library. Make sure the image is clear and the right size. Add a title if needed. This helps people understand the image better. Save the changes when done. Now, your image is part of the theme!
Image Seo Best Practices
Alt text helps search engines understand images. Use clear and simple words. Describe the image in a few words. Make it relevant to the content. Alt text aids users who can’t see the image. It tells them what the image shows. This helps in better accessibility.
Image size affects load times. Smaller images load faster. Use tools to compress images. Keep quality high but file size low. This helps your site load quicker. Fast sites keep visitors happy. They also rank better in search engines.

Credit: tonjoostudio.com
Troubleshooting Common Issues
Upload errors can be frustrating. Check your file size first. Files over the limit won’t upload. Reduce the size using tools. Sometimes, the file type causes issues. Ensure it’s a supported type like JPEG or PNG. Check your internet connection too. A poor connection leads to errors. Lastly, verify your WordPress permissions. You need proper access.
Display problems can be tricky. Images might not show correctly. First, check the image URL. Ensure it’s correct. Then, inspect your theme settings. Sometimes settings hide images. Adjust the theme layout if needed. Image size affects display too. Use responsive design for better viewing. If problems persist, clear your browser cache. It might help.
Frequently Asked Questions
How Do I Upload An Image To WordPress?
To upload an image, navigate to the WordPress dashboard. Click on ‘Media’, then ‘Add New’. Select your image file from your computer. Once uploaded, you can insert it into posts or pages using the WordPress editor.
Can I Add Images To My WordPress Theme?
Yes, you can add images directly to your WordPress theme. Use the theme’s customization settings or edit theme files. Ensure images are optimized for faster loading and better performance.
What Image Formats Are Supported By WordPress?
WordPress supports popular formats like JPEG, PNG, and GIF. These formats are optimal for web use. JPEG is great for photographs, PNG for transparency, and GIF for animations.
How To Insert Images In WordPress Posts?
To insert images, use the WordPress editor. Click on the ‘Add Media’ button above the text editor. Select an image from your library or upload a new one.
Conclusion
Adding images to a WordPress theme is simple. Follow the steps outlined. Practice makes the process smoother. Images enhance your website’s appeal. They attract visitors and keep them engaged. Remember to choose high-quality images. Compress them for faster loading times.
This improves user experience and SEO rankings. Explore different image placements. Find what works best for your theme. Always update your media library. Keep your website fresh and lively. With practice, you’ll become more comfortable. Your WordPress site will look professional.
Visitors will enjoy their experience. Happy blogging!


