
Are you ready to transform your WordPress website with just a few clicks? Importing a demo theme is one of the quickest ways to give your site a professional and polished look without starting from scratch.
Imagine having a beautifully designed website layout ready for you to customize, saving you hours of work and frustration. This guide is your key to unlocking that potential. You’ll learn how to effortlessly import a demo theme into WordPress, turning your vision into reality faster than you thought possible.
Whether you’re a seasoned webmaster or a WordPress newbie, this process is straightforward and incredibly rewarding. Stick around, and you’ll soon have a stunning website that captures attention and keeps your visitors coming back for more. Ready to dive in? Let’s get started!
Choosing The Right Theme
Effortlessly importing a demo theme in WordPress can enhance your site’s design. Begin by accessing the WordPress dashboard. Navigate to ‘Themes,’ select ‘Import Demo Data,’ and follow the prompts. This process ensures your site looks professional and appealing, with minimal effort.
Researching Theme Options
Explore many themes available online. Each theme has unique features. Focus on themes that fit your website style. Read reviews to know what others think. Look for themes with regular updates and support. Ensure the theme meets your design needs. Choose themes that are easy to use. Avoid themes with complicated settings. Check if the theme has good ratings.
Evaluating Compatibility
Confirm the theme works with your WordPress version. Compatibility ensures smooth operation. Check plugin compatibility. Not all themes work with every plugin. Ensure you can use important plugins. Some themes may cause issues. Choose themes that are responsive. They should work well on phones and tablets. A responsive theme improves user experience. Test the theme on different devices. Make sure it looks good everywhere.
Preparing For Import
Backing up is crucial. It saves your site’s data. Use tools like UpdraftPlus or BackupBuddy. These tools make it easy. They store your data safely. Mistakes happen. Backups protect your work.
Some themes need plugins. They help in theme setup. Check your theme’s documentation. Install plugins like Elementor or WooCommerce. They add features to your site. Plugins improve design and function. Always check for updates. Keep your plugins current.
Importing The Demo Content
Easily import demo content in WordPress by navigating to the theme’s settings panel. Select the demo content option, then click “Import. ” This process quickly sets up your website to match the theme’s sample design, providing a seamless start to building your site.
Accessing Theme Settings
First, log into your WordPress dashboard. Next, navigate to the Appearance tab. Click on Theme Settings. This is where you will find the options to import demo content. Make sure the theme you want is active. Otherwise, you won’t see the correct settings. Look for an option labeled Import or Demo Content. This will take you to the next step.
Using The Import Tool
Find the Import Tool on your theme’s settings page. Click on it to start the process. Some themes might need a plugin to import demo content. If so, a prompt will guide you. Follow the on-screen instructions carefully. Choose the demo you want to import. Then, click the Import button. Wait for the process to finish. Do not close your browser during this time. Once done, check your site. Everything should look like the demo.

Credit: wordpress.org
Customizing After Import
Adjusting layouts is fun and easy. Start by choosing your favorite layout. Try different options to see what fits best. Move sections around if needed. You can change the size of pictures and text areas. Make sure everything looks neat.
Next, focus on modifying colors and fonts. Pick colors that match your brand. Try different shades to find the best look. Fonts should be easy to read. Test different fonts to see which one looks best. Make your website look just right.
Troubleshooting Common Issues
Importing a demo theme in WordPress can be tricky. Ensure you have the right plugins installed and activated. Double-check your internet connection to prevent interruptions during the import process.
Resolving Import Errors
Import errors can be tricky. Sometimes, your internet might be slow. Check your connection first. Make sure the theme file is not corrupted. If it is, download it again. Also, check if your server has enough space. Not enough space can stop the import. Increase the space if needed. Another reason could be a plugin conflict. Disable all plugins and try again. Once the import is successful, enable the plugins one by one. This will help you find the problem plugin.
Fixing Display Problems
After import, the theme might look wrong. Check the WordPress version first. It should match the theme requirements. Update WordPress if needed. Check your theme settings too. Sometimes, settings get reset after import. Restore or adjust them as needed. Also, clear your browser cache. A full cache might show old data. If images don’t show, check the media library. If missing, upload them again. If layout is off, check CSS settings. Correct any wrong styles.
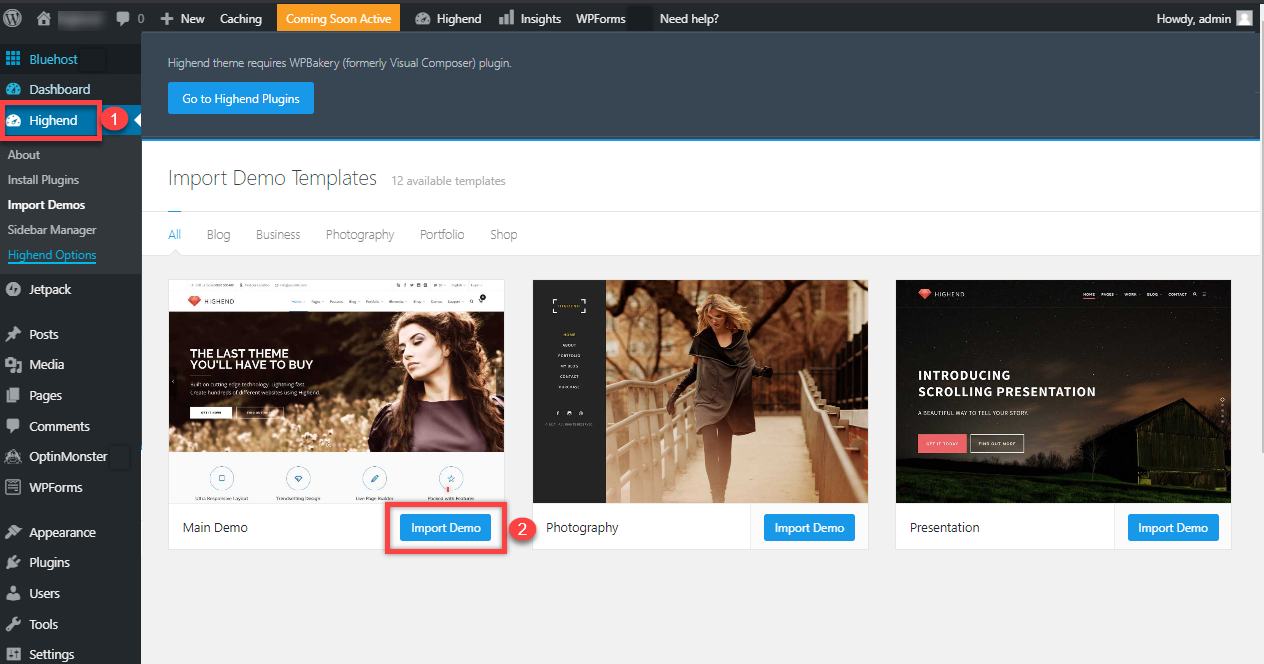
Credit: www.bluehost.com
Maintaining Your Imported Theme
Importing a demo theme into WordPress can simplify your website setup. Start by navigating to your WordPress dashboard. Use the theme’s documentation for guidance on importing settings and customizing features. This process helps you achieve a professional look with minimal effort.
Regular Updates
Keep your theme updated for best performance. Updates fix bugs and add new features. Check for updates monthly. Updating is easy and quick. Visit the theme settings page. Click the update button. Your site stays secure and runs smoothly.
Best Practices For Security
Security is important for your website. Use strong passwords for your site. Change passwords every few months. Enable two-factor authentication. This adds an extra security layer. Always install trusted plugins. Unverified plugins can harm your site. Back up your site often. This protects your data from loss.
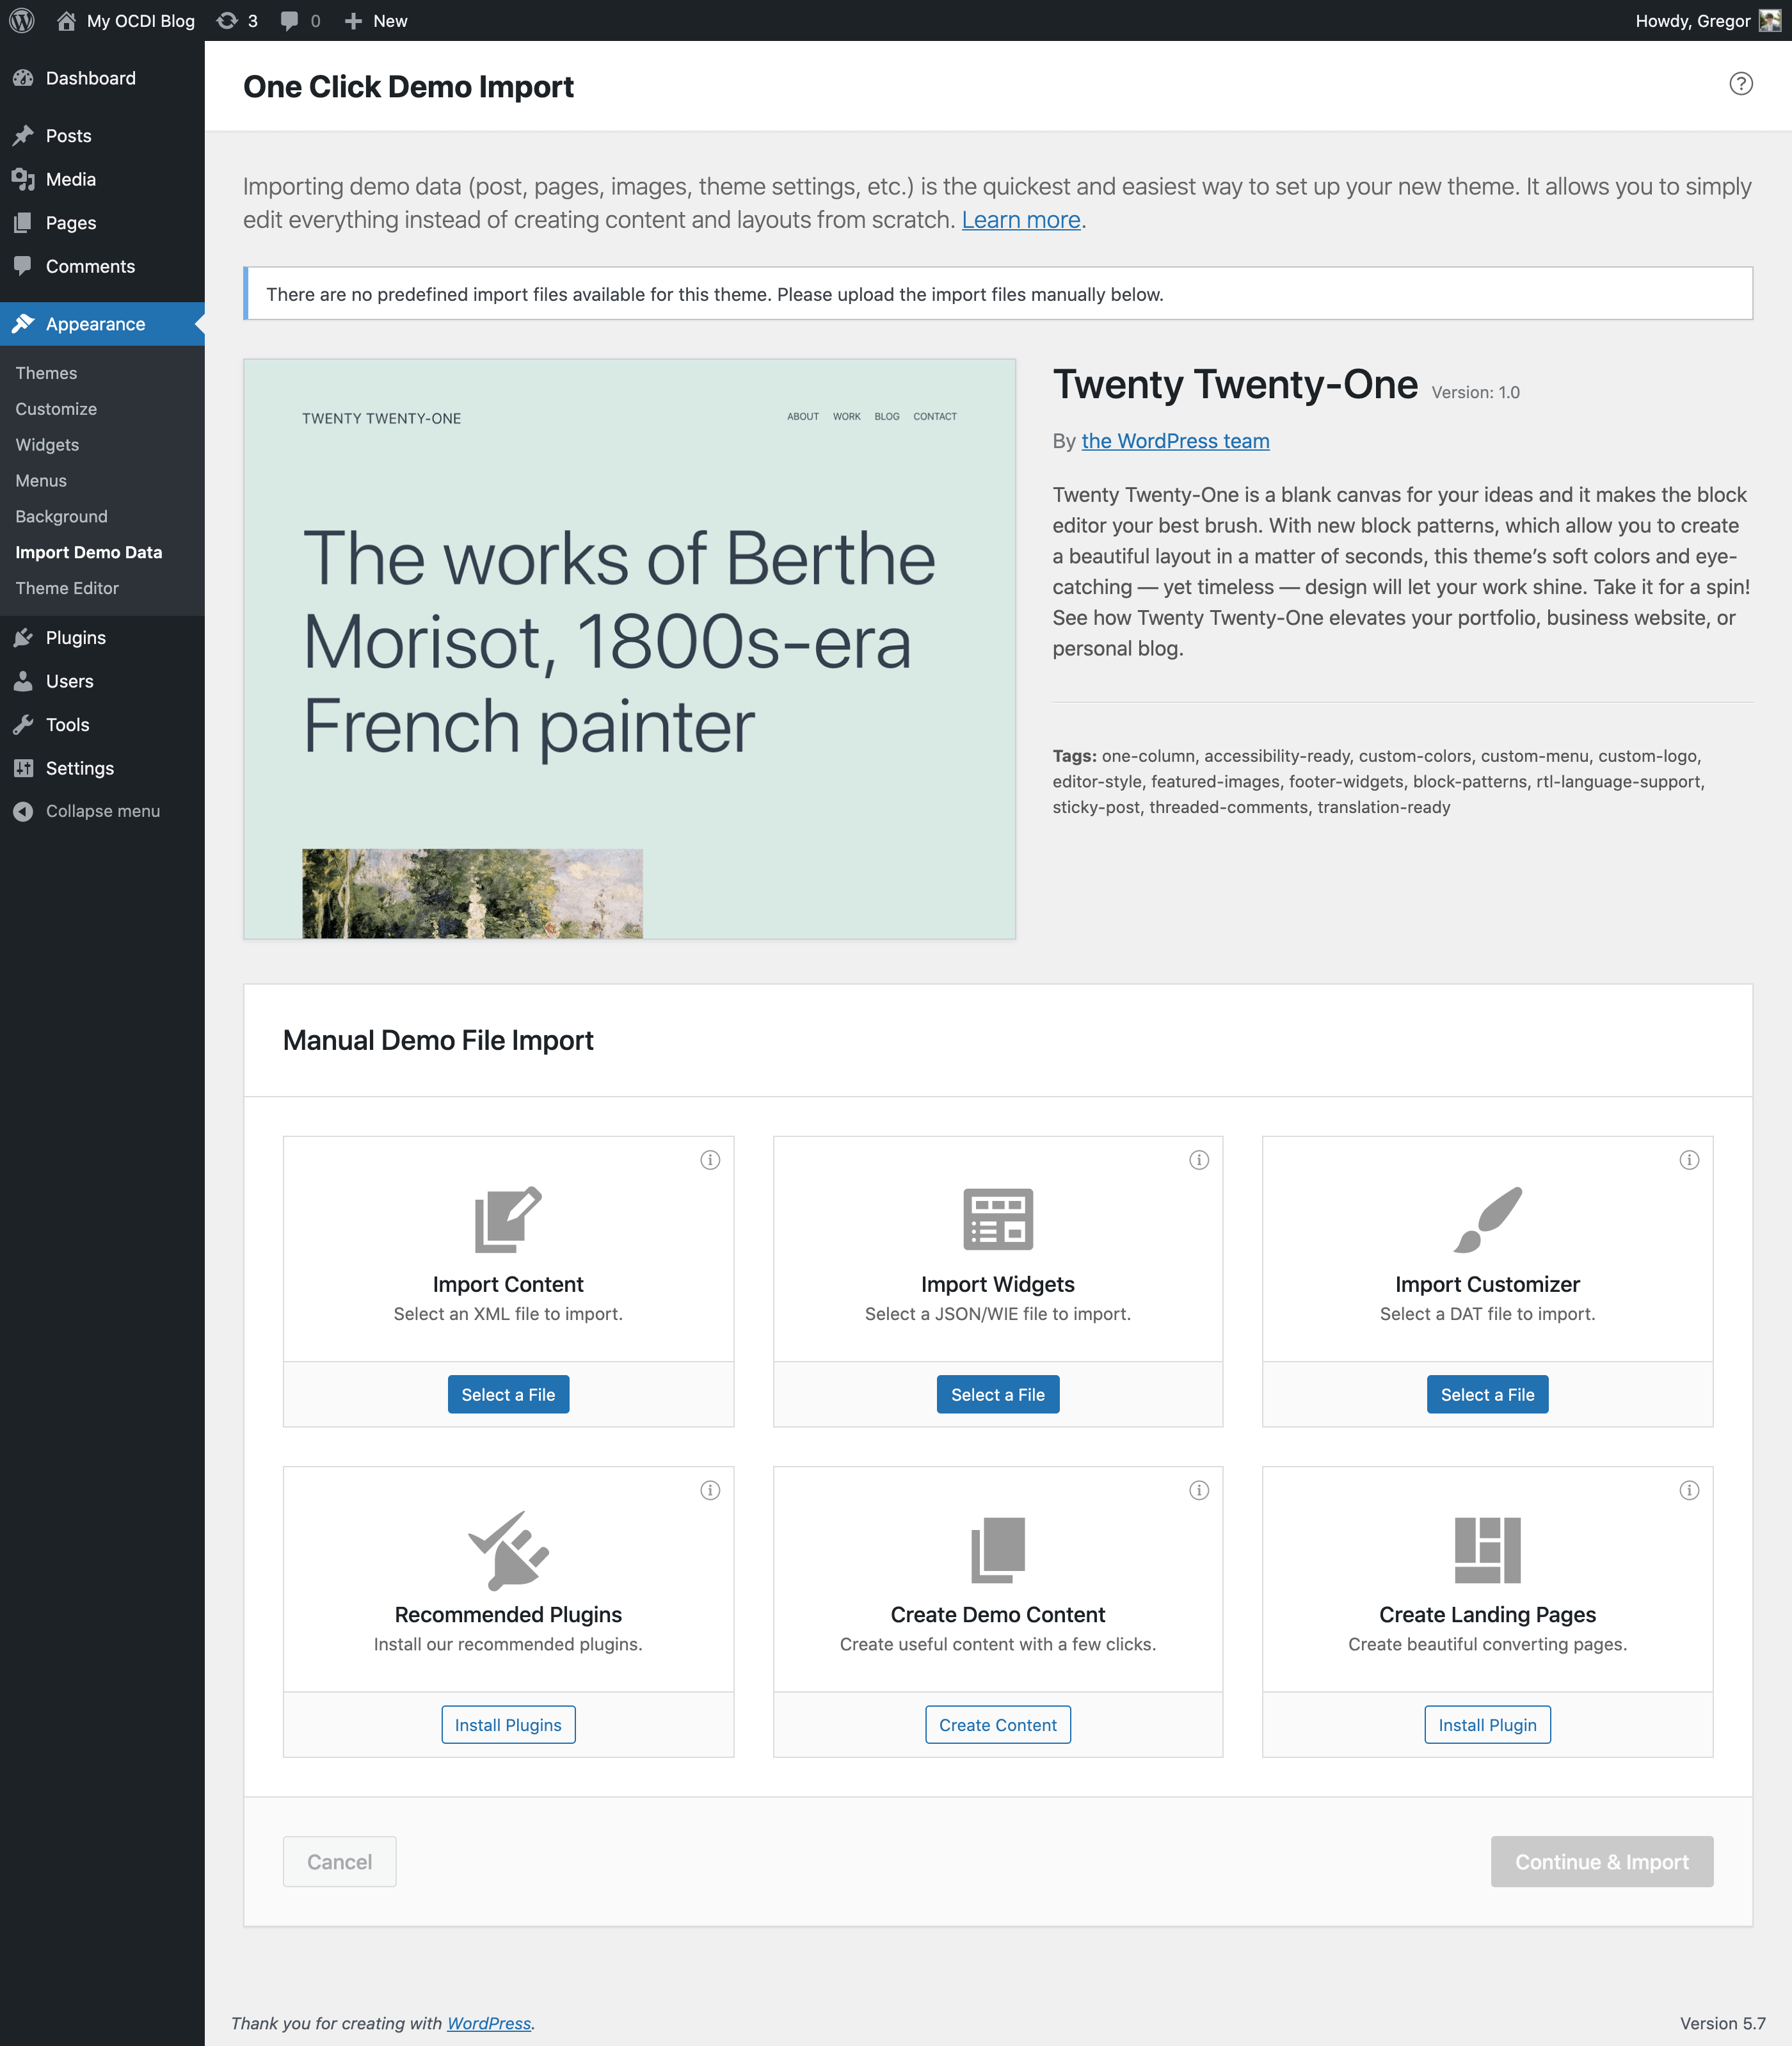
Credit: wordpress.org
Frequently Asked Questions
How To Import A Demo Theme In WordPress?
To import a demo theme in WordPress, first install and activate your chosen theme. Then, navigate to the theme’s options panel or demo importer section. Select your desired demo content and click “Import. ” Wait for the process to complete, then customize the imported demo to fit your needs.
Why Is My Demo Import Not Working?
Your demo import might fail due to server limitations or plugin conflicts. Ensure your server meets the theme’s requirements. Deactivate any conflicting plugins. Check your internet connection for stability. If issues persist, consult the theme’s support or documentation for troubleshooting steps.
Can I Import Demo Content Multiple Times?
Yes, you can import demo content multiple times. However, it may cause duplicate content or increased database size. It’s recommended to reset your WordPress installation before re-importing. Use a database reset plugin for a fresh start. Always back up your site before making significant changes.
Does Importing A Demo Theme Affect Seo?
Importing a demo theme can temporarily affect SEO if it includes duplicate content. Ensure you customize the content to reflect your brand. Remove or rewrite any placeholder text. Optimize images and metadata to improve SEO. Regularly update your site with unique, relevant content for better rankings.
Conclusion
Importing a demo theme in WordPress simplifies website setup. It provides a ready-made design, saving you time. Follow the steps carefully for a successful import. Always check theme documentation for specific instructions. You might face some challenges. But don’t worry.
Solutions are often easy to find online. Remember, practice makes perfect. Experiment with different themes to learn more. This will enhance your WordPress skills. Soon, you’ll create impressive websites effortlessly. Enjoy the process and keep exploring new themes. Happy designing!


