
Are you looking to enhance your WordPress site with a sleek and functional button? Whether you’re aiming to boost user interaction, drive conversions, or simply make navigation easier, adding a button to your WordPress theme can make a significant impact.
Imagine your visitors being effortlessly guided to the right pages, or your calls-to-action standing out with just the right amount of flair. In this guide, you’ll discover the straightforward steps to seamlessly integrate buttons into your WordPress theme. No coding expertise?
No problem. With our easy-to-follow instructions, you’ll be able to elevate your site’s design and functionality in no time. Ready to give your website that professional edge? Let’s dive in and explore how you can transform your WordPress theme with just a click of a button.
Choosing The Right Location
Header and Footer Areas are great spots for buttons. They catch the eye. Many themes have easy options. Just go to the theme settings. You can add a button there. In the header, it’s good for a main call-to-action. In the footer, use it for extra links. Both places help in better navigation.
Sidebar Options offer another place. Sidebars are usually on the side of the page. They can hold buttons for quick links. This helps in better user engagement. It’s easy to add them using widgets. Just drag and drop in the sidebar area. Make sure the button is big enough to see.
Content Area Integration is a flexible option. Add buttons within your content. This can be in posts or pages. It helps guide readers. You can use a button to lead them to another page. This makes your site more interactive. Use a plugin if your theme doesn’t support this.
Creating A Custom Button
Adding a button using HTML and CSS is easy. First, use the tag. This creates a basic button. Next, style it with CSS. Change colors, shapes, and sizes. Use background-color for color changes. Set padding to adjust size. Use border-radius for rounded corners. These steps make your button look nice.
Buttons can be interactive with JavaScript. This means buttons can do more. They can show messages or open links. Use onclick to make buttons interactive. Write a function in JavaScript. This function tells the button what to do. With JavaScript, buttons become useful tools.
Using WordPress Plugins
Popular Button Plugins help add buttons easily. Easy to use and install. Some popular choices are MaxButtons and Buttonizer. These plugins offer many styles. You can find them in the WordPress plugin store. Each has unique features. Choose the one you like best.
Plugin Installation Process is simple. First, go to your WordPress dashboard. Find the Plugins section. Click “Add New.” Search for your chosen plugin. Click “Install Now” and then “Activate.” Your plugin is ready to use.
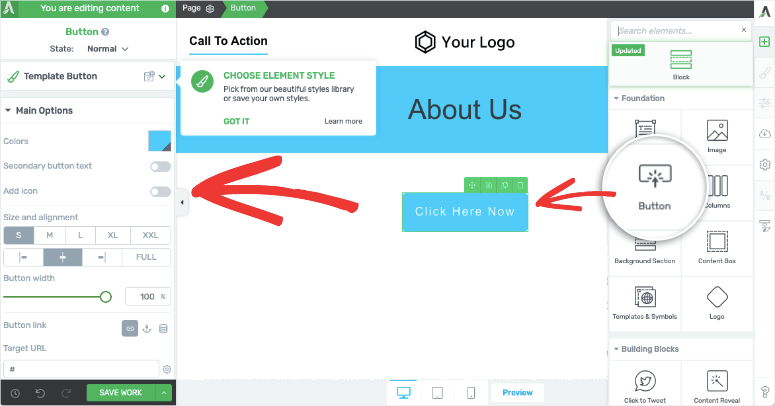
Customizing Plugin Buttons is fun. Open the plugin settings. Choose button styles and colors. Add text to your button. Make it look good. Preview changes before saving. Customize until you are happy with your button design.
Editing Theme Files
Accessing Theme Editor is easy in WordPress. Go to your dashboard. Find the Appearance section. Click on Theme Editor. This opens the theme files for editing. Always backup your files first. This keeps your original safe.
To modify PHP files, find the right file. Common files include header.php and footer.php. Locate the right file for your button. Use simple code to add buttons. Avoid complex changes.
Follow best practices for code changes. Always use a child theme. This keeps your changes safe. Don’t alter core files. This can break your site. Check for errors after changes. This ensures everything works. Save often to avoid losing work.
Implementing Shortcodes
Adding buttons to a WordPress theme using shortcodes is simple. First, generate the shortcode for your button design. Next, insert the shortcode into your page or post editor, and watch your button appear instantly on the site.
Understanding Shortcodes
Shortcodes are small code snippets. These snippets help add features. They are easy to use. You can put them in posts or pages. They simplify tasks in WordPress. You don’t need to write long code. WordPress reads shortcodes quickly. They make your site more dynamic. You can add buttons with shortcodes. Buttons are important for action. Shortcodes offer flexibility. They save time in design work.
Creating Custom Shortcodes
Making your own shortcode is simple. Start by adding functions in the theme. Use the function.php file. Define what your button does. You can choose button colors and size. Add text to the button. Use add_shortcode to register it. Your button is ready to use. Test it on a page. Adjust if needed. Custom shortcodes give you control. You can make many kinds of buttons.
Embedding Shortcodes In Pages
Embedding shortcodes is easy. Open the page editor. Add the shortcode in the text area. Use brackets like [your_shortcode]. Save and preview the page. Check how the button looks. Adjust the position if needed. Shortcodes blend well with text. They appear when you publish. You can update them anytime. Buttons help users take action. Shortcodes make pages interactive.
Credit: www.isitwp.com
Testing And Troubleshooting
Different browsers show websites in different ways. Test your button in Chrome, Firefox, and Safari. Also try Edge and Opera. Each browser has its own quirks. Check that your button looks good on all. Use online tools to test if you don’t have all browsers. This ensures a smooth experience for all users.
Many people use phones to browse. Ensure your button works on all devices. Use CSS media queries to make the button responsive. It should resize well on small screens. Check the button on tablets too. It should not look awkward. Keep the design simple and clean.
Sometimes, buttons do not click. This can be due to z-index issues. Make sure the button is on top. Broken buttons are often due to incorrect HTML tags. Check your code carefully. If the button does not show, it might be a CSS issue. Ensure the styles are correct.
Enhancing Button Functionality
Adding Animation Effects makes buttons look lively. Try adding a bounce or shake effect. This attracts attention to the button. You can use CSS for simple animations. JavaScript is good for complex effects. Keep animations short and smooth. Long animations can annoy users.
Linking to External Pages is easy. Use the button to open new tabs. Always use a target=”_blank” attribute. This helps users stay on your site. Make sure links are relevant. Irrelevant links confuse users. Check links regularly to ensure they work.
Incorporating Hover Effects improves user experience. Buttons change when hovered over. Add color change or shadow effect. This tells users the button is active. Use CSS to add hover effects. Keep changes subtle. Too much change can be distracting.

Credit: wordpress.stackexchange.com

Credit: themehunk.com
Frequently Asked Questions
How Do I Add A Button In WordPress?
To add a button, navigate to your WordPress dashboard. Use the ‘Customize’ option to edit your theme. Insert a button using HTML or a plugin. Customize its appearance using CSS. Preview changes before saving to ensure it aligns with your design.
Can I Customize Button Styles In WordPress?
Yes, you can customize button styles using CSS. Use the ‘Additional CSS’ section in the WordPress Customizer. Adjust color, size, and shape according to your design. Ensure styles are responsive for mobile users. Preview changes to check how they appear.
Which Plugin Helps In Adding Buttons?
Plugins like ‘MaxButtons’ and ‘Buttonizer’ help add and customize buttons easily. Install from the WordPress plugin directory. They offer user-friendly interfaces to tweak design and functionality. Ensure plugin compatibility with your theme to avoid conflicts.
Is Coding Necessary For Adding Buttons?
Coding isn’t necessary if using plugins. Plugins offer easy drag-and-drop features. However, for advanced customization, basic HTML and CSS knowledge might be helpful. Customize directly via the WordPress editor for more control over design.
Conclusion
Adding a button to your WordPress theme is simple. Follow these steps, and your website will shine. Buttons help guide users and improve navigation. They are essential for a user-friendly experience. Make sure your button stands out. Choose colors that match your theme.
Test your button on different devices. Ensure it works smoothly everywhere. This small change can make a big difference. Visitors will enjoy a seamless journey through your site. So, take action now and enhance your website’s appearance. Your site’s design will thank you.
Happy website building!


