
Are you looking to enhance your WordPress website without the risk of losing your customizations during updates? Creating a child theme could be the perfect solution.
Imagine having the power to tweak your site’s design and functionality while keeping the original theme intact. It’s like having a safety net that allows you to innovate without fear. In this guide, we’ll walk you through the simple steps to create a child theme in WordPress, with a special focus on using YouTube tutorials to make the process even easier.
By the end of this article, you’ll not only understand the “how-to” but also gain the confidence to apply these techniques to your own site. Ready to empower your WordPress experience? Let’s get started!

Credit: www.youtube.com
What Is A Child Theme?
A child theme is a type of theme in WordPress. It is like a copy of another theme. The original theme is called the parent theme. With a child theme, you can change the look of your site. The best part? You do not touch the parent theme. So, updates to the parent theme do not ruin your changes.
Child themes are great for customization. You can change colors, styles, and layouts. This way, your website looks unique. Also, it keeps your website safe. If the parent theme updates, your changes stay the same. This is why many people use child themes in WordPress. It is a smart and easy way to make your site special.
Benefits Of Using A Child Theme
Child themes keep your website safe. Updates don’t affect your changes. Original theme stays untouched. Customize without fear. Change colors, fonts easily. Child themes are like safety nets. They protect your work. Save time on updates. No need to redo changes. Easy to manage. Avoid mistakes with child themes. Perfect for beginners. Experts use them too. Stay creative with your designs. Freedom to experiment is yours. Your website stays stable. Child themes are smart choices. WordPress makes it simple. Enjoy more flexibility. Be unique. Shine online. Child themes let you stand out.
Prerequisites For Creating A Child Theme
Creating a child theme in WordPress requires basic knowledge of HTML, CSS, and PHP. Familiarity with WordPress file structure helps. Ensure access to an FTP client and a text editor for smooth theme development.
Basic WordPress Knowledge
Understanding WordPress is important. Know how WordPress themes work. Learn about the dashboard. Themes change the look of a site. Basic skills help in making changes. Practice helps in learning.
Required Tools And Software
Text editors like Notepad++ are useful. They help you write code. File transfer tools like FTP help upload files. WordPress admin access is needed. You will need a web browser. This helps view changes. CSS knowledge helps with styling. Use these tools for best results.

Credit: bizanosa.com
Setting Up The Parent Theme
Picking a good parent theme is very important. It helps the child theme work well. You need a theme with a clean code. Good support and regular updates are also important. Look for themes that are popular and have good reviews. They should match the style you want. Themes like Astra or OceanWP are often good choices. They are known for being flexible and easy to use. Check if the theme fits with your website idea. A good choice will save time and effort later.
Download the parent theme from a trusted source. Go to your WordPress dashboard. Find the Appearance section. Click on Themes. Choose Add New to upload your theme. Click Upload Theme and select your file. Press Install Now and wait. Once installed, press Activate. Now, your parent theme is ready. It sets the base for your child theme. Make sure everything looks good.
Creating A Child Theme Folder
First, choose a simple name for your folder. Use lowercase letters only. Keep it short and clear. Avoid spaces. Use hyphens if needed. Example: twentytwenty-child.
Go to your WordPress files. Find the wp-content folder. Open it. Inside, locate the themes folder. This is where your child theme will live. Make sure you have the right access. Creating a new folder is easy. Follow these steps carefully.
Adding A Stylesheet
Creating style.css is an essential step. First, make a new folder for your child theme. Inside this folder, create a file named style.css. Add a comment section at the top of this file. This section should include the name of the child theme, template, and other details. This helps WordPress recognize your theme. Remember to save your changes.
Enqueueing the Parent Stylesheet ensures styles are inherited. Open the functions.php file in your child theme folder. Add a function to enqueue the parent stylesheet. Use wp_enqueue_style() function for this purpose. This will link the styles of the parent theme to the child theme. Save the file once done.
Customizing The Child Theme
Explore child theme customization in WordPress through YouTube tutorials. Learn to enhance site design without affecting the main theme. Create unique styles and layouts tailored to your preferences effortlessly.
Adding Functions
Functions add special features to your theme. You can change many things with them. Use the functions.php file to add new code. This file is in your child theme folder. Write code carefully. Small mistakes can break the site. Always test after adding new functions. Backup your site before changing anything. This keeps your data safe. You can use online guides for help. They make learning easy.
Modifying Templates
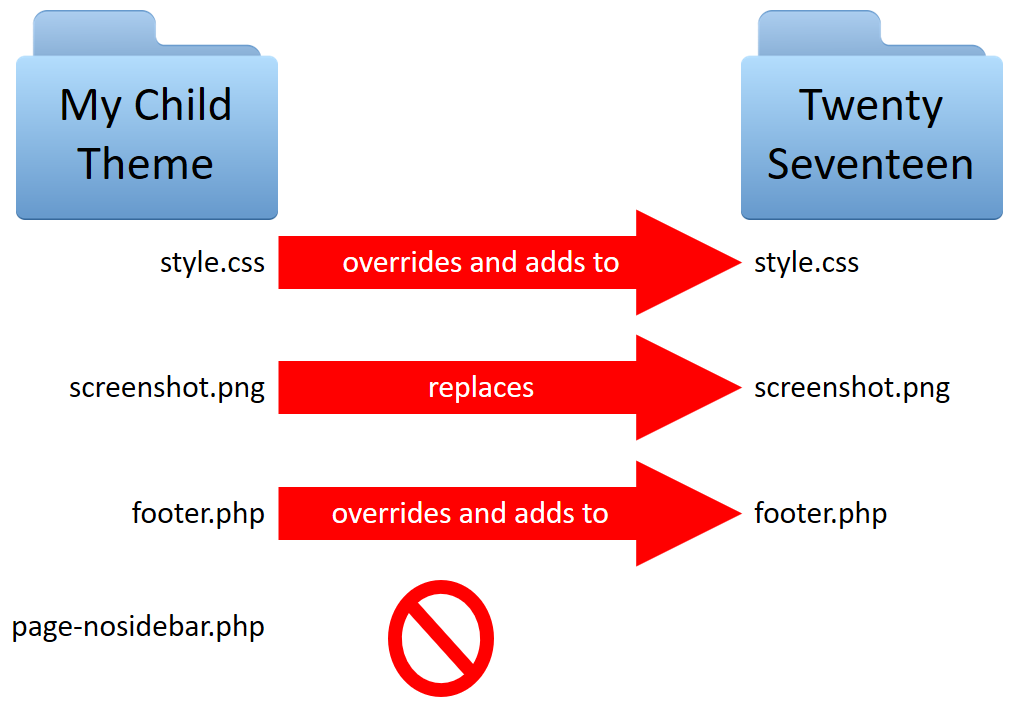
Templates change how your site looks. Copy template files from the parent theme. Place them in the child theme folder. Edit these files to make changes. Use simple code. Small changes can make big differences. Check your site after edits. Fix any errors you see. This keeps your site looking good. Keep backups of your template files. This helps you if you need old versions. Follow guides for better results.
Credit: learn.wordpress.org
Testing The Child Theme
First, visit the WordPress dashboard. Navigate to Appearance and select Themes. You will see your child theme listed there. Click on Activate next to the child theme. The child theme is now active on your site.
Check your site to see if it looks right. Look for any changes or missing parts. If you see errors, go back to the WordPress dashboard. Navigate to Appearance and select Editor. Check the style.css and functions.php files for mistakes. Fix any errors you find. Refresh your site to see if it works now.
Troubleshooting Common Issues
Learn how to create a child theme in WordPress with a helpful YouTube tutorial. Troubleshoot common issues with easy-to-follow steps. Enhance your site’s design while keeping it secure and functional.
Styles Not Loading
Sometimes, the child theme styles might not load properly. This can happen if the stylesheet is not linked correctly. Ensure you have added the correct @import URL in the child theme’s stylesheet. Check if the parent theme is active. If it’s not, switch back to the parent theme. Then, activate the child theme again. Always clear the browser cache after changes.
Changes Not Reflecting
Changes may not show up immediately. This could be due to cached files. Clear your browser cache first. Then, try refreshing the page. Also, ensure that the changes are saved. Check the WordPress Customizer for updates. Sometimes, changes need to be reapplied. Double-check your code for any errors. Even a small mistake can cause issues.
Using Youtube For Additional Guidance
YouTube has many tutorials. Some are better than others. Reliable tutorials have many views. They also have good ratings. Check the comments too. People share their thoughts there. Always choose videos from known creators. They provide quality content.
Follow video instructions step by step. Pause the video if you need more time. Write down important steps. This helps you remember. Try to do each step on your own. Practice makes it easy. Ask questions in the comments. Creators often reply. This helps you learn better.
Frequently Asked Questions
What Is A Child Theme In WordPress?
A child theme in WordPress is a sub-theme that inherits the functionality and styling of a parent theme. It allows you to modify or add features without altering the original theme files. This approach ensures that updates to the parent theme won’t overwrite your customizations, providing a safe way to customize your site.
Why Create A Child Theme In WordPress?
Creating a child theme allows you to customize your site safely. It prevents changes from being lost during parent theme updates. With a child theme, you can modify styles, functions, and templates. It offers flexibility and control without affecting the core theme files, ensuring your site remains stable and up-to-date.
How To Install A Child Theme In WordPress?
To install a child theme, first create a new folder in the “themes” directory. Add a “style. css” and “functions. php” file. Include the necessary information in “style. css” and enqueue the parent theme’s stylesheet in “functions. php”. Upload your child theme folder, then activate it in the WordPress dashboard.
Can A Child Theme Affect Site Performance?
A child theme generally does not affect site performance. It utilizes the parent theme’s resources efficiently. However, excessive customizations can impact load times. Ensure optimizations are done wisely and avoid unnecessary code. Properly configured child themes maintain site speed while allowing flexibility in design and functionality.
Conclusion
Creating a child theme in WordPress is simple and rewarding. It allows you to customize and update your site safely. Follow these steps to ensure your design stays intact. Begin with copying and editing the style. css file. Next, tweak functions.
php for added features. Remember to activate your child theme in WordPress. This approach keeps your website fresh and secure. With practice, your skills will grow. Your site will reflect your personal style and needs. Enjoy the process and explore new possibilities.
Keep learning. Keep creating.


