
Are you ready to elevate your website with a stunning design? If you’re using the Genesis Theme on WordPress, creating a new file can seem daunting.
But it doesn’t have to be. Imagine having the ability to customize your site exactly the way you want, making it not just functional but also visually captivating. You’ll not only enhance your site’s appearance but also improve user engagement and experience.
In this guide, you’ll discover simple, step-by-step instructions that demystify the process of creating a new file in the Genesis Theme. Get ready to transform your website into a digital masterpiece! Keep reading to unlock the secrets that will empower you to take full control of your WordPress design.

Credit: www.youtube.com
Setting Up Genesis Framework
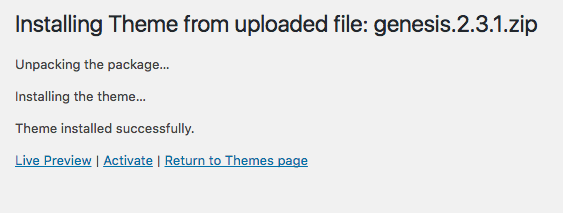
First, download the Genesis Framework from the official website. Then, log in to your WordPress dashboard. Go to Appearance and select Themes. Click on Add New and choose Upload Theme. Find the Genesis file you downloaded. Click Install Now to start the process. Wait for the installation to finish. You will see a success message when it’s done.
After installation, activate the Genesis Framework. Go to the Themes page again. Look for the Genesis theme. Click on the Activate button. Your website now uses Genesis. Visit your site to check changes. Genesis is ready to use. Enjoy the new look!
Creating A Child Theme
Creating a child theme for the Genesis Theme in WordPress involves generating a new style file. Begin by accessing your site’s directory and locate the Genesis theme folder. Next, create a new folder for your child theme and add a style.
css file to define your custom design elements.
Understanding Child Themes
Child themes are important in WordPress. They let you change design and style without losing updates. A child theme uses a parent theme’s files. It makes changes safe and easy to manage. Understanding this helps keep your website secure and organized. Always use child themes for customizations.
Setting Up Child Theme Files
Start by creating a new folder. Name it after your child theme. Inside, make a style.css file. It holds the design rules. Add another file named functions.php. It contains special code. These files are the basic setup for your child theme. Ensure they have the right parent theme details. This links them correctly.
Customizing The Child Theme
The functions.php file helps add features to your site. It can change how your theme works. Open this file using a text editor. Add code to add features. Be careful with the code. Wrong code can break your site. Always make a backup before changes.
The style.css file changes how your site looks. You can change colors and fonts. Open this file to edit. Add your styles at the end. Use simple CSS code. Test your site after changes. Check on different devices too.
Custom templates give your pages a new look. Create a new file in your theme. Name it like template-custom.php. Add code inside the file. This code will design your page. Use WordPress tags to show content. Save and upload to your server. Select this template in page settings.
Adding New Files
Start by opening your WordPress dashboard. Find the Appearance tab. Click on Theme Editor. Make sure you are in the right theme. Locate the functions.php file. Add your new PHP file here. Use the include or require statements. Save the changes you make. Now, your new PHP file is ready.
Widgets are fun and useful. Go to the Appearance menu. Choose Widgets. Click on Custom HTML. Paste your widget code here. Remember to save your changes. Your custom widget is now added.
Scripts can add special functions. Access the Theme Editor. Open the functions.php file. Use the wp_enqueue_script() function. This function helps load your script. Make sure to add the correct file path. Save your changes. Now, your custom script is active.
Testing The New Files
Ensure the new files work well. Check if the files fit in the theme. Open the website and see changes. Look for errors or missing parts. Files should blend smoothly with the theme. Make sure everything displays correctly. Check links and images.
Things may not work right. Errors are common. Check file names. They must match exactly. Look at file paths. Paths must be correct. Permissions are important. Files need right permissions. Clear caches often. Caches can cause old files to show. Check plugins. Plugins might cause conflicts. Disable plugins one by one to find the problem.
Credit: wpbeaches.com
Deploying Changes
Always back up your theme before making changes. Save a copy of your theme files on your computer. This ensures you can restore them if needed. Use a plugin or FTP client to make this process simple. Backing up helps to prevent any loss.
Check that your new theme files are ready. Upload these files to your WordPress directory. Make sure to activate the theme in your dashboard. Test your site to see if everything works. If there are any issues, you can go back to the old theme. Always keep your site looking fresh and updated.

Credit: crunchify.com
Frequently Asked Questions
How To Create A File In Genesis Theme?
To create a file in Genesis Theme, access your WordPress dashboard. Navigate to Appearance > Theme Editor. Select the Genesis theme and click on “New File”. Enter the desired file name and content. Save the changes to implement the file in your theme.
Can I Add Custom Code To Genesis Theme?
Yes, you can add custom code to Genesis Theme. Use the Genesis Simple Hooks plugin or create a child theme. It’s recommended to use a child theme to ensure your changes aren’t lost during updates.
What Is The Best Way To Customize Genesis?
The best way to customize Genesis is by using a child theme. This allows you to modify styles and functions without affecting the parent theme. Using a child theme ensures that your customizations remain intact during theme updates.
Do I Need Coding Skills For Genesis Theme?
Basic coding skills are helpful for customizing Genesis Theme. However, many changes can be made using plugins and widgets. Familiarity with HTML, CSS, and PHP can enhance your ability to make more advanced customizations.
Conclusion
Creating a new file in Genesis Theme is straightforward. First, access your WordPress dashboard. Navigate to Appearance, then Editor. Add your new file and save changes. With practice, your skills will improve. Using Genesis Theme enhances site customization. It offers flexibility and control.
Ensure you follow each step carefully. Mistakes can affect your site. Explore various file types and functions. Enhancing your site becomes easier over time. Keep learning and experimenting. Your site will benefit greatly. Stay committed to growing your WordPress skills.
It’s a rewarding journey for every website owner.


