
Are you ready to take your web development skills to the next level? Installing Laravel on your web hosting can open doors to powerful, elegant, and seamless application development.
But if you’re like most people, the process might seem daunting at first glance. Don’t worry, you’re not alone. In fact, many developers find themselves puzzled by the initial setup. That’s why we’ve crafted this step-by-step guide just for you.
Imagine effortlessly deploying your Laravel applications, saving time, and impressing your clients or audience with your newfound expertise. Intrigued? Keep reading, because we’re about to demystify the process and empower you with all the tools and tips you need. Let’s dive into the world of Laravel and make your web hosting work for you!
Requirements And Preparations
Laravel needs a server with PHP 7.4 or higher. It also requires OpenSSL, PDO, and Mbstring extensions. A web server like Apache or Nginx is needed. MySQL 5.7 or later is important for database work.
Ensure your server meets these needs. Check with your hosting provider. They can confirm if your server is ready.
First, install Composer. It is a tool for managing PHP packages. Next, make sure your server has SSH access. This helps with easy commands. Create a new database for Laravel. You will need it later.
Also, make sure your server’s timezone is correct. This helps in logging and other tasks. With these steps, your environment is ready for Laravel.
Choosing The Right Hosting Provider
Shared hosting is like sharing a computer with others. It is cheap but can be slow. You share resources with many users. Dedicated hosting gives you your own computer. It is fast and more expensive. You get all the resources for yourself.
Evaluating Hosting Features
Choose a host with good customer support. Look for 24/7 support so you can get help anytime. Check for fast servers. Fast servers make your website load quickly. This is important for users. Also, consider backups. Regular backups keep your data safe. Make sure your host offers them.
Setting Up Your Hosting Account
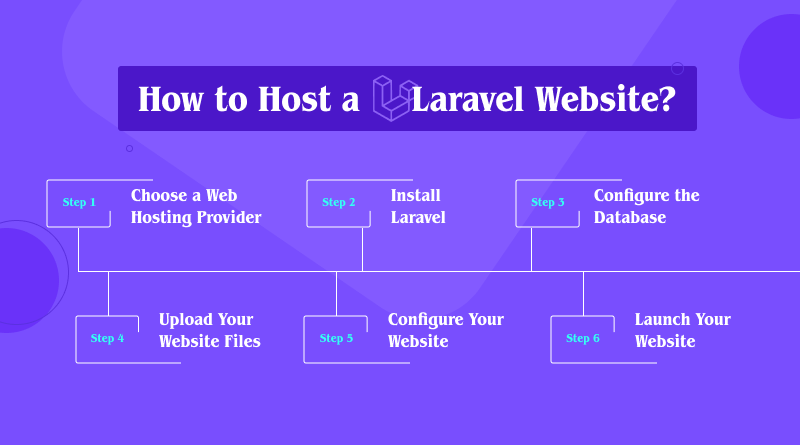
First, you need to choose a hosting provider. Make sure it supports PHP and MySQL. Visit the hosting provider’s website. Find the Sign Up or Create Account button. Click it. Fill in your details. Use a strong password. Confirm your email address. Now, your account is ready.
Log into your hosting account. Find the Domain section. If you have a domain, use it. Else, buy one. Go to DNS settings. Add a new DNS record. Point it to your hosting server. Save the changes. Wait a few hours. The domain will connect soon.

Credit: manage.accuwebhosting.com
Installing Laravel Via Composer
First, open the terminal on your computer. This is where you will type commands. Make sure you have access to your web hosting’s terminal. If you use shared hosting, check your hosting provider’s guidelines. Some hosts may require you to use a special application.
With the terminal open, navigate to your project directory. Type cd /path/to/your/project. This command changes the directory. Now, install Laravel using Composer. Type composer create-project --prefer-dist laravel/laravel your-project-name. This command downloads Laravel and sets it up. Wait for the installation to complete. Your Laravel project is now ready to use.
Configuring Laravel On Your Server
Setting up Laravel on web hosting involves downloading the framework, uploading files, and configuring the environment. Ensure compatibility with PHP version and install necessary extensions. Adjust server settings to meet Laravel’s requirements for optimal performance.
Setting Environment Variables
First, locate the .env file in your Laravel project. This file is key to your setup. Open it using a text editor. Here, you will set important values. Start by defining your APP_NAME and APP_ENV. Use simple names for clarity. Next, set APP_KEY. Run the command php artisan key:generate in your terminal. This will generate a secure key. Also, specify your APP_URL. This is your website link. Finally, configure DB_CONNECTION, DB_HOST, DB_PORT, DB_DATABASE, DB_USERNAME, and DB_PASSWORD. These settings help Laravel connect to your database. Save your changes.
Database Configuration
Ensure your database is ready. Use MySQL or PostgreSQL. Create a new database. Name it wisely. Open your terminal. Run php artisan migrate. This command sets up your database tables. Check for errors. Fix them promptly. Confirm your database is connected. Use Laravel’s Eloquent for database operations. Test connection with sample data. Ensure data is stored correctly. Adjust configurations as needed.
Testing Your Laravel Installation
Checking server logs is important. Logs help find errors. Open your hosting control panel. Go to the log section. Look for any error messages. Errors might show problems with your installation. Fix errors if you find any. This will help Laravel run smoothly.
Next, testing routes and views is key. Open your browser. Type your website URL. Add “/home” to the URL. Press Enter. The home page should appear. If it does, routes are working. Now, create a simple view. Add some text in it. Save and refresh the page. The new text should appear. This means views are working well.
Securing Your Laravel Application
Installing Laravel on web hosting ensures your application runs smoothly and securely. Start by uploading Laravel files to your server. Then, configure the environment settings for optimal performance and security.
Implementing Https
HTTPS keeps your data safe. It protects information between users and your site. All data is encrypted. This stops hackers from stealing it. To use HTTPS, get an SSL certificate. Your hosting provider can help with this. After getting the certificate, update your Laravel settings. Make sure your app always uses HTTPS. This is very important for all sites.
Managing Permissions
Set file permissions correctly. Some files need special access. Only give access to those who need it. This keeps your app safe. Directories should have permission set to 755. Files should have permission set to 644. Do not give write access to everyone. This stops bad people from changing your files. Always check your permissions often. Keep your app and users safe.
Credit: www.milesweb.in
Troubleshooting Common Issues
Encounter issues while installing Laravel on web hosting? Check file permissions and ensure server requirements are met. Verify Composer and PHP versions to avoid compatibility issues.
Resolving Installation Errors
Facing errors during installation is common. First, check if all required packages are installed. Ensure the PHP version is compatible with Laravel. Sometimes, missing extensions cause problems. Verify database configurations are correct. Double-check your .env file settings. Permissions can also be a roadblock. Make sure necessary folders have the right permissions. Often, running composer install again fixes issues. Clear any cached data using php artisan cache:clear. This can resolve unexpected errors. Always read error messages carefully. They offer clues to the problem.
Debugging Configuration Problems
Configuration issues often disrupt smooth operation. Start by examining the configuration files. Ensure that .env settings match server requirements. Misconfigured database credentials can halt progress. Verify database connections are working. Sometimes, wrong URL settings in .env cause issues. Check that the APP_URL is correct. Incorrect path settings can also lead to problems. Review the config/app.php file for errors. Always remember to restart the server after changes. This ensures new settings take effect. Use php artisan config:cache for updated configurations.
Optimizing Performance
Install Laravel on your web hosting to enhance site performance. Begin by ensuring your server meets Laravel’s requirements. Use Composer to manage dependencies, then upload files to your server. Adjust configurations for optimal functionality.
Caching Strategies
Caching can make your website run faster. It stores data for quick access. Laravel supports multiple caching drivers. These include file, database, and Redis. Choose the right one for your needs. File caching is simple but slower. Redis is fast but complex. Use cache tags to organize and clear cache easily. This helps in managing your data better.
Optimizing Database Queries
Database queries should be fast and efficient. Use Laravel’s query builder for better results. It helps to write clean and safe SQL queries. Always use indexes on columns that are frequently searched. This speeds up data retrieval. Avoid selecting unnecessary columns. Only fetch what you need. This reduces load on your database.
Credit: www.inmotionhosting.com
Frequently Asked Questions
How To Install Laravel On Hosting?
Install Laravel by uploading files via FTP. Set permissions for storage and bootstrap/cache. Configure. env file. Execute “composer install” command. Ensure PHP version supports Laravel.
Can I Run Laravel On Shared Hosting?
Yes, you can run Laravel on shared hosting. Ensure the server meets Laravel’s requirements. Upload your files, set permissions, and configure the environment. Use Composer locally to manage dependencies. Adjust the `. htaccess` file for proper routing. Some features might be limited due to shared hosting constraints.
Which Hosting Is Best For Laravel?
Laravel works well with cloud hosting providers like AWS, DigitalOcean, and Linode. Choose a host offering PHP 8 and SSH access. Prioritize high performance, strong security features, and reliable customer support. Consider managed Laravel hosting for easy setup and maintenance.
Ensure scalability to accommodate growing traffic and application needs.
How To Host Laravel Locally?
Install XAMPP or MAMP, download Laravel, and set up the environment. Use Artisan commands to serve the application locally. Configure the database in the. env file for connectivity. Ensure PHP and Composer are properly installed for seamless operation.
Conclusion
Installing Laravel on web hosting is straightforward. Follow each step carefully. Check for compatibility with your server. Download Laravel files from the official website. Use a tool like Composer for installation. Set up your database connection. Test your installation for errors.
Solve any issues you find. Deploy your Laravel app securely. Regularly update Laravel and your server. Keep your code organized for easy management. Enjoy building powerful web applications with Laravel. Now, you can harness the benefits of Laravel on your hosting.
Happy coding!


