
Are you struggling to update the submenu on your Cherry Theme WordPress site? You’re not alone.
Many website owners find themselves stuck when trying to make small yet crucial changes to their menus. But don’t worry – you’re about to discover how easy it can be to tweak your submenu like a pro. Imagine having a website that not only looks great but also functions seamlessly, guiding your visitors exactly where you want them to go.
This isn’t just about improving your site’s navigation; it’s about enhancing your user’s experience and keeping them engaged. In this guide, we’ll break down the process into simple, actionable steps that anyone can follow. You’ll learn not just how to change your submenu, but how to do it in a way that makes your website more effective. Keep reading, and take the first step towards a more user-friendly website today.
Accessing WordPress Dashboard
First, log in to your WordPress Dashboard. Use your username and password. Once logged in, find the left-hand menu. This menu is your main control panel. Look for the Appearance tab. Click on it. A new menu appears.
Find the Menus option. Click on it. Now you see your menu settings. Here, you can change submenu items. Just drag and drop them. It’s easy and fun. Make sure to save changes. This updates your site.
Navigating To Appearance Settings
To change the submenu, first find the Appearance option. This is in the WordPress dashboard. Click on it to open the menu settings. Here, you can adjust the submenu items.
Select Menus under Appearance. This will show your current menu structure. You can add, remove, or reorder submenu items. Look for the submenu you want to change. Click on it to edit the details.
Make sure to save your changes. The save button is usually at the bottom. This ensures your new submenu appears on your site. Check your site to see how it looks. If not right, go back and edit again.
Opening Menu Editor
First, log into your WordPress dashboard. Find the appearance tab on the left side. Click it to see the menu option. This is where you can change menus. Select the submenu you want to change. Be sure to pick the right one.
After selecting, look for the dropdown under each menu item. Click the dropdown to see more options. Here, you can adjust the submenu items. Move them up or down to change order. You can also add new items if needed.
Save your changes by clicking the save menu button. This ensures your submenu updates are live. Always check your site after saving. Make sure the changes look good.
Selecting The Menu To Edit
First, log in to your WordPress dashboard. Find the Appearance section on the left. Click on Menus. This will take you to the menu page. Here, you can see all your menus.
Choose the menu you want to edit. You might have many menus. Pick the right one. Look for the Select button next to the menu name. Click it. Now, you can see the menu items below.
Look for the submenu items. These are under the main menu items. You can add or remove items here. If you need to change the order, just drag and drop them. Remember to save your changes at the end.
Adding Submenu Items
First, log in to your WordPress dashboard. Find the Appearance section on the left. Click on Menus to open the menu settings. You will see a list of your menus. Select the menu you want to change. Look for the Add Items button.
Click it to add new submenu items. Choose from pages, posts, or custom links. Drag the item you want under the main menu item. This makes it a submenu. Save your changes when done. Visit your site to see the new submenu. It should show under the main menu item. Easy steps make it quick.

Credit: www.templatemonster.com
Reordering Submenu Items
First, open your WordPress dashboard. Find the Appearance tab on the left. Click on it. A menu will appear. Choose Menus from this list. You will see your menu structure. Here, locate the submenu items you want to change.
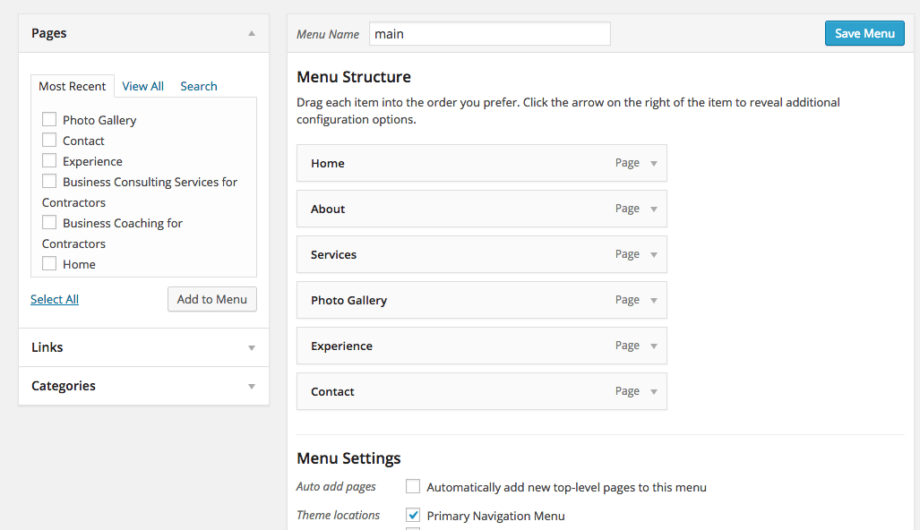
To change their order, click and hold the submenu item. Drag it up or down. Place it in the desired position. Release the mouse button. The item will stay there. Remember to click Save Menu to apply changes.
If you want to rename an item, click the arrow on the right. A few options will appear. Change the text in the Navigation Label box. Again, don’t forget to save your changes.
Removing Submenu Items
Begin by accessing your WordPress dashboard. Click on Appearance in the sidebar. Select Menus. You will see a list of your menu items. Locate the submenu items you want to remove. Click the small arrow next to the item. This will expand the settings. Press the Remove link to delete the submenu item. Save your changes by clicking the Save Menu button. Your submenu items are now removed.
Check your website to ensure the changes are visible. Sometimes changes might not show immediately. Refresh your browser to see the update. If still not visible, clear your browser cache. Removing submenu items helps keep your site clean. It makes navigation easier for users.
Credit: www.sumydesigns.com
Saving Menu Changes
Always save changes after editing the submenu. Click Save Menu to keep changes. This button is found on the right corner. Missing this step means losing edits. Review your submenu before saving. Ensure all items are correct. Check for any misspellings or errors. Reorder items if needed. Drag and drop to change order. Make sure your menu looks good. You want a clear and neat menu. Test the submenu on your website. Refresh the page to see changes.
Previewing Changes On Site
Previewing changes is important. It helps ensure your site looks good. Click the preview button. You can find it on the top bar. This will open a new window. Look at the changes you made. Check if the submenu is correct. If not, go back and edit. Repeat the process. Always preview before saving. This keeps your site looking nice. Use the preview button often. It helps catch mistakes early.
Troubleshooting Common Issues
Many users face submenu change issues in Cherry Theme. Sometimes the submenu doesn’t display properly. This may happen due to plugin conflicts. Check installed plugins. Disable them one by one.
Another reason might be incorrect settings. Go to the menu settings. Ensure everything is set correctly. Double-check the menu structure. Make sure all items are in the right place.
Cache problems may cause submenu errors too. Clear the browser cache. Refresh the page. This often solves the problem. If these steps don’t work, contact support. They can provide further help.
Credit: wpgeodirectory.com
Frequently Asked Questions
How Do I Access The Cherry Theme Submenu?
To access the Cherry Theme submenu, navigate to your WordPress dashboard. Click on ‘Appearance’ and then ‘Menus. ‘ Here, you can find and edit submenu items. Ensure you save changes to update the submenu on your website.
Can I Customize Submenu Items In Cherry Theme?
Yes, you can customize submenu items in the Cherry Theme. Go to ‘Appearance’ and select ‘Menus’ from the WordPress dashboard. Here, you can add, remove, or rearrange submenu items as needed.
How To Add A New Submenu Item?
To add a new submenu item, go to ‘Appearance’ and select ‘Menus. ‘ Choose the desired menu and click ‘Add Items. ‘ Select a page, post, or custom link to add as a submenu item. Save your changes to apply them.
Why Is My Submenu Not Displaying Correctly?
Your submenu might not display correctly due to a theme conflict or incorrect settings. Check your theme settings under ‘Appearance’ and ‘Menus. ‘ Ensure you’ve assigned the correct menu location and saved changes.
Conclusion
Changing the submenu on the Cherry Theme is simple. Follow the steps carefully for best results. Start by accessing your WordPress dashboard. Navigate to the Appearance section. Then, select Menus. Here, you can edit submenu items easily. Save your changes once satisfied.
A well-organized menu improves user experience. It makes navigation smooth for visitors. Consistent updates keep your site fresh. Always double-check your changes. Ensure everything looks correct. With practice, this process becomes second nature. Happy editing!


