
Are you ready to unleash your creativity and design a unique WordPress theme using Dreamweaver? Crafting your own theme is not just for seasoned developers.
With the right guidance, you can create a stunning, personalized design that stands out. Imagine the satisfaction of knowing that your website reflects your vision and style perfectly. Whether you’re a budding designer or a WordPress enthusiast looking to expand your skills, this guide will walk you through the process step by step.
By the end of this article, you’ll not only have a fully functional WordPress theme but also a deeper understanding of web design principles. Let’s dive in and bring your ideas to life!
Credit: www.youtube.com
Setting Up Dreamweaver
Installing Dreamweaver is the first step. Visit the Adobe website. Find the Dreamweaver page. Download the installer. Follow the instructions. Make sure your computer meets the needs. Dreamweaver works on Windows and Mac. Remember to choose the right version.
After installing, configure Dreamweaver for WordPress. Open Dreamweaver. Go to ‘Site’ menu. Click ‘New Site’. Enter your site name. Choose a local folder. Set your server settings. This helps Dreamweaver connect to WordPress files. Ensure all paths are correct.
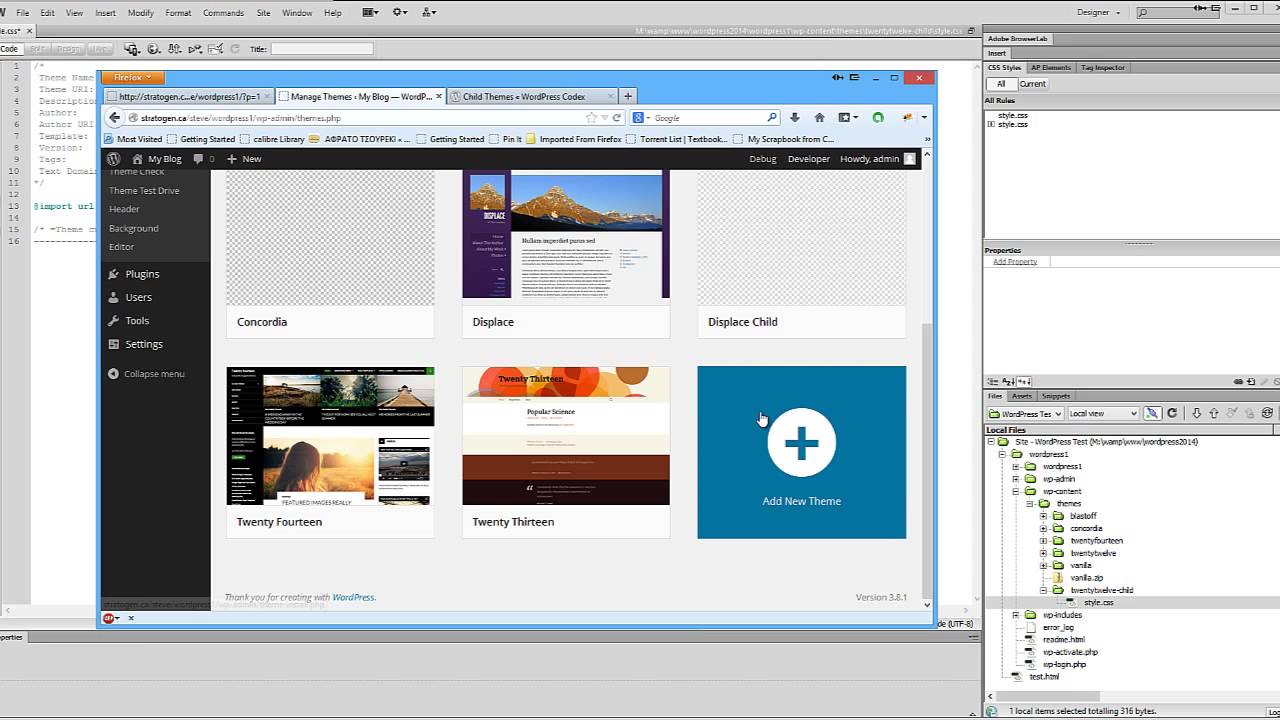
The Dreamweaver interface is user-friendly. On the left, find the Files panel. The middle shows the Code and Design views. The right side is for properties and tools. Explore these sections. Familiarize yourself with buttons. This will help you later. Knowing the interface is crucial.
WordPress Theme Basics
WordPress themes have many important parts. Each part helps your website look good. The header shows at the top. The footer is at the bottom. The sidebar has links and extra info. Stylesheets change how things look. Templates decide where things go. Themes use these parts to make your site unique.
A theme has many files. The main file is style.css. It holds design rules. The functions.php file adds special features. index.php is the main template. Other files are for pages, posts, and sidebars. Each file has its own job. Together, they build the theme.
Some functions make your theme smart. get_header() adds the header. get_footer() adds the footer. Use the_title() to show the title. the_content() shows text on pages. These functions control what users see. They make your theme work well.
Creating A New Theme Folder
Create a new folder for your theme. Give it a name. This will be your theme folder. Inside, make a new file called style.css. This file tells WordPress about your theme. Add another file named index.php. It will display your content.
Keep your files organized. Place header.php for the top part. Use footer.php for the bottom part. Create sidebar.php for the side section. Make sure your files stay in the right order.
Designing The Theme Layout
Dreamweaver offers many design tools. These tools help create a WordPress theme. Use the drag-and-drop feature for easy layout changes. The visual editor shows real-time updates. This helps spot mistakes quickly. Adjust colors, fonts, and elements easily. Dreamweaver’s tools make theme design simple.
HTML builds the structure of the theme. CSS styles the theme. Both are important for a nice look. Use simple HTML tags to form layout parts. Then, apply CSS rules for colors and spacing. Check the code in Dreamweaver’s editor. It shows how changes look immediately. This way, themes become both pretty and functional.
People use phones and computers to view sites. Themes must fit all screens. Use media queries in CSS. They adjust layout based on screen size. Dreamweaver lets you see how changes work on different devices. This ensures the theme is responsive. It looks good on any device. Responsive design is key for user satisfaction.
Integrating WordPress Functions
Dreamweaver helps design websites. It supports PHP, which is key for WordPress. PHP makes sites dynamic. Use Dreamweaver to write PHP code. This code connects with WordPress. Functions in PHP do special tasks. They show posts, pages, and comments. PHP makes WordPress themes alive.
WordPress loops are important. They help display posts. Loops check the database. They find posts and pages. Loops make themes dynamic. Use loops to show recent posts. Loops can change the look. They make content interactive. Dreamweaver helps write loops easily.
Themes need custom features. Add special buttons or menus. Customize with CSS and PHP. Dreamweaver lets you change design. Themes must look good and work well. Use Dreamweaver tools to adjust. Make themes unique and user-friendly.
Testing And Debugging
Building a WordPress theme in Dreamweaver involves crucial steps like testing and debugging. Ensure your theme functions smoothly by checking for errors and fixing bugs. Regular testing helps in maintaining a responsive and user-friendly design.
Previewing In Browsers
Always check your theme in different browsers. Each browser may show your theme a bit differently. Use Dreamweaver to preview and adjust your design. Check for layout issues. Make sure your theme looks good on small screens. Testing on mobile devices is important. This helps to catch problems early.
Common Errors And Fixes
Look for syntax errors in your code. These are common mistakes. Misspelled tags or missing brackets are typical. Use Dreamweaver’s tools to find these errors. Fix them right away. Always save your work. This way, you don’t lose any changes. Keep an eye on error messages. They can guide you to the problem.
Validating Code
Use a validator to check your code. This tool finds mistakes you might miss. It checks if your HTML and CSS follow the rules. Clean and correct code works better. It also helps with SEO. Make sure your code is valid before going live. This makes your site more reliable.
Deploying The Theme
Deploying your custom WordPress theme using Dreamweaver involves uploading files to your server. Ensure all theme components are organized. After uploading, activate the theme in your WordPress dashboard to see changes live.
Uploading To WordPress
First, compress your theme folder into a ZIP file. Navigate to your WordPress dashboard. Choose “Appearance” then “Themes”. Click “Add New” and select “Upload Theme”. Select your theme ZIP file and click “Install Now”. Wait for the upload to finish. If you see errors, check your files again.
Activating The Theme
After upload, you must activate the theme. Go to the “Appearance” section. Find your theme in the list. Click “Activate” next to your theme name. Your site now uses the new theme. Check if it looks right. If not, you may need to fix things.
Final Checks And Adjustments
Visit your site to see your theme live. Check each page and post. Ensure images and text display correctly. Adjust settings if needed. Sometimes, plugins can cause issues. Deactivate problem plugins. Test again. Make sure everything works smoothly before telling others about your new theme.

Credit: www.youtube.com
Credit: www.hostpapa.com
Frequently Asked Questions
How Do I Start Creating A WordPress Theme?
Begin by setting up Dreamweaver and WordPress. Familiarize yourself with WordPress theme structure. Use Dreamweaver to create HTML and CSS files. Integrate PHP for dynamic content. Test your theme locally and troubleshoot issues. Once satisfied, upload to your WordPress site.
Regular updates ensure compatibility and functionality.
Can Dreamweaver Be Used For WordPress Themes?
Yes, Dreamweaver is compatible with WordPress theme development. It offers tools for coding HTML, CSS, and PHP. Dreamweaver’s live view helps visualize your design. It supports FTP for theme upload. Use its code editor for efficiency. Regular Dreamweaver updates enhance WordPress theme compatibility.
What Skills Are Needed For Theme Creation?
Basic HTML, CSS, and PHP skills are essential. Understanding WordPress structure is crucial. Familiarity with Dreamweaver enhances productivity. Design principles help create visually appealing themes. Problem-solving skills aid in troubleshooting. Continuous learning keeps you updated with WordPress changes. Practice improves efficiency and quality.
Is Dreamweaver Suitable For Beginners?
Dreamweaver is beginner-friendly with an intuitive interface. It offers visual aids and templates. Tutorials are available for learning basics. Built-in features simplify coding. It supports drag-and-drop functionality. Regular practice enhances proficiency. Beginners can gradually explore advanced features. Dreamweaver is a good starting point for theme creation.
Conclusion
Creating a WordPress theme in Dreamweaver can be simple. Follow the steps above. Practice often for better skills. Customize your theme to fit your style. Check your work as you go. Keep designs clean and clear. Use Dreamweaver tools effectively.
Remember, patience brings success. Share your theme with others. Gain feedback to improve your design. Explore tutorials for more tips. Stay creative and inspired. Enjoy your WordPress journey. Now, start building your theme. Dreamweaver makes it possible. Happy designing!


