
Imagine you’ve just discovered a new WordPress theme that perfectly aligns with the vision you have for your website. Excited, you rush to install it, only to find that your current theme is stubbornly clinging on.
You might feel a wave of frustration, but worry not—there’s a solution. By using Myphpadmin, you can effortlessly change your WordPress parent theme without breaking a sweat. This guide is crafted to empower you, guiding you step-by-step through the process of switching themes in a way that’s straightforward and efficient.
Whether you’re a seasoned developer or a WordPress novice, understanding how to change your parent theme through Myphpadmin can save you time and enhance your website’s functionality. Dive in with us, and unlock the potential of your site with just a few clicks.

Credit: thebootstrapthemes.com
Accessing Myphpadmin
Myphpadmin is a tool for managing databases. First, open your hosting dashboard. Find the section labeled database. Look for the Myphpadmin icon there. It might be under a menu or tab. Click the icon to enter Myphpadmin. You may need to log in again.
To log in, use your database username and password. These are often different from your WordPress login. If you forgot them, check your hosting account for details. Enter the username and password into the login fields. Click the submit button. You should now see the Myphpadmin interface.
Credit: ultahost.com
Navigating To WordPress Database
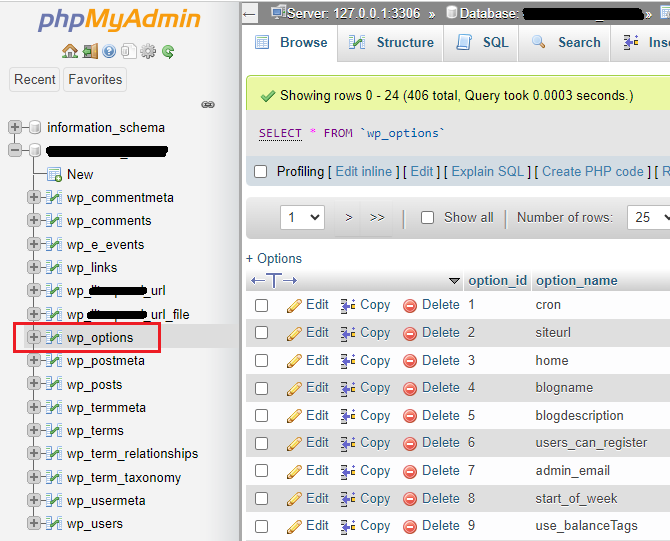
Accessing the WordPress database via phpMyAdmin allows you to change the parent theme effortlessly. Locate the ‘wp_options’ table, then find the ‘template’ and ‘stylesheet’ rows. Change these values to your new theme’s folder name to switch themes without the WordPress dashboard.
Identifying The Correct Database
To change the parent theme, find the right database. Log into Myphpadmin with your credentials. Look for the list of databases on the left. The database name often matches your WordPress site name. Click on it to open. Inside, you will see many tables. The wp_options table is important. Click on it to view its contents.
You will see rows with different keys. Look for the template and stylesheet rows. These hold the parent theme information. Change the values to your new theme name. Be careful not to change other settings. Save changes by clicking the save button. Your parent theme is now updated.
Finding The Correct Table
Locating the Options Table is important for theme change. Begin by accessing your Myphpadmin. Check your database list. Each WordPress site has a separate database. Find the one you need. Look for the options table. It usually starts with “wp_options” but can vary. Click on the table name to open it. Many rows appear. These rows store different settings.
Understanding Table Structure is key. Each row has option_name and option_value. These columns hold important data. To change themes, find the row with “template” as option_name. Also, look for “stylesheet” row. Both rows need changes. Enter the new theme name in these rows. Save changes to update the theme.
Credit: shortpixel.com
Changing The Parent Theme
Open Myphpadmin and look for your database. Click on the “wp_options” table. Find the “template” and “stylesheet” entries. These show your current theme. Use the search bar to make this step easier. It helps to locate entries fast.
Locate the “template” row. Click edit on this row. Change the value to your new theme’s name. This tells WordPress to use the new theme. Make sure to save your changes. Without saving, changes won’t work.
Find the “stylesheet” row next. Click edit on this row too. Enter the new theme’s name here. This sets the style for the new theme. Again, remember to save. Only saved changes will apply.
Saving Changes
Ensuring Changes are Saved is very important. First, check if your changes are reflected. Refresh the WordPress dashboard. Navigate to the Appearance section. Look for your new parent theme. If it appears, then changes are saved. If not, you might need to repeat the steps.
Another way is checking the front-end. Visit your website. Observe if the theme looks different. Sometimes, changes might not be visible immediately. Clear the cache if necessary. This can help display the new theme.
Verifying Theme Change
To verify the theme change, open Myphpadmin. Go to the database of your site. Find the wp_options table. Look for the template and stylesheet entries. They should have your new theme name. If they do, then the theme change is successful. Double-check these entries. Ensure they match the theme name exactly.
Also, check your website. Make sure it loads correctly. Look for any error messages. If something seems off, it might be due to the change. Troubleshoot as needed. It’s crucial to ensure your site functions well after the theme change.
Troubleshooting Common Issues
Switching the parent theme in WordPress through Myphpadmin can solve theme-related issues. Access the database, locate “wp_options,” and change the “template” and “stylesheet” fields to the desired theme name. This direct approach helps when the dashboard is inaccessible.
Resolving Access Errors
Access errors can stop you from changing themes. Check database settings first. Wrong details can cause issues. Permissions are important too. Make sure your user has admin rights. Without them, changes won’t work. Look for plugin conflicts. They can block access. Disabling plugins might help. Clear cache to see changes. It can solve display issues.
Fixing Theme Display Problems
Themes can show wrong if settings are off. CSS clashes can cause display errors. Edit stylesheets to fix them. Update themes often. New versions fix bugs. Check theme settings in the dashboard. Wrong options can cause problems. Reinstall themes if errors persist. This can fix corrupted files. Backup data before changes. It keeps your site safe.
Frequently Asked Questions
How Do I Access Myphpadmin For WordPress?
To access Myphpadmin, login to your hosting account. Navigate to the database section. Click on Myphpadmin to open the database management tool. Here, you can manage WordPress databases, including changing the parent theme. Ensure you have the necessary credentials before proceeding for security reasons.
Can I Change The Parent Theme Via Myphpadmin?
Yes, you can change the WordPress parent theme using Myphpadmin. Access your database, locate the ‘wp_options’ table, and find the ‘template’ row. Modify the value to your desired theme’s name. Make sure to double-check the spelling to avoid errors.
What Precautions Should I Take When Using Myphpadmin?
Ensure you have a database backup before making changes in Myphpadmin. Mistakes can lead to data loss or website issues. Use secure login credentials and avoid sharing them. Follow hosting guidelines for database management to keep your site secure and operational.
Why Change WordPress Parent Theme In Myphpadmin?
Changing the parent theme via Myphpadmin is useful when you can’t access the WordPress dashboard. It allows theme modifications directly in the database. This method is quicker for advanced users needing to resolve theme-related issues without dashboard access.
Conclusion
Changing the WordPress parent theme in phpMyAdmin is straightforward. Follow the steps carefully. First, back up your site. Next, access phpMyAdmin in your hosting panel. Find the “wp_options” table. Look for “template” and “stylesheet” fields. Edit these with your new parent theme’s name.
Save changes and check your site. Your theme should update successfully. Troubleshoot if issues arise. Regular backups help prevent problems. Practice makes the process easier. Keep learning and exploring WordPress. Your site deserves the best management.


