
Are you ready to transform your WordPress site with a fresh new look? Adding a WordPress theme manually might sound daunting, but it’s easier than you think.
Imagine having complete control over your website’s appearance, tailoring it precisely to your vision. In this guide, you’ll discover the simple steps to manually add a WordPress theme and unlock the full potential of your site. No more settling for limited options or spending extra on customization.
By mastering this skill, you not only enhance your website’s aesthetics but also elevate your brand’s identity. Dive in now and empower yourself with the knowledge to make your site stand out. You’re just a few steps away from creating the website of your dreams.
Preparation Steps
Picking a theme is fun. Make sure it fits your site. Think about your site’s purpose. Different themes have different styles. Check the reviews and ratings first. Also, look at theme features. Some themes are free. Others cost money. Pick what matches your needs.
Go to the WordPress theme page. Click the download button to get your theme. It will save as a ZIP file. Save it in a place you can find easily. Do not unzip the file. Keep it ready for upload. Always download from a trusted site. This keeps your site safe.
Every theme should work with your WordPress version. Check the theme’s details for compatibility info. Look for updates on the theme page. If your WordPress is old, update it first. This helps avoid errors. Some themes need extra plugins. Make sure you can add them.
Accessing WordPress Dashboard
Access WordPress Dashboard to add themes manually by navigating to ‘Appearance’ and selecting ‘Themes’. Upload a theme file from your computer using the ‘Add New’ option, then activate it.
Logging Into WordPress
Enter your website address in the browser. Add “/wp-admin” at the end. This opens the login page. Type your username and password. Click the login button. Now you are inside the WordPress Dashboard.
Navigating To Appearance
In the dashboard, find the menu on the left. Look for the Appearance tab. It is below the Plugins tab. Click on it. This opens more options. You will see the Themes section. Here you can add or change themes.
Uploading Theme Via WordPress
First, go to your WordPress dashboard. Click on Appearance and then Themes. You will see an Add New button at the top. Click it. Then, click on Upload Theme. Now, you will need a .zip file of your theme. Click Choose File and find your theme file. Once selected, click Install Now. The theme will upload and install.
After installation, a success message will appear. You will see an Activate button. Click it to use the new theme. Your site will now show the new theme. Check the site to see the changes.

Credit: www.youtube.com
Installing Theme Via Ftp
First, you need an FTP client like FileZilla. Open it and enter your server details. Fill in the host, username, and password. Then click connect. After connecting, you will see files and folders on your server. Find the WordPress root folder. This folder usually contains wp-content and wp-admin directories.
Inside the wp-content folder, locate the themes directory. This is where you will upload your theme. Now, on your computer, find the theme folder you downloaded. It should be unzipped. Drag this theme folder to the themes directory on the server. Wait for the upload to finish. Once done, your theme files are now on the server.
Troubleshooting Common Issues
Adding WordPress themes manually can solve installation errors. Download the theme zip file, and upload it via the WordPress dashboard. Ensure compatibility with your WordPress version to avoid issues.
Resolving Upload Errors
Upload errors can stop your work. Check the theme file size first. Ensure it meets the limit. Large files may need compression. Use a tool to reduce size. Also, check your internet. Slow connection may interrupt upload. You can try again later. Another fix is checking permissions. Make sure you have the right access. Without it, uploading fails. Lastly, look at your PHP settings. Some themes need higher limits. Adjust settings if needed. These steps should help.
Fixing Activation Problems
Activation problems can be frustrating. First, confirm the theme’s compatibility. It must match your WordPress version. Outdated themes cause errors. Always check for updates. Next, inspect your plugins. Conflicts may occur. Disable them one by one. This helps find the issue. Another tip is reviewing your site’s memory. Some themes require more resources. Increase memory if errors persist. Lastly, check your settings. A wrong setting might block activation. Correct any mistakes you see. These tips will aid in solving activation issues.
Customizing Your Theme
The WordPress Customizer lets you change your website’s look. It’s easy to use. Click on “Customize” in your dashboard. A new page will open. You can see your site on the right. Options are on the left. You can change colors, fonts, and backgrounds. Try different settings. See changes in real-time. This makes it fun and simple.
Widgets make your site useful. They add extra features. Find them in “Appearance” then “Widgets”. Drag and drop them into sidebars. You can add search bars or recent posts. Menus help people find pages. Go to “Appearance” then “Menus”. Add new items. Arrange them as you like. This helps users move around your site easily.
Ensuring Theme Security
Keeping your WordPress themes updated is very important. Updates often fix security holes. They also improve performance and add new features. Check for updates on your WordPress dashboard. It’s easy and quick. Always backup your site before updating. This keeps your data safe.
Security plugins help protect your WordPress site. They act like guards. These plugins find and block threats. Choose popular plugins like Wordfence or Sucuri. They are easy to set up. Make sure the plugin is updated often. This ensures it works well.
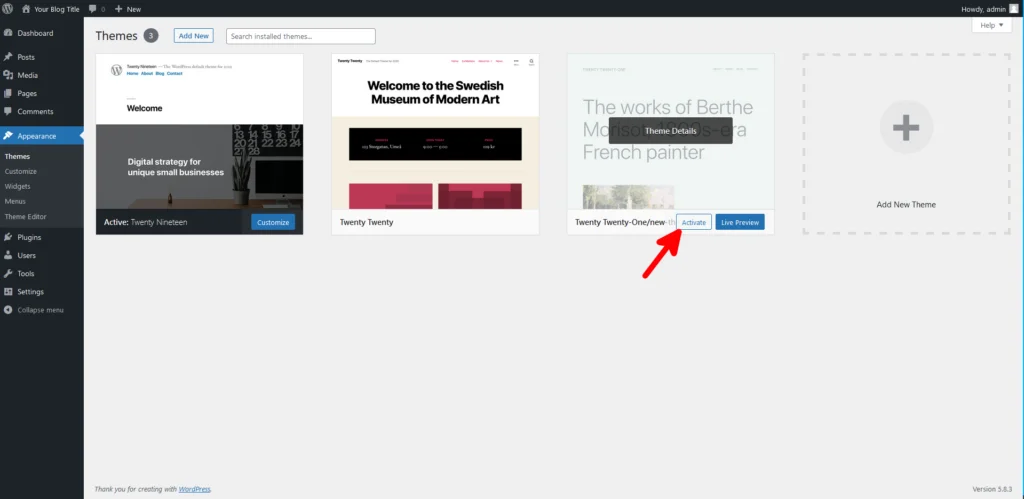
Credit: www.scalahosting.com

Credit: www.domains.co.za
Frequently Asked Questions
How To Manually Install WordPress Themes?
To manually install a WordPress theme, download the theme zip file first. Go to your WordPress dashboard, navigate to ‘Appearance’, then ‘Themes’, and click ‘Add New’. Select ‘Upload Theme’, choose your downloaded theme file, and click ‘Install Now’. Finally, activate the theme to apply it.
Can I Add Themes Without Ftp Access?
Yes, you can add themes without FTP. Use your WordPress dashboard to upload and install themes. Navigate to ‘Appearance’, then ‘Themes’, click ‘Add New’, and upload your theme file. This process allows you to install themes directly, bypassing the need for FTP access.
What Are Common Errors In Theme Installation?
Common errors include incorrect file format, incomplete uploads, or compatibility issues. Ensure your theme is in. zip format before uploading. Check if your theme is compatible with your WordPress version. If you face issues, reinstall the theme or check for plugin conflicts.
Why Isn’t My Theme Appearing?
Your theme may not appear due to installation errors or compatibility issues. Double-check if the theme was uploaded correctly and is activated. Ensure your WordPress version supports the theme. If problems persist, try reinstalling the theme or contact the theme developer for support.
Conclusion
Adding WordPress themes manually is straightforward. You gain control and flexibility. Start by downloading your chosen theme. Next, upload it via the WordPress dashboard. Make sure to check compatibility with your version. Activate the theme once installed. Customize it to suit your needs.
Manual installation might seem complex initially. But it gets easier with practice. You avoid automatic updates this way. This gives you stability. Ensure regular backups to prevent data loss. Your WordPress site will look unique and professional. Enjoy the creativity and personal touch it brings.


