
Are you looking to give your WordPress site a fresh and cohesive look without spending hours on coding? Adding theme general settings can be your secret weapon.
These settings allow you to customize your website’s appearance and functionality with just a few clicks. Imagine transforming your site’s aesthetic to better reflect your brand’s personality, ensuring visitors stay longer and engage more. In this guide, you’ll learn step-by-step how to navigate WordPress’s theme general settings, making it easy for anyone—even if you’re not a tech wizard.
Ready to unlock the full potential of your website? Let’s dive in and explore the simple yet powerful tweaks that can elevate your site’s design and boost user experience.
Choosing The Right Theme
Picking a theme is a big step. Free themes are great for beginners. They often have basic features. But there are limits to what you can do. Premium themes cost money. They offer more features and support. They can make your site look unique.
Decide what you need. A small blog might do well with a free theme. A business site might need a premium one. Consider your budget and needs carefully.
Most people use phones to visit websites. Responsive design means your site looks good on all devices. Check if a theme is responsive before you pick it.
Some themes adjust well to different screens. Others don’t. A responsive theme helps more people enjoy your content. It also improves user experience. This is very important.
Credit: totalwptheme.com
Installing A Theme
First, log into your WordPress dashboard. Find the ‘Appearance’ section on the left. Click ‘Themes’. You will see a button named ‘Add New’. Click it. Browse through the available themes. Choose one you like. Hover over the theme and click ‘Install’. After installation, click ‘Activate’. Your new theme is now live.
Download your theme’s zip file to your computer. Open your FTP client. Connect to your server. Find the ‘wp-content’ folder. Inside it, locate the ‘themes’ folder. Unzip the theme file. Upload the unzipped folder to ‘themes’. Return to your WordPress dashboard. Go to ‘Appearance’, then ‘Themes’. You will see your uploaded theme. Click ‘Activate’ to make it live.
Accessing Theme Customizer
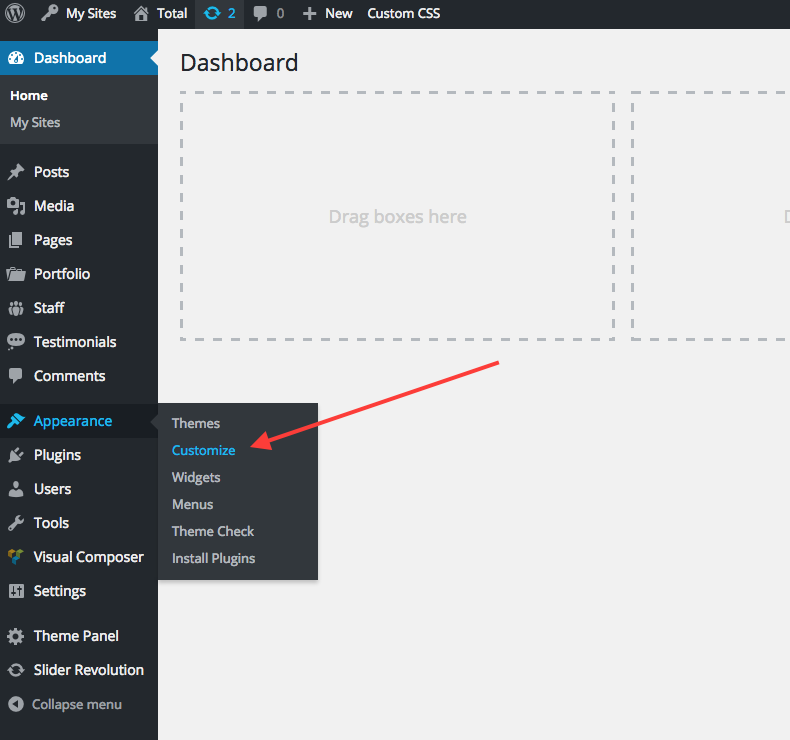
Navigating the Dashboard is the first step. Start by logging into your WordPress site. Look at the left side of your screen. This is your dashboard. Find the Appearance tab. Click on it. Now, you will see the Customizer option. Click it. This opens the Theme Customizer.
Next, you will see the Customizer Interface. It is easy to use. On the left, there are different settings. Each setting changes your theme. On the right, see your website. Changes show here instantly. Feel free to explore. Make your site look great!
Credit: www.tutorialspoint.com
Configuring General Settings
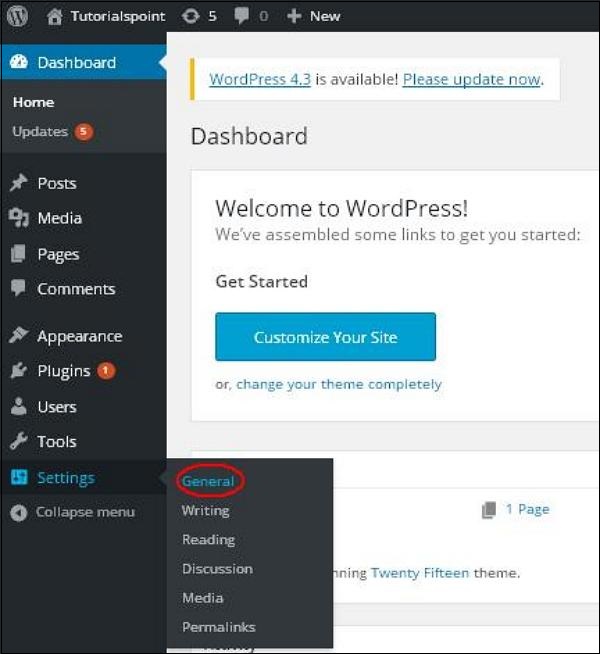
Set up the Site Identity first. This includes your site title and tagline. Choose a title that reflects your website. A good tagline gives more info about your site. You can also upload a site icon. This icon shows in the browser tab. Make sure it is clear and easy to see.
Choose the right Color Scheme for your website. Colors help set the mood. They should match your brand. Your theme may offer different color options. Test them out to find the best look. Keep it simple and clean. Too many colors can confuse visitors.
Pick fonts that are easy to read. Your theme might have Typography Options. Use these to change font styles. Choose fonts that match your site’s style. Avoid fonts that are too fancy. Simple fonts help users read better. Adjust font size for better visibility.
Customizing Header And Footer
Start by opening your WordPress dashboard. Click on the Appearance tab. Then, select Customize. Find the section labeled Header. Here, you can upload your logo. Use a simple image. Next, type your site title. Make sure it’s clear. Check how it looks on the preview. If satisfied, click Publish.
Go back to the Appearance tab. Choose Menus. Decide where your menu should appear. It could be in the header or footer. Use the drag and drop feature to arrange items. For widgets, go to Widgets under the same tab. Select a widget area. These could be sidebars or footers. Add the widgets you need. Save your changes. Always preview before finalizing. This ensures everything fits well.

Credit: visualmodo.com
Setting Up Homepage Layout
Choosing between a static page and latest posts for your homepage is crucial. Static pages show the same content always. Latest posts update with new content. Static pages are great for business sites. Latest posts suit blogs. Decide based on your site’s purpose. Static pages need more updates. Latest posts manage themselves with new entries. Both options have benefits. Choose wisely to match your site’s goals.
Widgets help in arranging content on the homepage. Drag and drop them in your theme. They add features like search bars, text boxes, and images. Custom widgets can be added. They make your page unique. Use them to highlight important sections. They improve user experience. Explore widget options in your WordPress dashboard. Arrange them to create a pleasing layout. Widgets simplify design changes.
Adjusting Background Settings
Colors make your website look better. Select a color that matches your theme. Bright colors can be fun. Soft colors can be calming. Use colors that make text easy to read. Test different colors. Find what looks best. Color changes are easy in settings. Click and change. Save your favorite choice.
Images add life to your website. Choose a picture that suits your theme. Nature images are popular. City images can be cool. Upload your image in the settings. Resize the image if needed. Make sure it fits. A good image makes your site special. Keep it simple. Too many images can distract visitors.
Managing Additional Css
Easily enhance your WordPress website by managing additional CSS through theme general settings. Customize appearance without altering core files. Improve site design efficiently with user-friendly options.
Adding Custom Styles
Adding custom styles is easy in WordPress. Visit the dashboard and find “Appearance.” Click on “Customize.” Look for the “Additional CSS” section. Here, you can add your own styles. Type your CSS in the box. Save changes after adding your styles. This updates your site’s look. Custom CSS is helpful for specific changes. It gives control over design. Experiment with different styles to see what works.
Using Css For Responsive Design
Responsive design makes your site look good on all devices. Use CSS to adjust layout for different screens. Add media queries in the “Additional CSS” section. Media queries change styles based on screen size. Set breakpoints for tablets and phones. This way, your site will be user-friendly. Responsive design is important today. It helps reach more visitors. A well-designed site keeps users happy.
Saving And Publishing Changes
Previewing changes helps you see how your site looks. Use the preview button. It shows changes without making them live. This way, you can check everything. Make sure it looks right. Once satisfied, you can proceed.
Next, it’s time to publish to the live site. Find the publish button. Click it to make changes visible to everyone. Your site will now show the updated design. Always double-check your site after publishing. Ensure everything is working fine. If not, you can make adjustments.
Frequently Asked Questions
How Can I Access Theme Settings In WordPress?
To access theme settings in WordPress, navigate to the “Appearance” section in your dashboard. Click on “Customize” to open the theme customizer. Here, you’ll find various settings related to your theme’s appearance and functionality. Adjust these settings to tailor your site’s look and feel according to your preferences.
Are Theme Settings Customizable For All Themes?
Most themes offer customizable settings, but the extent varies. Premium themes usually provide more comprehensive customization options than free ones. Before installing a theme, check its documentation or reviews to understand the customization features available. This ensures you can personalize your site to meet your specific needs and style preferences.
How Do I Change The Theme’s Color Scheme?
To change the color scheme, go to “Appearance” in your WordPress dashboard and click “Customize. ” Look for the “Colors” section within the customizer. Here, you can adjust the primary colors of your theme. Some themes offer advanced color settings, allowing you to tweak specific elements for a cohesive design.
Can I Add Custom Css In Theme Settings?
Yes, you can add custom CSS in the theme settings. Navigate to “Appearance” and select “Customize. ” Within the customizer, find the “Additional CSS” section. Input your CSS code here to customize your theme beyond default options. This allows for precise styling adjustments, enhancing your website’s unique appearance.
Conclusion
Adding theme settings to WordPress enhances your site’s appearance. It’s simple and improves user experience. Start by accessing your WordPress dashboard. Then, navigate to the theme settings. Customize colors, fonts, and layout to match your style. Save changes to apply them.
Regular updates keep your site fresh and secure. Practice makes you more comfortable with these settings. Experiment with different themes for variety. Your site can look professional with these simple tweaks. Now, you’re ready to create a visually appealing website.
Enjoy the creative process and watch your site evolve.


