
You’ve just purchased a stunning premium theme for your WordPress site. Excitement courses through you as you imagine your website transforming into a sleek, professional masterpiece.
But, there’s a lingering question: how do you get this new theme onto your WordPress site? You might feel a bit overwhelmed, wondering if it’s a complex process that requires technical expertise. The good news? It’s simpler than you think.
In this guide, you’ll discover step-by-step instructions to seamlessly add your premium theme to WordPress. Stay with us, and by the end of this article, you’ll have the knowledge and confidence to elevate your website’s design effortlessly. Ready to make your website shine? Let’s dive in!

Credit: thimpress.com
Choosing The Right Premium Theme
Picking a theme is fun. It changes your site’s look. Themes can make your site pretty. Some themes load fast. Others have many features. Responsive themes look good on phones. SEO-friendly themes help your site rank better. Check if the theme updates often. This keeps your site safe. Look for good customer support. It helps if you have problems.
Read reviews from other users. They share their experiences. Some themes are easy to use. Others need coding skills. Choose a theme that fits your needs. A simple theme is great for beginners. A complex one is for experts. Be sure you like how it looks. You will see it every day.
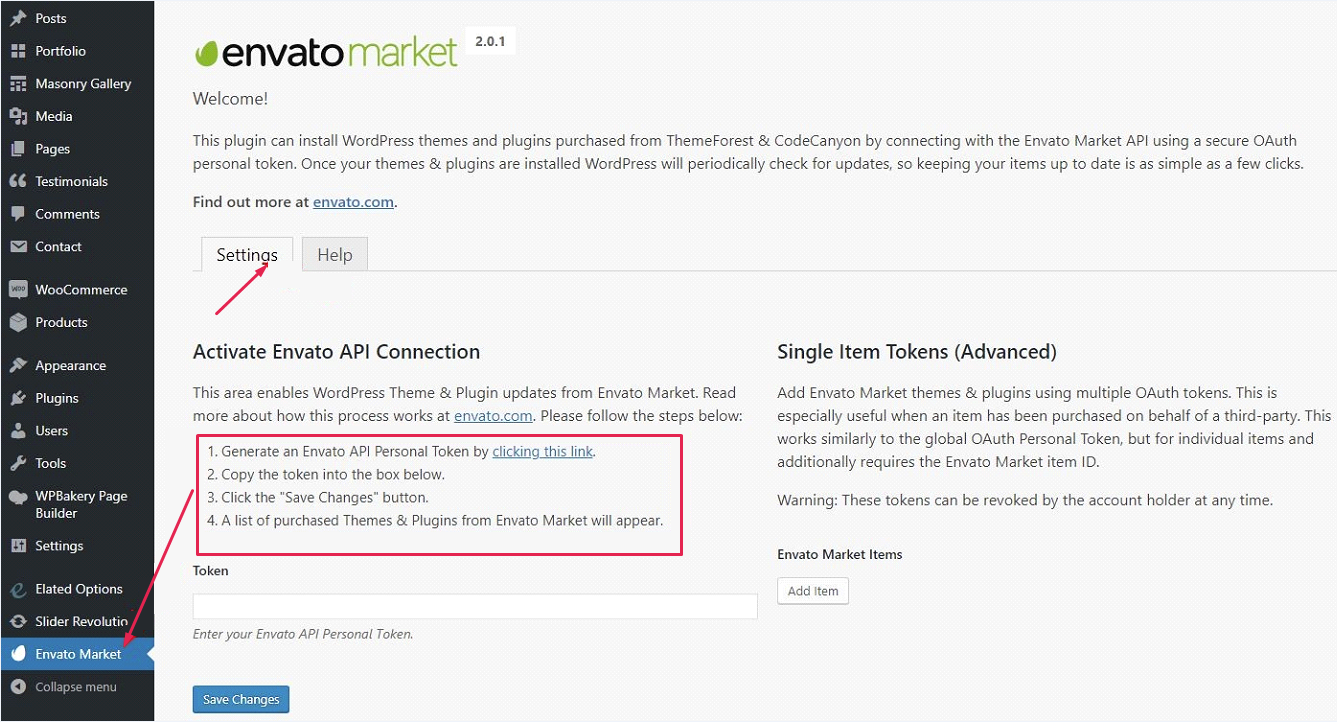
Credit: helpcenter.qodeinteractive.com
Downloading Your Purchased Theme
Begin by logging into your WordPress account. Go to your theme provider’s website. Find the section where you can download your theme. Click the download button. Wait for the download to finish. You will get a zip file. Save it in a place where you can find it later. This file is important for the next steps.
Make sure you have the latest version. Check if any updates are available. Sometimes themes come with free updates. Keep your theme updated. This helps it work better on your site. An updated theme also has fewer bugs. Now you are ready to add the theme to WordPress.
Preparing Your WordPress Site
Always back up your WordPress site before changes. This keeps your data safe. Use a plugin like UpdraftPlus or BackupBuddy for easy backups. Save your backup in a secure place. This could be your computer or cloud storage. It’s important to check your WordPress version. Make sure it works with the new theme. Go to your dashboard. Find the version number in the bottom right corner. Check the theme’s requirements. Compare them with your current setup.
Updating WordPress is simple. Click on “Dashboard”. Then, click on “Updates”. Follow the steps to update. This ensures your site works well with new themes. Always use the latest version for security. It helps your site run smoothly.

Credit: www.instagram.com
Installing The Premium Theme
Open your WordPress dashboard. Look for the Appearance tab. Click it. Find the Themes option. Select Add New. You will see an upload button. Click it. Choose your downloaded theme file. Make sure it’s a .zip file. Click Install Now. Wait for it to upload. Once done, click Activate. Your new theme is ready.
Open your FTP client. Connect to your server. Find the wp-content folder. Inside, look for themes. Upload your unzipped theme folder here. Wait for the upload to complete. Go back to your WordPress dashboard. Navigate to the Appearance tab. Find your new theme. Click Activate. Your theme is now live.
Activating The Theme
First, go to your WordPress dashboard. Find the “Appearance” menu. Click on “Themes”. You will see a list of themes. At the top, click “Add New”. Then, click “Upload Theme”. A new window will appear. Select the theme file from your computer. Click “Install Now”. Wait for the upload to finish.
Once installed, click “Activate”. Your new theme is now live. Check your website. Ensure everything looks good. If there are issues, contact the theme support. They can help fix problems. Enjoy your new theme!
Customizing Your Premium Theme
Installing a premium theme on WordPress is straightforward. First, download the theme file after purchase. Then, upload it through the WordPress dashboard under “Appearance” and “Themes. “
Exploring Theme Options
Premium themes have many options. These options help you make your site unique. Colors, fonts, and layouts are easy to change. You can find these options in the theme settings. Check each setting. See what changes on your site. This is a fun way to learn.
Using Customizer Tools
The customizer tool is very useful. It shows changes in real-time. This tool is in the WordPress dashboard. Preview your site before saving changes. Try different looks. Make your site special. Experiment with backgrounds and widgets. Customize until you are happy.
Troubleshooting Common Issues
Enhance your WordPress site by adding a premium theme after purchase. Navigate to the dashboard, select “Appearance,” and click “Themes. ” Upload the theme file and activate it, ensuring a seamless integration. Troubleshoot common issues like missing files or activation errors by checking compatibility and following installation instructions.
Resolving Theme Conflicts
Theme conflicts can make your website act weird. Check if your plugins clash with the theme. Deactivate all plugins first. Then, activate them one by one. This helps to find the bad plugin. If the theme still has issues, switch to a default theme. See if the problem is gone. This helps to know if the theme is the issue.
Fixing Installation Errors
Installation errors can happen with themes. Make sure the theme file is not too big. The file should be in a .zip format. Check your WordPress version. It must match the theme’s needs. If the error continues, contact the theme’s support team. They can help fix the error.
Ensuring Site Performance
Enhance your website by adding a premium theme to WordPress effortlessly. First, download the theme file from your purchase. Next, navigate to your WordPress dashboard, select “Appearance,” then “Themes,” and click “Add New. ” Upload the theme file, install, and activate it to boost your site’s performance.
Optimizing For Speed
Speed is key for any website. A slow site can lose visitors fast. Compress images to make your site load quicker. Use a caching plugin to store parts of your site. This helps pages load without delay. Keep plugins to a minimum. Too many plugins can slow things down. Regularly update your theme and plugins. Updates can improve speed and security.
Testing Theme Responsiveness
A responsive theme works on all devices. Check your site on phones and tablets. Look for any broken parts or missing images. Test buttons to see if they work. Make sure text is easy to read on small screens. Try rotating your device. The layout should adjust smoothly. A responsive theme keeps users happy and engaged.
Frequently Asked Questions
How To Install A Purchased WordPress Theme?
To install your purchased WordPress theme, navigate to your WordPress dashboard. Go to Appearance > Themes > Add New > Upload Theme. Choose your downloaded theme file, click ‘Install Now’, and then activate it. Ensure you have the necessary plugins for full functionality.
Can I Customize A Premium WordPress Theme?
Yes, you can customize a premium WordPress theme. Most themes come with customization options. Access these through the WordPress Customizer or theme settings. You can change colors, fonts, layouts, and more. Ensure to check the theme’s documentation for specific customization features and guidance.
Do I Need A Child Theme For Customization?
Using a child theme is recommended for customization. It allows you to safely modify your theme without losing changes during updates. Create a child theme by copying the parent theme’s files. This practice ensures your customizations remain intact with theme updates.
What Are Common Issues After Theme Installation?
Common issues include missing styles, plugin conflicts, or demo content not importing. Check theme documentation for solutions. Ensure your WordPress version is up to date. Clear cache and contact theme support if problems persist. Properly configured hosting can also prevent many issues.
Conclusion
Adding a premium theme to WordPress is simple with the right steps. You enhance your site’s design and functionality effortlessly. Start by downloading your theme and logging into WordPress. Navigate to “Appearance” and select “Themes,” then click “Add New. ” Upload your theme file and activate it.
Your website will now showcase the new design. Explore settings to customize further. A well-chosen theme boosts user experience and improves site appeal. Always ensure themes are updated for security and performance. Enjoy the new look and feel of your WordPress site.
Make your online presence shine!


