
Have you ever landed on your WordPress site and felt something was just off? Maybe the layout is perfect, the images are sharp, but the text just doesn’t pop like it should.
You’re not alone. Changing the font in your WordPress theme can transform your website’s look and feel, making it not only visually appealing but also more engaging for your audience. Imagine your favorite book printed in a clunky, hard-to-read font.
Would you still enjoy it as much? Probably not. The same goes for your website. The right font can captivate your visitors, making your content more readable and inviting. In this guide, you’ll discover the simple steps to change a font in a WordPress theme. Whether you’re a seasoned web designer or a WordPress newbie, you’ll find this process easier than you might think. Get ready to elevate your site’s design and keep your readers hooked from the first glance. Keep reading to learn how you can make your website stand out with just a few clicks!
Credit: www.inmotionhosting.com
Choosing The Right Font
Picking a font is not just about style. It affects readability and mood. Think about who will read your site. Young kids or adults? Choose a font size that’s easy to read. Look at the font’s weight. Some fonts are too thin. Some are too bold. Balance is key. Consider the spacing between letters. Tight letters can be hard to read. Fonts with good spacing look cleaner. Lastly, check if the font is web-safe. Not all fonts work on every device. A web-safe font will work everywhere.
There are many fonts to choose from. Some popular choices are Arial, Times New Roman, and Georgia. These fonts are classic and easy to read. For a modern look, try Roboto or Open Sans. They are clean and simple. Want something fun? Comic Sans is playful but not for serious sites. Courier New is great for a typewriter effect. Each font gives a different feel. Pick one that matches your site’s mood.
Locating Theme Settings
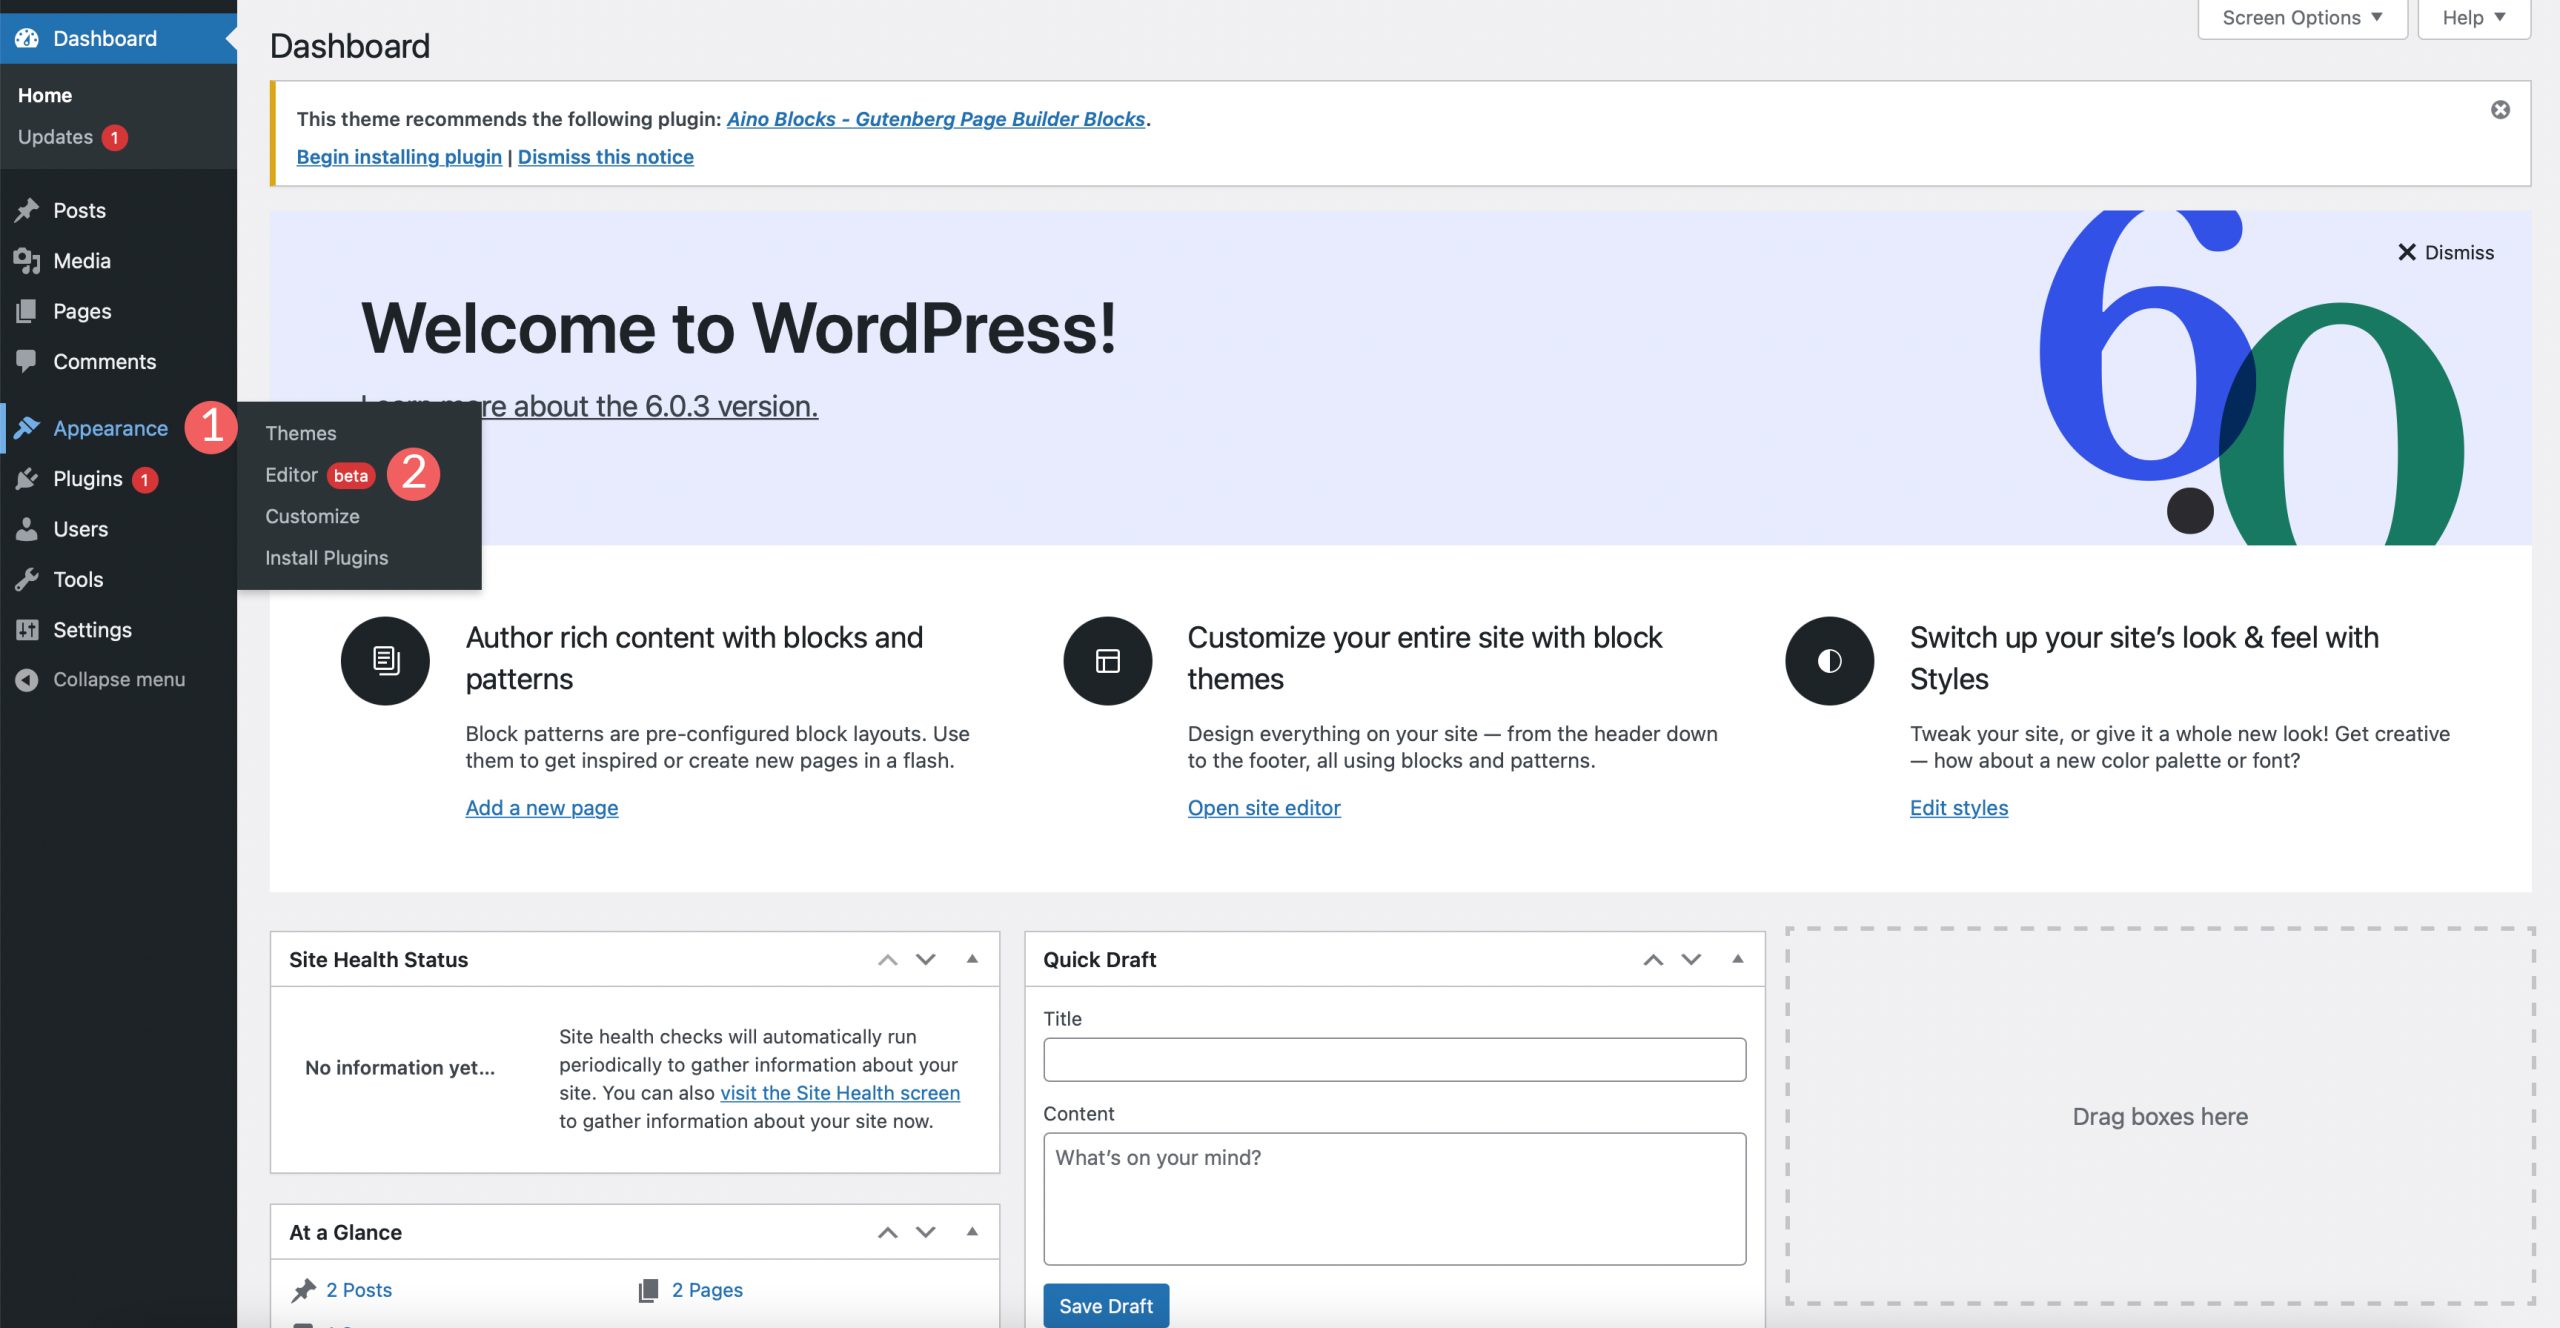
Begin with logging into your WordPress dashboard. It’s where you manage your site. Look for the sidebar on the left. Click on Appearance. This is where you’ll find theme options.
Once in Appearance, spot the Customize button. This opens the theme customizer. Here, you can change fonts. Navigate through the options. Look for Typography settings. Fonts are under Typography. Select the font you like. Preview it instantly. Save changes when happy.
Changing Fonts Via Customizer
First, open your WordPress dashboard. Find the Appearance tab on the left. Click on it to open more options. Choose Customizer from the list. The Customizer helps you change how your site looks. Look for the Typography section. This is where you change fonts. Click on it to explore font settings.
In the Typography section, find a list of fonts. Pick a font you like. Click on the font name to select it. Your site will show the new font. Check if you like the change. If not, try another font. Preview your site to see the new look. Save changes when you’re happy with it.
Using Additional Css For Font Changes
CSS helps style a website. It changes colors, fonts, and more. Selectors target elements on the page. Properties define what you change, like color or size. Values are what you set, like red for color. Learning these can help you change fonts.
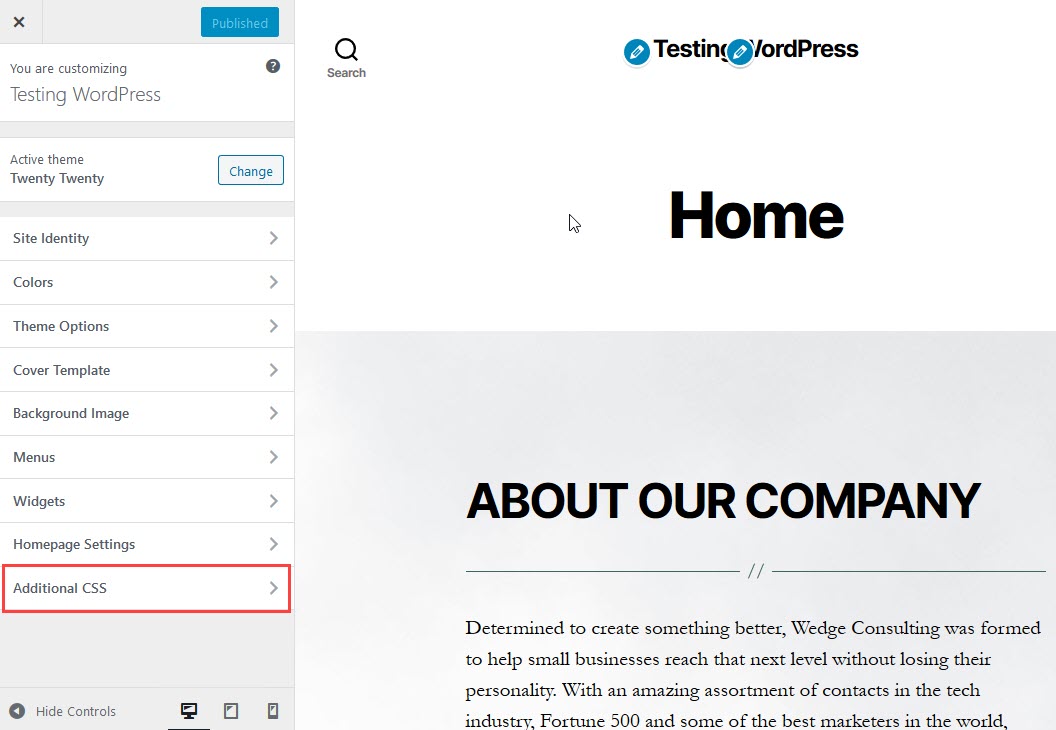
Open your WordPress dashboard. Go to Appearance, then Customize. Find the Additional CSS section. Here, you can add your own CSS code. To change a font, write: body { font-family: 'Arial', sans-serif; } This changes the main font to Arial. You can use other fonts too. Just replace ‘Arial’ with your font choice. Save changes to see your new font.
Installing A Font Plugin
Plugins make font changes easy. They offer many choices. No coding needed. Just install and pick a font. Fonts make your site unique. They improve design. Plugins save time. You get more control over styles. Easy to change fonts anytime. Update your look often.
Plugins are simple to use. They help you change fonts fast. No need for complex steps. Just a few clicks. They give more options and styles. You can try many fonts. Plugins make your site look better. They are safe and reliable. Many users trust them. Plugins keep your site updated.
| Plugin Name | Description |
|---|---|
| Easy Google Fonts | Adds Google Fonts easily. |
| Font Organizer | Organizes fonts neatly. |
| WP Google Fonts | Simple font setup. |
Uploading Custom Fonts
Preparing font files is important. Start by getting the font files you need. Usually, these files are in formats like TTF or OTF. Choose fonts that look nice and are easy to read. Once you have the files, check them. Ensure they are not corrupted or damaged.
Next, organize your font files. Create a folder on your computer. Name it something easy to remember, like “Custom Fonts”. Place all your font files in this folder. This keeps things neat and easy to find.
First, open your theme’s CSS file. This file controls the look of your site. Find the spot where font styles are set. To add new fonts, use the @font-face rule. This rule tells the browser about your custom fonts.
Start by typing @font-face. Then, give your font a name. This is the name you will use in your CSS. Set the src to the location of your font files. This lets the browser find and use the font.
Testing And Troubleshooting
Preview your font changes before saving them. This helps you see how the new font looks. Click the preview button in the WordPress theme editor. This will show you the changes live. Make sure the font is clear and easy to read. Check if the new font matches your site’s style. This step is important to ensure your site looks good.
Fonts sometimes don’t display correctly. Clear your browser cache to fix this. If the font still doesn’t work, check the theme settings. Ensure the font file is uploaded correctly. Some themes have specific font formats. Make sure the format matches the theme’s requirements. If all else fails, consult your theme’s support. They can help solve font issues effectively.

Credit: 10web.io
Credit: www.elegantthemes.com
Frequently Asked Questions
How Do I Change Fonts In WordPress Themes?
To change fonts in WordPress themes, access the WordPress dashboard. Go to Appearance > Customize. Navigate to the Typography section. Here, you can select and customize fonts for different site elements. Save changes to apply them. Some themes may require additional CSS or plugin assistance.
Can I Use Google Fonts In WordPress?
Yes, you can use Google Fonts in WordPress. Many themes support Google Fonts integration. You can select and customize fonts directly in the Customizer. Alternatively, use a plugin like Easy Google Fonts. It allows for easy integration and management of Google Fonts across your site.
Do All Themes Allow Font Changes?
Not all themes allow font changes directly. While many themes offer customization options, some may require additional CSS coding. Premium themes usually provide more flexibility and options. If font customization isn’t available, consider using a plugin or editing theme files.
Always back up before making changes.
Is Custom Css Needed For Font Changes?
Custom CSS may be needed for font changes in some themes. While many offer built-in options, others might limit customization. Using custom CSS allows for more precise control over font styles and sizes. It’s essential to know CSS basics or consult a developer for complex changes.
Conclusion
Changing fonts in a WordPress theme is easy. Follow the steps carefully. Explore different font styles to match your site’s vibe. Remember to preview changes before saving. This ensures your design looks perfect. Fonts can greatly enhance readability and aesthetics.
They can make your site more appealing. Choose fonts that suit your content and audience. Keep experimenting with different options. This helps in finding the best fit for your theme. A well-chosen font can make your website more attractive. It can also improve user experience.
Enjoy customizing your WordPress site!


