
Imagine opening your WordPress site and feeling that it needs a fresh look. You’re not alone; many website owners crave a visual upgrade.
Changing the theme in a WordPress Network can seem daunting, but it doesn’t have to be. The right theme can transform your site, making it more engaging and user-friendly. You might wonder how to make this change without disrupting your site’s functionality or appearance.
This guide will walk you through the process step-by-step, ensuring a smooth transition. By the end of this article, you’ll have the confidence to switch themes effortlessly, enhancing your site’s appeal and functionality. Let’s dive in and unlock the potential of your WordPress Network with a new theme!
Setting Up WordPress Network
WordPress Multisite is a feature. It allows you to create many websites. All under one installation. Think of it like a big house. Each room is a different site. You manage them all from one place. This saves time and effort. One login for everything. Easy, right?
A network setup offers many benefits. You update plugins once for all sites. It saves space and time. Themes are shared too. Manage users easily. Add or remove them as needed. Costs are lower with one server. Backup all sites together. This keeps data safe.
First, install WordPress. Make sure it’s the latest version. Next, edit the wp-config.php file. Add the multisite line of code. Save and upload the file. Then, deactivate all plugins. This avoids problems later. Go to the admin dashboard. Follow the steps to enable the network.
Accessing Network Admin Dashboard
First, log into your WordPress Network. Look for the My Sites tab. Click it. A menu will appear. Find the Network Admin option. Click on it. You will enter the dashboard. The dashboard is where you manage your network. Here, you can change settings and themes.
The admin panel is easy to find. It has many tools. Use the themes section to change designs. Click on the themes option. This shows all available designs. Choose one that you like. Click on it to activate. Changes happen instantly. Your network will look fresh.
Installing New Themes
Search for themes that work with WordPress Network. Visit the WordPress theme repository. Ensure the theme supports multisite. Read the theme’s description and reviews. Check for updates and compatibility. Use themes with good ratings. Avoid themes with bugs or errors. Choose themes that match your needs. Look for themes with customization options. Pick themes that load fast and look good.
Download the theme to your computer. Log into your WordPress network admin. Go to Themes and click Add New. Click Upload Theme and choose file. Select the theme ZIP file. Click Install Now. Wait for the installation to finish. Check for any errors. Make sure the theme is installed properly. The theme should now be on your network.
Go to the Themes page in your network. Find the theme you want to activate. Click Network Enable. This makes the theme available for all sites. Site admins can now activate it. Ensure the theme works on different sites. Test the theme on a sample site. Check for any problems or issues. If problems occur, consider a different theme. Themes should work smoothly for all users.
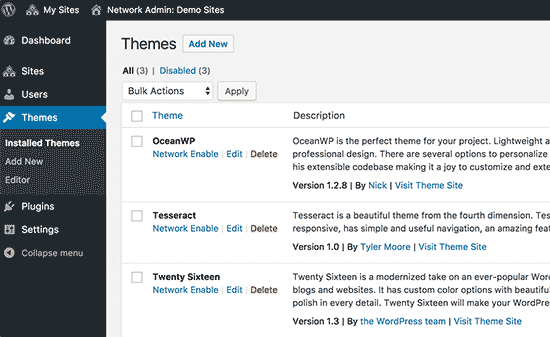
Credit: support.basehost.com.au
Changing Theme For Network Sites
To change a theme for specific sites, go to the Network Admin dashboard. Click on Themes. You will see a list of available themes. Choose the one you like. Click Enable to activate it for your chosen site.
Each site can have its unique look. Make sure the theme fits the site’s content. This makes the site more appealing and easy to use.
Selecting A Theme For Specific Sites
Different sites need different themes. Choose the right one for each site. This helps in delivering the correct message. Themes can change how your site looks and feels.
Applying Changes Across The Network
A theme can apply to all sites in the network. Go to the Themes section in the Network Admin. Click Network Enable. Now, all sites use the same theme. This keeps a consistent look across the network.
Testing Theme Functionality
After changing the theme, check its functions. Ensure everything works fine. Look at different pages. Make sure they load correctly. Fix any issues you find. A theme should make your site easy to use.
Managing Themes Across The Network
Site admins can control themes for the whole network. Enabling a theme makes it available for all sites. Disabling a theme hides it from site users. This control helps keep the network tidy. Too many themes can confuse users. It’s easy to switch themes on and off. Just click the enable or disable button. All changes affect the whole network.
Each site can have its own look. Site admins can customize themes for each site. This makes every site unique. They can change colors, fonts, and layouts. Each change only affects one site. This lets users create a special feel for their space. It’s easy and quick to do. Just use the theme settings.
Keeping themes updated is important. Updates bring new features and fix bugs. They keep the network safe and running well. Admins can update themes from the dashboard. Just check for updates and click to install. It’s simple and keeps everything fresh. Regular updates are a good habit. They help avoid problems later.

Credit: themeforest.net
Troubleshooting Common Issues
Switching themes in a WordPress network can be tricky. Start by navigating to the network admin dashboard. Select themes and apply the desired one to your site. Make sure to check compatibility issues to ensure a smooth transition.
Resolving Theme Compatibility Problems
Some themes might not work well with your site. Check if the theme is updated. Older themes can cause problems. Switch to a different theme if needed. Make sure your plugins are also updated. Sometimes plugins can cause issues.
Fixing Display And Layout Errors
Check your theme settings. Settings may need adjustments. Visit the theme’s support page. The page can offer solutions. Clear your browser cache. This can fix display problems. Try using another browser. Some themes work better on different browsers.
Handling Theme Update Conflicts
Backup your site before updating. This keeps your data safe. Disable plugins one by one. This helps find the problem. Contact theme support for help. They can offer advice. Revert to an older theme version if needed. Older versions may work better.
Credit: weddingphotographersites.com
Frequently Asked Questions
How Do I Change Themes In WordPress Network?
To change themes in a WordPress Network, go to the Network Admin dashboard. Navigate to “Themes” under “Sites. ” Select the desired theme and enable it for the network. Then, activate it for individual sites. Ensure compatibility and check for any customizations that might be needed.
Can Each Site Have A Different Theme?
Yes, each site in a WordPress Network can have a different theme. Network Admins can enable multiple themes and site administrators can choose from them. This allows customization for each site, catering to different designs and functionalities as required by individual site owners.
Is Changing A Theme Easy In WordPress Network?
Changing a theme in WordPress Network is straightforward. Navigate to the Network Admin, enable desired themes, and activate them for specific sites. Ensure themes are compatible with plugins and site functionalities. Always backup your site before making major changes to prevent data loss.
What Precautions Should I Take Before Changing Themes?
Before changing themes, back up your site to prevent data loss. Check theme compatibility with plugins and functionalities. Review the design and customizations needed for the new theme. Test the theme on a staging site to ensure everything works smoothly before applying it live.
Conclusion
Changing themes in a WordPress network is straightforward. Follow the steps shared earlier. Ensure your theme suits your site’s purpose. Consider user experience while choosing a theme. Test the new theme before making it live. This helps avoid technical issues later.
Keep your site updated for best performance. Regular updates ensure security and functionality. Always back up your site before changes. This prevents data loss in case of errors. With practice, theme changes become easier. Enjoy customizing your WordPress network. Happy blogging!


