
Have you ever felt that your A2 WordPress site needs a fresh new look to better reflect your brand or personality? Adding a theme is a simple yet powerful way to transform your website’s appearance and functionality.
Whether you’re a business owner, blogger, or just a creative soul, the right theme can make your site stand out, enhance user experience, and even boost your online presence. But how do you choose the perfect theme and install it without getting lost in technical jargon?
In this guide, you’ll discover a step-by-step approach to adding a theme to your A2 WordPress site. We’ll break it down into easy-to-follow steps, ensuring you can effortlessly give your site the makeover it deserves. Imagine a website that not only looks stunning but also captivates your audience, making them want to explore every corner. Ready to dive in and make your site truly yours? Let’s get started!
Choosing The Right Theme
First, know what your site needs. Is it for a blog or a shop? Different goals need different themes. Think about your target audience. Is your site for kids or adults? This will help in choosing the right look and feel.
Explore themes that fit your goals. A2 has many choices. Look for popular and well-rated themes. Visit the theme’s demo page. See if you like the design. Check user reviews for real feedback.
Good themes have useful features. Check for responsive design. This means it looks good on phones and computers. Look for customization options. Can you change colors and fonts easily? Ensure it supports plugins you might need.
Credit: www.isitwp.com
Installing A New Theme
Access the WordPress Dashboard. Start by logging into your WordPress account. Look for the dashboard area. It’s your control center.
Next, navigate to Theme Settings. Find the “Appearance” option. Click on “Themes”. This takes you to the theme section.
Upload or Search for Themes. You can upload a theme from your computer. Click “Add New” to upload. Or, explore themes available online. Use the search box for specific themes. You can preview themes before choosing. Select “Install” to add a new theme. Activate the theme to use it.
Activating The Theme
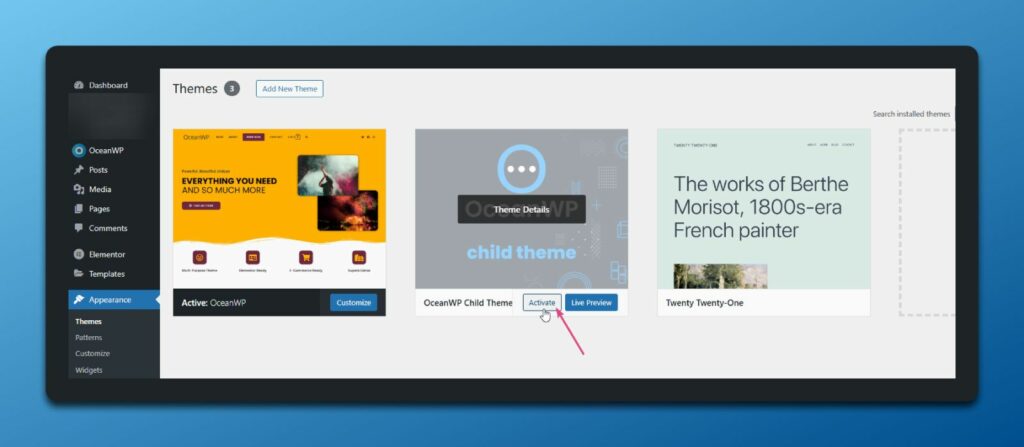
First, log into your WordPress dashboard. Look for the Appearance tab. Click on it. You will see the Themes option. Click on Themes. Now, you can see the available themes. Hover over a theme to preview it. A Preview button will appear. Click it to see how your site looks with that theme. This helps in choosing the right theme for your site. It’s important to like how your site looks. Once satisfied, you can move to the next step.
After previewing, click the Activate button on the theme you like. This makes the theme live on your website. Your site now has a new look. Make sure the theme fits your content. Check if everything looks good. If not, you can easily change to another theme. Repeat the process until you find the perfect fit.
Customizing Theme Settings
Change the theme colors to match your brand. Use the color picker for easy selection. Choose fonts that are easy to read. This makes your site look better. A good font makes reading fun. Select a font size that is not too small. Your site will then be easy on the eyes.
A custom header gives your site a unique look. Upload your logo to make your brand stand out. Make sure the logo fits well. Resize if necessary. A clear logo is important. It helps people remember your brand. A good header makes a strong first impression.
Change the layout to improve user experience. Choose a layout that is simple. A clean design makes navigation easy. Adjust the design elements to fit your style. Use spacing and alignment wisely. This makes your content easy to follow. A well-designed site keeps visitors longer.
Testing And Previewing
Check Responsiveness: Themes should work on all devices. Test the theme on phones, tablets, and computers. Make sure everything looks good. Buttons should be easy to click. Text should be easy to read. Images should fit the screen. If something looks wrong, adjust settings or choose another theme.
Ensure Cross-Browser Compatibility: Different browsers show things differently. Check your theme on Chrome, Firefox, and Safari. Look for problems. Fix them if you find any. Some themes have settings to help with this. Check these settings. Make sure your website looks the same on all browsers. This helps everyone see your site properly.
Credit: oceanwp.org
Optimizing For Performance
Enhance your A2 WordPress site by adding a new theme. Navigate to the dashboard, select “Appearance,” then “Themes. ” Choose a theme and click “Install,” followed by “Activate. ” This process boosts site aesthetics and performance, ensuring a seamless user experience.
Minimize Load Times
Fast websites make users happy. Slow ones don’t. Keep your site light. Avoid heavy plugins. They slow down your site. Use only needed plugins. Clean your database often. This keeps it small. Small databases load fast. Choose a good host. Good hosts improve speed.
Optimize Images And Scripts
Images can be big. Big images slow sites. Use smaller images. Tools can help resize images. This makes them smaller. Also, compress images. Compressed images load fast. For scripts, only use the needed ones. Remove extra scripts. They can slow your site. Use async or defer for scripts. This helps them load better.
Maintaining Theme Updates
Check for theme updates regularly. Always look at the dashboard. New updates fix bugs and add features. Updating is important. It keeps your site safe. It can also make your site faster. Updates help themes work well.
Backup before updating. Save your site data first. Use plugins to do this easily. Backups protect your content. If updates go wrong, you can restore. Always backup. It saves time and worry. A secure site is a happy site.
Credit: www.websiteplanet.com
Frequently Asked Questions
How Do I Install A WordPress Theme On A2 Hosting?
To install a theme, log in to your WordPress dashboard. Navigate to ‘Appearance’ and select ‘Themes. ‘ Click ‘Add New’ and browse themes. Choose a theme and click ‘Install. ‘ After installation, activate the theme to apply it to your site.
A2 Hosting supports easy theme installations.
Can I Upload A Custom Theme To My A2 WordPress Site?
Yes, you can upload custom themes. In your WordPress dashboard, go to ‘Appearance’ then ‘Themes. ‘ Click ‘Add New’ and choose ‘Upload Theme. ‘ Select your theme file (. zip format) from your computer and click ‘Install Now. ‘ Activate the theme after installation.
Are Free Themes Available For A2 WordPress Users?
Yes, thousands of free themes are available for A2 WordPress users. Browse through the WordPress theme repository directly from your dashboard under ‘Appearance’ > ‘Themes. ‘ Free themes offer various designs and functionalities, suitable for different website types.
How Do I Change The Theme On My A2 Site?
To change your theme, go to your WordPress dashboard. Navigate to ‘Appearance’ and click ‘Themes. ‘ Preview themes before choosing one. Click ‘Activate’ to apply your selected theme. Ensure to check theme compatibility with your plugins and site design.
Conclusion
Adding themes to your A2 WordPress site is simple. Follow the steps to customize your website. Choose a theme that fits your brand and audience. Install it quickly through the dashboard. Use the customization options to make it unique. Test the site to ensure everything works well.
A well-chosen theme improves user experience. It enhances your website’s look and feel. Keep your site updated for best performance. Explore different themes and find what suits your needs. Your site can stand out with the right theme. Enjoy creating a visually appealing website!


