
Are you looking to enhance your WordPress site by adding another menu? Whether you want to improve navigation or simply give your site a fresh look, adding an extra menu can make a world of difference.
Imagine your visitors easily finding what they need, leading to a better user experience and more time spent on your site. This simple yet effective change could be the key to keeping your audience engaged and boosting your site’s performance.
In this guide, we’re going to take you through the step-by-step process of adding another menu to your WordPress theme. Even if you’re not tech-savvy, you’ll find this task manageable and even enjoyable. Ready to transform your site and captivate your visitors? Let’s dive in and make your WordPress site more navigable and user-friendly!
Choosing The Right Theme
Picking the right theme is very important. Not all themes allow extra menus. Check the theme’s description first. Look for words like “multiple menus” or “customizable menus”. Some themes might have a demo. Watch it to see how menus look. Read user reviews as well. They can give you extra insights. Good themes will have positive feedback. Try to pick themes that are easy to use. This helps you later on when adding menus. Some themes offer support. This is helpful if you have questions. Make sure the theme supports your WordPress version. Older themes might not work well. Always update your theme for better performance.

Credit: www.serafindesigns.com
Creating A Child Theme
A child theme lets you change your WordPress site. It keeps the main theme safe. You won’t lose any changes after updates. First, create a new folder on your computer. Name it like your theme but add “-child” at the end. This tells WordPress it’s a child theme.
Inside this folder, make a file called style.css. In this file, write details about your child theme. Include the theme name, author, and description. Link it to the parent theme using Template. This connects the child and parent themes.
Next, create a functions.php file. This file helps load the parent theme’s style. Use the wp_enqueue_style function. This function makes sure styles from both themes appear. Upload your child theme folder to your site. Use an FTP client or your host’s file manager.
Activate the child theme in WordPress. Go to the dashboard and click “Themes.” You should see your child theme listed. Click “Activate” to start using it.
Registering A New Menu Location
To add a new menu, first open your theme folder. Find the functions.php file. This file is important for your theme. You need to edit it carefully.
Editing The Functions.php File
Open the functions.php file. Use a code editor like Notepad++. Add your new code to this file. Make sure to backup before editing.
Adding The Menu Registration Code
In the functions.php, find the section for custom code. Add this code there:
function register_my_menu() {
    register_nav_menu('extra-menu', __('Extra Menu'));
}
add_action('init', 'register_my_menu');
This code creates a new menu spot. It’s called Extra Menu. Remember to save the file after adding the code.

Credit: wpmudev.com
Displaying The New Menu
Adding a new menu to your WordPress theme involves a few simple steps. Begin by registering your menu in the theme’s functions. php file. Then, include it in the desired theme location using the wp_nav_menu function.
Identifying The Template File
First, find the correct template file. It might be header.php or footer.php. Look in your theme folder. Use a code editor for this. Open the file and see the code. You might see words like wp_nav_menu. This means you are in the right place.
Inserting The Menu Display Code
Now, add your new menu code. Use wp_nav_menu() function. Here is an example: php wp_nav_menu( array( 'theme_location' = 'new-menu' ) ); ?>. This tells WordPress to show the new menu. Make sure you save your changes. Go to your site and check if it works. If you do not see the menu, check your code again. Ensure the location name matches.
Customizing Menu Appearance
Changing the CSS styles of your menu is easy. Use the WordPress customizer. You can find it under “Appearance” in the dashboard. Look for “Additional CSS.” Add your CSS code here. It will change the look of your menu. Make it unique and stylish. Try different colors. Use different fonts. Adjust the padding. Experiment with borders. Let your creativity shine.
Create custom menu classes for more control. Go to the menu editor. Click on “Screen Options.” Enable “CSS Classes.” Now, you can add custom classes to each menu item. This lets you style them separately. Use different colors for each item. Highlight important links. Make some items bold. Keep others plain. This adds variety. Helps users find what they need.
Testing And Troubleshooting
Adding a new menu to your WordPress theme involves editing the functions. php file. This process allows customization of your site’s navigation. Troubleshooting common issues may involve checking code syntax or plugin conflicts.
Checking Menu Visibility
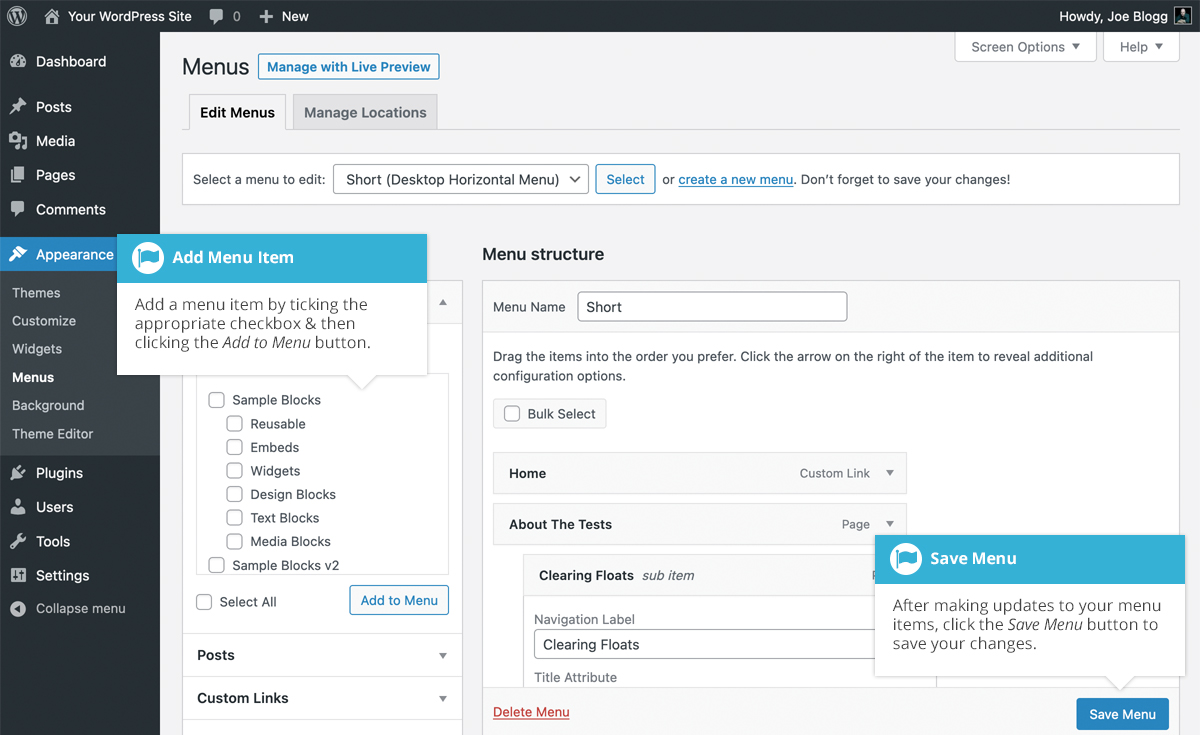
Ensure the new menu is enabled in theme settings. Navigate to the WordPress dashboard. Go to Appearance and then Menus. Select the menu you created. Ensure it’s assigned to a theme location. Refresh your website to see changes. If the menu is not visible, check widget settings. Widgets may hide menu areas.
Resolving Common Issues
Menu not showing? First, check theme compatibility. Some themes support limited menus. Try switching to a compatible theme. Next, ensure plugins aren’t causing conflicts. Disable plugins one by one. Observe if the menu appears. Sometimes, plugin settings interfere with menu visibility. Also, review custom CSS codes. Incorrect CSS can hide menus. Lastly, update WordPress to the latest version. Outdated versions may cause display problems.
Leveraging Plugins For Menu Management
Discovering plugins simplifies adding another menu to your WordPress theme. These tools offer user-friendly interfaces for customization. Manage menus effortlessly and enhance your site’s navigation with ease.
Popular Plugins For Menus
Plugins make it easy to manage menus in WordPress. Max Mega Menu is a popular choice. It offers drag-and-drop menu building. Users can customize styles easily. WP Mega Menu provides beautiful designs and advanced features. It supports responsive layouts. Another useful plugin is Responsive Menu. It helps create mobile-friendly menus. Nav Menu Roles lets users set menu visibility based on user roles. Each plugin offers unique features for better menu management.
Advantages Of Using Plugins
Plugins save time for users. Adding menus without coding is possible. They offer flexibility in design. Users can change styles quickly. Plugins enhance the site’s usability. They support responsive designs for mobile users. Customizations are simple and user-friendly. Plugins boost creativity in menu designs. They allow for dynamic updates. Using plugins is cost-effective. They are easy to install and manage.
Best Practices For Menu Usability
Menus help users find information quickly. It’s important to keep them tidy. Each menu should have clear labels. Users need to know what each link does. Group similar items together. This helps users find things faster. Avoid long lists; they confuse people. Shorter lists are easier to scan. Use drop-down menus for sub-items. This saves space and keeps the main menu clean.
Keeping Menus Organized
Organized menus improve user experience. Use simple words for menu items. People should understand them easily. Arrange items in a logical order. Popular items should be near the top. Regularly check for broken links. Fix them to keep the menu reliable. Update the menu as needed. This ensures all information is current.
Ensuring Accessibility
Accessibility is crucial for all users. Menus should be easy to use on all devices. Ensure they work well on smartphones and tablets. Use high-contrast colors for better readability. This helps people with vision issues. Menus should be navigable with a keyboard. This is vital for users who can’t use a mouse. Include alt text for images in menus. This aids users who rely on screen readers.
Credit: easywpguide.com
Frequently Asked Questions
How Do I Add A Second Menu In WordPress?
To add a second menu, navigate to Appearance > Menus in your dashboard. Click “Create a New Menu” and name it. Assign it to a theme location under “Menu Settings”. Customize with links and save. Ensure your theme supports multiple menus for proper display.
Can I Customize Menu Locations In WordPress?
Yes, you can customize menu locations by accessing the WordPress dashboard. Go to Appearance > Menus and assign menus to different theme locations. Check your theme documentation for supported menu locations to ensure correct placement and functionality.
How To Display Additional Menus On Pages?
To display additional menus on pages, use widgets or custom code. Go to Appearance > Widgets and drag the “Custom Menu” widget to your desired sidebar or footer area. Alternatively, insert PHP code in theme files to display menus where needed.
Do All Themes Support Multiple Menus?
Not all themes support multiple menus. Check your theme’s documentation or settings under Appearance > Menus. If your theme lacks support, consider switching to a more flexible theme or use custom coding to add additional menu locations manually.
Conclusion
Adding another menu enhances your WordPress theme’s functionality. It allows better navigation for users. You can customize it to match your site’s design. Follow steps carefully to avoid mistakes. Test your menu before launching it live. A well-placed menu improves user experience.
It helps visitors find information easily. Regularly update your menu with fresh content. Keep it simple and intuitive for users. These steps boost your site’s usability. Stay consistent with your design choices. Users appreciate easy navigation. Ensure your site remains accessible and organized.
This keeps visitors coming back for more.


