
Are you looking to expand your website’s reach to a global audience? Adding translation to your WordPress theme can be a game-changer.
Imagine your content breaking language barriers and connecting with readers worldwide. This guide will show you how to make your WordPress site multilingual, giving you the tools to enhance user experience and boost engagement. With just a few simple steps, you can transform your site into a dynamic platform that speaks directly to your audience’s heart, no matter where they are.
Ready to unlock the full potential of your website? Let’s dive in and get started!
Theme Translation Basics
Translation helps people read content in their own language. It makes websites more friendly. To start, use a translation plugin like WPML or Polylang. These plugins help translate themes easily. They are easy to install.
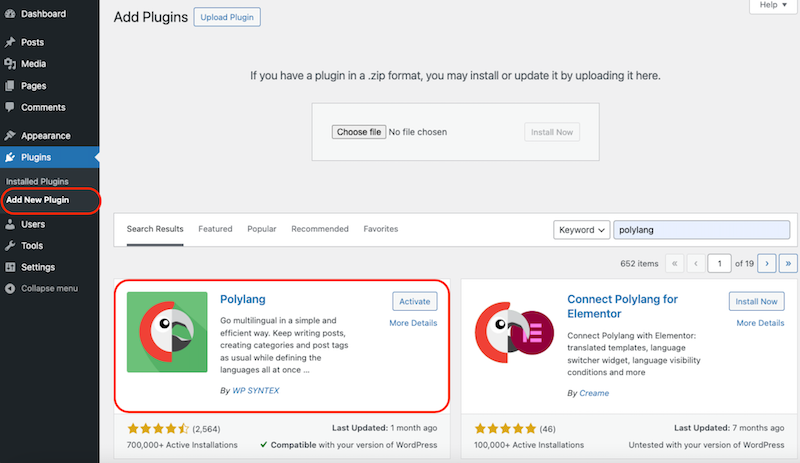
Go to the WordPress dashboard. Click on “Plugins” and then “Add New”. Search for your chosen plugin. Click “Install” and then “Activate”. Once done, go to the settings. Choose the languages you want.
Use the plugin to translate theme texts. Navigate to the plugin settings. Choose the text you want to translate. Enter the translations. Save your changes. Now your theme speaks many languages!
Credit: make.wordpress.org
Setting Up A Child Theme
Creating a child theme is important. It keeps your changes safe. Child theme stores your custom files separately. This way, updates don’t erase them. Begin by making a new folder. Name it something clear. Example: “mytheme-child”. Inside, add a style.css file. This file should have a special code at the top. Include your parent theme’s name. Also, make a functions.php file. This file helps link your child theme to the parent. Use simple codes to connect them.
WordPress needs both themes to work together. Always check your changes. Ensure everything looks good. If something breaks, fix it early. Child themes make updating easy. They ensure your work stays safe. Keep testing your theme. Make sure it functions well. This process helps your site grow. Always back up your work. It protects your effort and time.
Locating Theme Files
Find the theme files in the WordPress dashboard. Go to Appearance, then Theme Editor. A new page will open with your theme files. Look for files ending in .php. These files contain the code. You can change these files to add translations. Be careful not to break the code. Use a child theme to keep changes safe. A child theme is a copy of the original theme. It lets you edit without risk. Always back up your files before making changes. This keeps your work safe.
Installing Translation Plugins
Many plugins can help translate your WordPress theme. Some are very popular. WPML is a top choice. It supports many languages. Polylang is another good option. It’s free and easy to use. TranslatePress lets you translate directly from the front-end. All these plugins make translation easy.
First, go to the WordPress dashboard. Next, click on “Plugins.” Then, select “Add New.” Search for the plugin you want. Click “Install Now.” After that, click “Activate.” Your plugin is now ready. Follow the plugin’s guide for setup. Always check for updates. Keep your plugin up-to-date for best results.
Creating Translation Files
The .po file is a text file. It contains phrases and words. These are for translation. The .mo file is a binary file. It works with .po files. It helps translate content faster. Both files are important. They make translation easy. Themes need these files. They ensure proper language display.
Poedit is a simple tool. It helps create translation files. Open the .po file in Poedit. Translate each phrase. Save the changes. Poedit generates the .mo file. This file works with themes. It updates translations automatically. Poedit is user-friendly. It makes translation tasks easy. Many use it for language updates.
Editing Language Files
First, open the WordPress dashboard. Find the Appearance menu. Click on Theme Editor. Look for the languages folder. This folder holds translation files. You need these files to edit language.
Download the .po file from the language folder. Use a text editor, like Poedit. Open the file with it. Find the text you want to change. Edit the text carefully. Save changes after editing. Upload the modified file back. Use FTP or the dashboard. This updates the translation.
Integrating Translations With Loco Translate
Adding translation to a WordPress theme becomes simple with Loco Translate. This tool allows users to manage language files easily, ensuring your theme is accessible in various languages. Enhance your website’s reach by integrating translations directly into your WordPress dashboard.
Plugin Configuration
Loco Translate is a popular plugin for WordPress translations. First, install and activate Loco Translate. Go to the plugins section of your dashboard. Find Loco Translate and click activate. Once activated, find it in the tools menu. Here, select the theme you want to translate.
Syncing Translations
After configuration, it’s time to sync translations. In Loco Translate, go to the translations tab. Click sync to update your translation files. This ensures all new strings are ready for translation. Always sync after theme updates. It keeps translations up to date. Make sure to save changes. This saves your hard work.
Credit: translatepress.com
Testing And Debugging
Verifying translations is key. Open your WordPress site. Check each page. Ensure all words are translated. Look at menus and buttons. Double-check important parts. Ask friends for help. They might see mistakes you missed.
Some errors are common. Missing translations can happen. Look at your translation files. Make sure they are complete. Check if the theme supports translations. Some themes need special plugins. Wrong language display can occur. Check your language settings. Look at your site’s language code.
Sometimes, text doesn’t change. Cache issues might be the reason. Clear your browser’s cache. Use a plugin to clear WordPress cache. If a translation is not visible, it might not be saved correctly. Double-check your translation files. Ensure they are uploaded properly. If all else fails, consult online forums. Someone might have faced the same problem.
Maintaining Translations
Always keep your translations up to date. Themes change often. This can break translations. It’s important to check your theme updates. Look for any new strings. These might need translation. Update translation files as soon as possible. This keeps your site looking professional.
Updating After Theme Changes
Theme updates can add new features. These features might need translation. Check the theme files after every update. Find new text strings. Add these to your translation files. This helps keep your site consistent. Avoid missing translations that confuse visitors.
Best Practices For Consistency
Consistency is key in translations. Always use the same terms. This builds trust with your visitors. Keep a glossary of common terms. Share it with your team. This ensures everyone uses the same words. Regularly review translations. Fix any mistakes quickly. This keeps your site professional and easy to read.
Credit: polylang.pro
Frequently Asked Questions
How Do I Translate A WordPress Theme?
To translate a WordPress theme, use a plugin like Loco Translate. Install and activate the plugin. Navigate to the Loco Translate dashboard, select your theme, and create a new language. Translate strings and save changes. This makes your theme accessible in different languages without altering the original code.
Can I Use Google Translate For WordPress?
Yes, you can use Google Translate for WordPress. Install a translation plugin like GTranslate. This plugin uses Google Translate to automatically translate your site. It provides a language switcher widget for users. However, automatic translations may lack accuracy compared to manual translations.
What Is A .po File In WordPress?
A. po file in WordPress contains translations for a theme or plugin. It pairs original text with translated text. Developers use it to translate themes into different languages. Use a plugin or software like Poedit to edit. po files. Ensure the file is saved correctly for translations to work.
How To Make Theme Translation-ready?
To make a theme translation-ready, use WordPress functions like __() and _e(). Wrap strings in these functions. Create a. pot file using a tool like Poedit. This file serves as a template for translations. Include this file in your theme, allowing users to create translations easily.
Conclusion
Adding translation to a WordPress theme enhances user experience. It makes your site accessible to a broader audience. Simple steps can transform your website into a multilingual platform. Use translation plugins or customize the theme files. These methods are straightforward and effective.
Ensure your content is clear in every language. This effort boosts engagement and helps reach global visitors. Remember, a multilingual site shows inclusivity. It values diverse cultures and languages. Start today, and make your WordPress site truly international. Your audience will appreciate the extra effort you put in.


