
Unlocking the power of your WordPress website just got easier with Google Analytics. Imagine having the ability to peek into your website’s performance, knowing exactly how your visitors interact with each page.
If you’re using the Genesis WordPress theme, you’re already on the right track for a sleek and functional website. But without Google Analytics, you might be flying blind, missing out on crucial insights that could elevate your site to new heights.
Adding Google Analytics to your Genesis theme isn’t just a tech-savvy move—it’s a game-changer. It allows you to understand your audience better, tailor your content, and ultimately drive more traffic and engagement. Are you ready to transform data into actionable insights? This guide will walk you through the simple steps to integrate Google Analytics seamlessly into your Genesis theme. Stick with us, and you’ll soon be harnessing the full potential of your website.
Benefits Of Google Analytics
Google Analytics helps you understand your website visitors. You can see where they come from. This tool shows which pages they visit the most. It also tells you how long they stay on each page. With this information, you can improve your site. Make it better for your users.
Knowing your audience is key. Google Analytics provides that knowledge. It helps track user behavior. You can see what content works best. This can guide future content creation. It is essential for growth. Every website owner should use it. It helps in making smart decisions.
Credit: www.shoutmeloud.com
Preparing For Installation
Create a Google account if needed. Access Google Analytics website. Click on “Start for free“. Follow steps to set up your Analytics account. Add your website details. Choose “Web” as the platform.
After setup, find the Tracking ID. Go to “Admin” at the bottom left. Choose “Tracking Info“. Select “Tracking Code“. Your Tracking ID starts with “UA“. Copy the ID for later use.
Accessing Genesis Theme Settings
First, open your web browser. Type your website link and add “/wp-admin”. This will take you to the WordPress Dashboard login page. Enter your username and password. You will now see the Dashboard. It’s your website’s control center. You can change many things here.
On the left side, find the “Appearance” tab. Click it. Then, click “Theme Settings” under it. This opens the Genesis Theme Settings page. Here, you can make changes to your theme. You can add Google Analytics code here. It’s easy once you know where to look.
Inserting Tracking Code
Access your WordPress dashboard. Click on Genesis in the menu. Select Theme Settings. Scroll down to the bottom. Find the section called Header and Footer Scripts. Paste your Google Analytics tracking code in the header box. Save your changes. This will add the code to every page. Check if the code works. Visit the Google Analytics site.
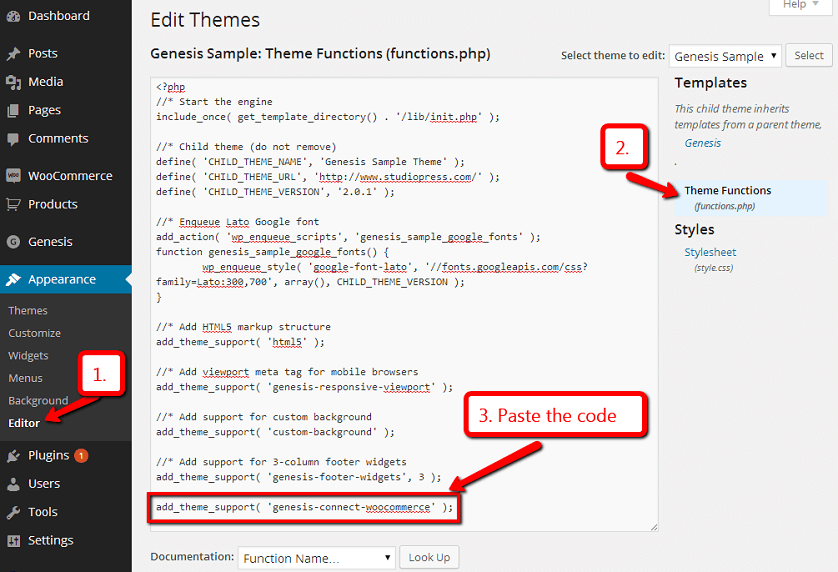
Go to your WordPress dashboard. Look for the Appearance tab. Click on it. Then select Editor. Find the header.php file. Paste your Google Analytics code before the closing head tag. Save the file. This method is also simple. Remember to check for updates.
Verifying Installation
Confirm the setup by checking if Google Analytics tracks your Genesis WordPress theme. Use the Google Analytics dashboard to see if data appears. Ensure the tracking code is correctly placed in the theme header or footer.
Checking Real-time Data
Open Google Analytics. Find the Real-Time section. Look for active users on site. If you see users, your setup works. This means your tracking code is active. Check different pages. Make sure they show in analytics. This confirms proper installation.
Using Google Tag Assistant
Use Google Tag Assistant for checking. Install it on your browser. Turn it on when visiting your site. It shows tags on each page. Find the Google Analytics tag. If it’s visible, the tag is active. Sometimes it shows errors. Fix them if needed. This tool helps verify your setup.

Credit: codefetti.com
Troubleshooting Common Issues
Integrating Google Analytics with the Genesis WordPress theme often leads to common issues. Start by ensuring the Analytics code is correctly placed in the theme’s header. Double-check plugin settings and update your theme to the latest version for compatibility.
No Data In Google Analytics
Many users face the issue of no data appearing in Google Analytics. This can be frustrating. First, check if the tracking code is correctly placed. It should be in the header file. Ensure it is added before the closing head tag. Sometimes, the code is missing or incomplete.
Another reason could be filters blocking data. Review your filters in Analytics settings. They might be excluding necessary data. Also, verify that the tracking ID matches. The wrong ID stops data collection.
Tracking Code Errors
Errors in the tracking code can prevent data collection. It’s vital to use the right code format. Double-check for any typos or mistakes. Even a small error can cause big problems. Sometimes, plugins or themes can alter the code. Disable any plugins and test again.
Ensure that the code is not blocked by ad blockers. Ad blockers might stop the tracking code from working. Ask users to whitelist your site. This can improve data visibility.
Enhancing Analytics Usage
Setting Up Goals in Google Analytics helps track user actions. These actions can be page visits or sign-ups. First, access the Google Analytics dashboard. Click on “Admin” at the bottom. Choose “Goals” in the view column. Select “New Goal” to start. Use templates or create custom goals. Define the goal type, such as destination or duration. Set the goal details, like the page URL. Save your settings. Goals can improve understanding of user behavior.
Integrating with Google Search Console boosts website insights. First, log into your Google Analytics account. Click on “Admin” at the bottom. Navigate to the property column. Choose “Property Settings”. Scroll to “Search Console”. Click “Adjust Search Console” and select your website. Link the Search Console to Analytics. This integration shows search data in Analytics. It helps in analyzing organic search traffic. Use the insights to enhance SEO strategies.
Credit: larryludwig.com
Frequently Asked Questions
How Do I Add Google Analytics To Genesis?
To add Google Analytics to Genesis, install a plugin like “Header and Footer Scripts” or “Genesis Simple Hooks”. Insert the tracking code in the header section. Save changes to activate tracking. This method ensures seamless integration without altering your theme’s core files.
Where To Find Google Analytics Tracking Id?
To find your Google Analytics tracking ID, sign in to Google Analytics. Navigate to “Admin” and select your account and property. Under “Property Settings”, locate the tracking ID starting with “UA-“. Use this ID to integrate Google Analytics with your Genesis theme.
Is A Plugin Required For Integration?
Using a plugin is recommended for easy integration. Plugins like “Header and Footer Scripts” simplify adding Google Analytics to Genesis. They offer a user-friendly interface for inserting tracking codes without modifying theme files, ensuring hassle-free updates and maintenance.
Can I Track Traffic Without Coding?
Yes, you can track traffic without coding by using plugins. Plugins like “MonsterInsights” provide a code-free setup for Google Analytics. They automatically insert tracking codes and offer detailed analytics, making it easy for non-coders to monitor website performance.
Conclusion
Adding Google Analytics to your Genesis WordPress theme is simple. Now, you can track visitor behavior easily. Understanding audience interaction helps improve your site. Use insights to enhance user experience. Monitoring analytics supports better content creation. It’s important for growth.
Regularly check data to refine strategies. A well-integrated analytics tool guides your decisions. Stay informed and adapt to trends. Your site will thrive with informed adjustments. Analytics empower you to connect better with your audience. Embrace the data-driven approach for sustained success.
Keep learning and evolving with your insights.


