
Setting up your own web hosting might sound daunting, but it can be a game-changer for your online presence. Imagine having full control over your website, from speed to security, without relying on third-party services.
This guide will walk you through the process step by step, demystifying technical jargon and empowering you to take charge of your web hosting. Whether you’re looking to save money, customize your online space, or simply learn something new, this article is your gateway to mastering web hosting.
Stick around, and by the end, you’ll be equipped with the knowledge and confidence to host your website like a pro.
Choosing The Right Hosting Plan
Shared hosting is like sharing a house with friends. It’s cheap and easy. You share space with many websites. This can slow your site. Dedicated hosting is like having your own house. It’s more expensive but faster. You have all the resources to yourself. Great for busy sites.
Cloud hosting uses many computers. It keeps your site running. Even if one computer fails, others help. This makes it reliable. It’s like having many helpers. You pay for what you use. This can save money. Good for growing sites.
VPS hosting is like a private room in a big house. You have more control. It’s better than shared hosting. But not as costly as dedicated hosting. You get a part of the server. This makes it fast and safe. Perfect for growing businesses.
Registering A Domain Name
Choosing the right domain registrar is important. Many options are available. Look for registrars with good customer support. Check their pricing. Some offer discounts for the first year. Others might have hidden fees.
Check if your desired domain is available. Use the search tool on the registrar’s site. Popular names might be taken. Consider alternatives if your first choice is not available. Add numbers or use different words to create a unique name.
After registering, ensure your domain is secure. Enable privacy protection to hide personal details. This prevents unwanted contact. Set up auto-renewal to keep your domain active. Forgetting to renew can lead to losing it.
Setting Up Your Server
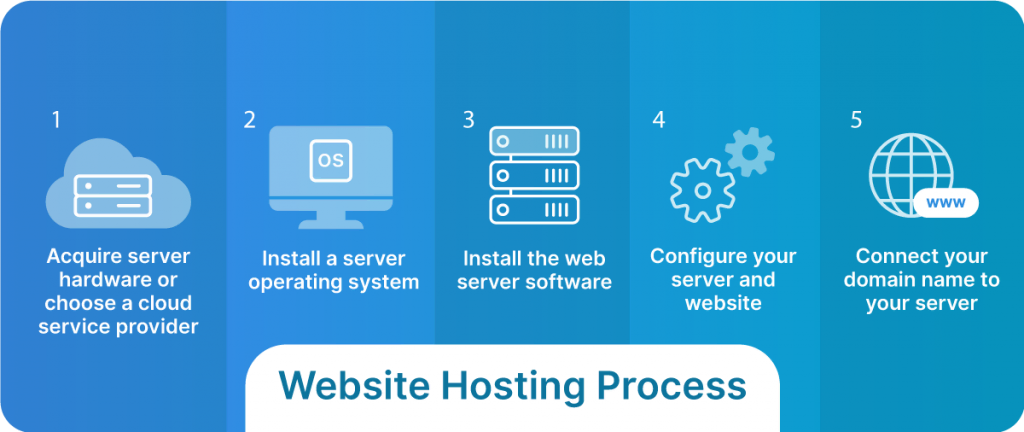
A server is a powerful computer. It stores and manages data. Server configuration is the setup process. It includes several steps. Always ensure the server is secure. Security is crucial. Proper setup avoids problems later. Backup your data regularly. This protects against data loss. Use strong passwords for security.
The operating system is like the brain of your server. Choose between Linux or Windows. Linux is popular for web hosting. It is open-source and free. Windows is user-friendly. It may cost money. Pick what suits your needs best. Both have pros and cons. Consider your skills too.
Your server needs the right hardware. RAM and CPU are important. More RAM means better performance. A faster CPU handles tasks quickly. Storage is also crucial. SSDs are faster than HDDs. Make sure your hardware matches your needs. Plan for future growth. Upgrade if necessary.
Installing Web Hosting Software
Choosing the right control panel is key. cPanel and Plesk are popular choices. They offer easy-to-use interfaces. Both help manage websites and emails. cPanel is known for its user-friendly design. Plesk supports many different languages. This makes it great for international users. Each has its own strengths.
Start by downloading the software. Follow the simple steps on the screen. Most guides are straightforward. Install Apache or Nginx for web servers. MySQL or MariaDB for databases. These are common choices. They support many web applications. Make sure to check system requirements first. This avoids issues during installation.
Keeping your server safe is important. Use firewalls to block unwanted traffic. Regularly update your software. This fixes security holes. Passwords should be strong and unique. Use SSL certificates for secure connections. This protects user data. Also, backup your data often. This ensures you don’t lose important information.
Configuring Your Website
FTP helps you transfer files to your web server. Use an FTP client like FileZilla. It’s free and easy. Connect to your server with your login details. Drag and drop files to upload. Keep your website files organized. Create folders for images, scripts, and documents. This makes file management simple. Remember to update files when needed. Back up files to avoid loss.
Databases store website information. Use MySQL or similar software. Create a new database for your site. Name it clearly. Use strong passwords for security. Connect your site to the database. Check settings to ensure they work. Test the database connection. Make sure data is saved correctly. Regularly back up the database to protect data.
SSL certificates keep data safe. Buy a certificate from a trusted provider. Install it on your server. This encrypts website traffic. Check SSL settings in your control panel. Ensure the certificate is active. Look for the padlock icon in the browser. This shows the site is secure. Renew the certificate before it expires. Protects user information from hackers.

Credit: www.siteuptime.com
Managing Hosting Performance
Use tools to watch your hosting server. These tools can show server health. They also track uptime and downtime. It’s important to know if your site is running well. Tools like Google Analytics and Pingdom help check speed. Keeping an eye on these helps in quick fixes. A fast site keeps users happy and returns often.
Speed up your website for better performance. Compress images to load faster. Minimize CSS and JavaScript files. Use caching to store site data temporarily. This reduces load times for users. A content delivery network (CDN) can also help. It distributes site content globally, making it faster for everyone.
Be ready for sudden visitors. Traffic surges can slow your site. Use load balancers to manage this. They spread traffic across servers. Having a scalable hosting plan helps. It adjusts resources based on demand. Always test your site for high traffic. This ensures it stays online during busy times.
Troubleshooting Common Issues
Setting up web hosting often brings common issues like server downtime or incorrect DNS settings. Solutions include checking server configurations and ensuring domain pointing accuracy. Regular updates and backups can prevent frequent problems.
Error Logs Analysis
Error logs can show problems in your web hosting. They help find what went wrong. Check logs for error messages. Look for patterns. This can show common issues. Fix problems step by step. Do not skip any errors. Each error tells a story. Understanding them is key.
Backup And Recovery
Backing up data is very important. Always have a backup plan. Use tools to save your data. Store backups in a safe place. If something breaks, you can recover. Recovery means getting your data back. Make sure backups work by testing them. This keeps your data safe.
Customer Support Channels
Customer support helps fix problems. Use support channels like chat or phone. They can guide you. Email support is also helpful. Always ask questions. Support teams are there to help. Keep contact details handy. This makes reaching out easier.

Credit: www.youtube.com
Credit: www.liquidweb.com
Frequently Asked Questions
Can I Create My Own Web Hosting?
Yes, you can create your own web hosting. Set up a server with necessary software, stable internet, and security measures. Consider using Linux, Apache, MySQL, and PHP. Ensure your server meets domain and bandwidth requirements for optimal performance.
How Do I Create A Self Hosted Website?
To create a self-hosted website, choose a domain name and register it. Select a reliable hosting provider. Install a content management system like WordPress. Customize your site with themes and plugins. Regularly update and maintain your website for optimal performance.
Is It A Good Idea To Host Your Own Website?
Hosting your own website offers control and customization. It requires technical skills and ongoing maintenance. Consider security, costs, and time commitment. For beginners, third-party hosting may be easier. Ensure you weigh pros and cons before deciding.
How Do I Get Started With Web Hosting?
Choose a reliable web hosting provider. Register a domain name that suits your needs. Select a hosting plan based on your requirements. Set up your website using a content management system like WordPress. Regularly update and maintain your website to ensure optimal performance.
Conclusion
Setting up your own web hosting can be simple. You have learned the basics in this guide. Choosing the right hosting service is crucial. It affects website performance and user experience. Start by selecting a reliable provider. Then, configure your server settings carefully.
This ensures smooth operation and security. Regular updates keep your site safe and fast. Troubleshooting common issues is essential. It helps maintain your site’s functionality. With practice, hosting becomes easier. Experiment and learn as you go. Your skills will grow over time.
Enjoy the journey of managing your own web hosting.


