Are you trying to figure out where your domain DNS is hosted when using MailerLite? Understanding this can feel confusing, especially if you’re new to managing emails and websites.
But knowing exactly where your DNS lives is key to keeping your emails running smoothly and your domain secure. You’ll discover simple ways to find your domain DNS hosting within MailerLite, so you can take control without any tech headaches.
Keep reading—by the end, you’ll have clear answers and practical steps you can follow right away.
What Is Dns Hosting
DNS hosting controls where your domain’s website and emails connect on the internet. MailerLite shows where your domain DNS is hosted in its settings. Checking this helps you manage your domain and email setup easily.
What Is Dns Hosting?
DNS hosting is a service that manages your domain’s DNS records. These records tell the internet where to find your website, email, and other services. Without DNS hosting, your domain name cannot connect to the right servers.
When someone types your domain name in a browser, DNS hosting directs that request. It matches your domain to the correct IP address of your website. This process happens very fast, often in milliseconds.
How Dns Hosting Works
DNS hosting stores and manages your domain’s DNS records. These include A records, MX records, CNAMEs, and others. Each record has a specific role in routing traffic.
The DNS host responds to queries from users’ devices. It sends back the IP address or service location. This allows browsers and apps to connect correctly.
Why Dns Hosting Matters In Mailerlite
MailerLite uses DNS hosting to verify your domain for email sending. Correct DNS records improve email delivery and reduce spam risk. MailerLite provides instructions on how to set these records.
Understanding where your DNS is hosted helps you manage these settings. It ensures your emails and website work smoothly with MailerLite services.
How Dns Works With Mailerlite
Understanding how DNS works with MailerLite helps you manage your domain better. DNS, or Domain Name System, links your domain name to the internet location. This process ensures your emails and website work smoothly with MailerLite.
MailerLite uses DNS records to verify your domain and improve email delivery. Setting up DNS correctly avoids problems like emails going to spam or websites not loading. Knowing where your DNS is hosted helps control these settings with ease.
What Is Dns Hosting In Mailerlite?
DNS hosting means where your domain’s DNS records are stored. MailerLite does not host your DNS directly. Instead, your DNS records stay with your domain registrar or another DNS provider. MailerLite gives you the details to add or update your DNS records.
How To Find Your Dns Host
Check your domain registrar’s dashboard to find your DNS host. Common registrars include GoDaddy, Namecheap, or Google Domains. The DNS host shows where your domain’s records live and where you must add MailerLite’s records.
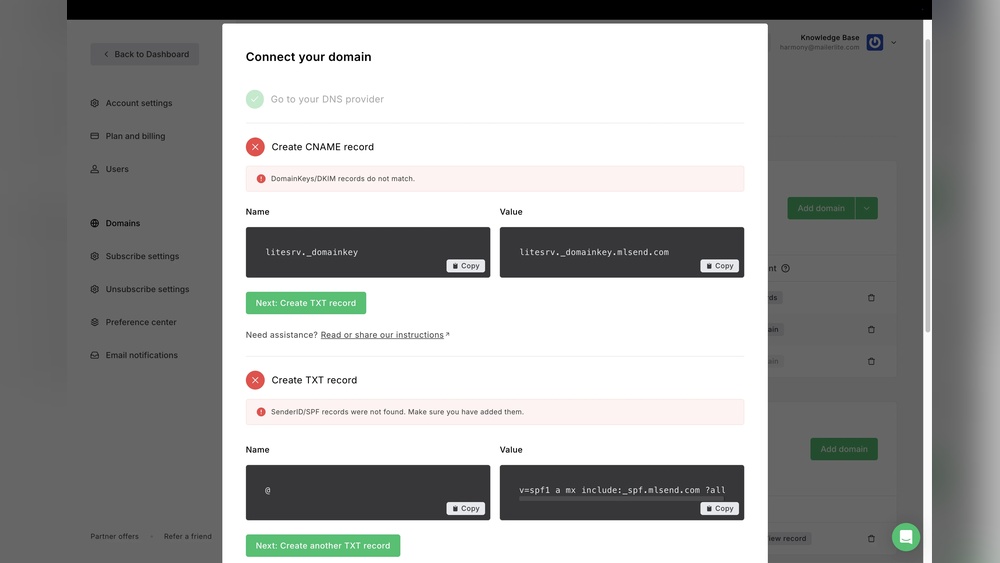
Adding Mailerlite Dns Records
MailerLite provides specific DNS records like TXT, CNAME, or MX. These records prove your ownership and improve email sending. Add these records in your DNS host’s control panel. Changes may take up to 48 hours to update worldwide.
Why Correct Dns Setup Matters
Correct DNS setup helps your emails reach inboxes, not spam. It also makes your website and email services reliable. Wrong DNS records cause delivery failures and website errors. Regularly check and update your DNS settings for best results.
Checking Your Domain Dns In Mailerlite
Checking your domain DNS in MailerLite is important for managing your email campaigns. DNS records tell MailerLite where to send and receive emails. This setup helps improve your email delivery and protects against spam. Knowing how to check your DNS in MailerLite keeps your domain running smoothly.
Accessing Domain Settings
Start by logging into your MailerLite account. Go to the “Websites” tab on the dashboard. Select “Domains” from the menu. Here, you see a list of all domains connected to your account. Click on the domain you want to check. This opens the domain settings page where you manage DNS details.
Locating Dns Records
On the domain settings page, find the section labeled “DNS Records.” This section lists all your current DNS entries. Look for records like TXT, CNAME, and MX. These records control email routing and verification. Check if the records match the instructions MailerLite provides. Correct DNS records ensure your emails work properly.

Credit: www.mailerlite.com
Common Dns Hosts Used With Mailerlite
Finding out where your domain DNS is hosted is important for managing your MailerLite account. DNS hosts control where your domain points and how emails are delivered. Many users connect MailerLite with popular DNS providers to ensure smooth email marketing.
Understanding common DNS hosts helps you manage settings without confusion. It also helps in troubleshooting email delivery issues. Let’s explore popular DNS providers and MailerLite’s default DNS setup.
Popular Dns Providers
Many MailerLite users use well-known DNS hosts. These include GoDaddy, Namecheap, Cloudflare, and Google Domains. These providers offer easy DNS management and reliable servers. They let you add or update DNS records needed for MailerLite. Managing DNS at these hosts is simple and user-friendly.
GoDaddy is popular for domain registration and DNS. Cloudflare offers strong security and fast DNS resolution. Namecheap provides affordable domains and easy control panels. Google Domains integrates well with other Google services. Choosing any of these helps keep your MailerLite emails working well.
Mailerlite’s Default Dns Setup
MailerLite offers a default DNS setup for new users. This setup simplifies connecting your domain to MailerLite. It automatically adds necessary DNS records for email sending and tracking. Users only need to verify their domain to start.
This default setup reduces errors in DNS configuration. It also speeds up the process of launching email campaigns. MailerLite’s system works well with most common DNS hosts. This makes it easier to manage your domain and email settings all in one place.
Troubleshooting Dns Hosting Issues
Troubleshooting DNS hosting issues can feel confusing. DNS controls where your domain points and impacts how emails and websites work. Problems here can stop your MailerLite emails from sending or landing in inboxes. Understanding common issues helps fix them faster.
Dns Propagation Delays
DNS changes take time to spread across the internet. This process is called propagation. It can last from a few minutes to 48 hours or more. During this time, some users see old DNS records. Be patient and check again later.
Incorrect Dns Records
Wrong DNS records cause many problems. Records must match MailerLite’s requirements exactly. A small typo or missing entry can stop emails. Double-check all records for accuracy, especially MX and TXT records.
Verifying Dns Changes
After updating DNS, verify changes using online tools. These tools show if the records have updated worldwide. Confirm the correct entries appear for your domain. This step helps confirm your updates work properly.

Credit: community.shopify.com
Tips For Managing Dns With Mailerlite
Managing DNS settings in MailerLite is important for smooth email delivery and domain control. Proper handling avoids delays and errors in your campaigns. These tips will help you update and monitor DNS effectively.
Best Practices For Dns Updates
Always back up your current DNS settings before making changes. Use clear, simple names for your records to avoid confusion. Make one change at a time and wait for it to take effect. DNS changes can take hours to update worldwide. Check your email service guidelines to add the right records. Avoid deleting records unless you are sure they are not needed. Keep your domain registrar login details secure and updated.
Using Dns Tools For Monitoring
Use online DNS checkers to verify your records after updates. These tools show if your DNS records are correct and active. Monitor your domain’s health regularly to catch issues early. Set alerts for DNS changes to avoid unauthorized edits. Tools like MXToolbox or DNSChecker are simple and free. Regular checks keep your email delivery reliable and your domain safe.

Credit: community.shopify.com
Frequently Asked Questions
Where Is My Domain Dns Hosted In Mailerlite?
Your domain DNS is hosted with your domain registrar, not MailerLite. MailerLite manages email and website services but does not host DNS. You must access your domain registrar’s control panel to manage DNS settings for your domain.
How Do I Find My Dns Host For Mailerlite Domain?
Check your domain registrar’s dashboard or use online tools like WHOIS lookup. These tools reveal where your DNS records are hosted. MailerLite only requires you to update DNS records but does not host them.
Can I Manage Dns Settings Directly In Mailerlite?
No, MailerLite does not allow direct DNS management. You must update DNS records through your domain registrar. MailerLite provides the necessary DNS record values to add or modify for domain verification and email setup.
Why Do I Need To Update Dns For Mailerlite?
Updating DNS records verifies your domain and enables email sending via MailerLite. Proper DNS setup ensures email deliverability and prevents spoofing. MailerLite gives you the exact records to add in your DNS host’s control panel.
Conclusion
Finding where your domain DNS is hosted in MailerLite helps keep your email settings correct. It ensures your emails reach inboxes and not spam. Always check your DNS settings when you add or change domains. This keeps your email campaigns running smoothly.
Knowing this makes managing your MailerLite account easier. Keep your domain and DNS info updated for best results. Simple steps can save time and avoid errors. Stay organized and your emails will perform better.