
Are you looking to redirect your domain effortlessly using Namecheap? Whether you’re consolidating websites, changing your online presence, or ensuring visitors land on the right page, knowing how to redirect your domain can be a game-changer.
Imagine the ease of guiding your audience exactly where you want them to go, maximizing your site’s efficiency and user experience. You might think it’s a daunting task, but with Namecheap, it’s straightforward and hassle-free. Curious to find out how?
Dive into this guide to unlock the simple steps that will have your domain redirecting in no time. Your path to seamless navigation starts here.

Credit: typedream.com
Benefits Of Domain Redirection
Domain redirection offers valuable advantages for website owners and businesses. Redirecting a domain can enhance user experience, improve SEO, and streamline website management. Understanding these benefits can help you make informed decisions about your web presence.
Improved User Experience
Redirecting a domain ensures users find the right content quickly. Visitors can access updated pages without confusion. This seamless navigation keeps users engaged and reduces bounce rates.
Seo Enhancement
Domain redirection helps maintain search engine rankings. Redirects prevent broken links, preserving your site’s authority. This continuity can lead to better search engine visibility.
Brand Consistency
Keep your branding consistent with domain redirection. Redirecting old domains to new ones maintains your brand image. Users will always see the correct domain associated with your business.
Efficient Resource Management
Redirecting domains simplifies resource management. It allows you to consolidate content without losing traffic. This efficiency reduces the need for multiple websites.
Traffic Consolidation
Domain redirection helps gather traffic from various sources. Redirecting different domains to one site centralizes visitor data. This centralization aids in better analytics and decision-making.
Protection Against Errors
Redirects minimize the risk of errors. They guide users away from outdated or incorrect pages. This protection ensures your site remains trustworthy and reliable.
Preparation Before Redirecting
Redirecting a domain on Namecheap requires thoughtful preparation. Before starting, ensure you have covered all necessary steps. These steps will safeguard your data and confirm your authority over the domain. Let’s explore the essential preparations needed before redirecting your domain.
Check Domain Ownership
First, confirm you own the domain. Log into your Namecheap account. Navigate to the “Domain List” section. Verify your domain appears in the list. This step is crucial. It ensures you have the right to make changes. Without ownership, you cannot redirect your domain. Double-check your domain registration details. They should match your personal or business information. This prevents any complications later.
Backup Important Data
Before redirecting, backup all essential data. This includes website files, databases, and emails. Use Namecheap’s built-in tools for this task. Alternatively, use third-party software. Store backups in a secure location. This step protects your data from loss. If any issues arise during the redirect, you can restore your site. Regular backups are a best practice. They ensure you have a fallback plan in place.
Accessing Namecheap Account
Quickly redirect your domain on Namecheap by logging into your account. Navigate to the ‘Domain List’ section, select your domain, and click on ‘Manage’. Use the ‘Redirect Domain’ option for easy changes.
Accessing your Namecheap account is the first step towards redirecting your domain effortlessly. Whether you’re a beginner or a seasoned pro, getting into your account is straightforward. Let’s dive into the simple steps to get you started.Login Procedures
To access your Namecheap account, head over to their main website. Look for the “Sign In” button, usually located at the top right corner. Click it, and you’ll be prompted to enter your username and password. If you can’t remember your login details, don’t panic. There’s a “Forgot Password?” link right there to help you reset it. Simply follow the instructions, and you’ll be back on track in no time. Once logged in, you’ll find yourself on the dashboard. It’s like entering the control room of your online universe. Everything you need is right there, neatly organized and ready for action.Finding Your Domain
Now that you’re in, it’s time to locate your domain. On the dashboard, look for the “Domain List” section. This is where all your domains are displayed. Can’t find the “Domain List”? Don’t worry. It’s typically on the left-hand side menu. Click on it, and you’ll see a list of domains you own. Select the domain you want to redirect. Once clicked, you’ll access a page with all the settings related to that domain. It’s amazing how much power you hold with just a few clicks. Navigating through your Namecheap account isn’t just about redirecting domains. It’s about being in control of your digital assets. Have you ever imagined how easy managing domains could be? With Namecheap, you don’t have to imagine—it’s your reality.
Credit: www.youtube.com
Navigating Domain Settings
Easily redirect your Namecheap domain by accessing the domain settings. Follow simple steps to point your domain to a new URL. Make your website redirect seamlessly and efficiently.
Navigating domain settings on Namecheap can feel like decoding a complex puzzle. But with the right guidance, it becomes straightforward. This section will help you understand the basics of DNS settings and redirection options. Simplifying the steps ensures you effortlessly redirect your domain.Dns Settings Overview
Domain Name System (DNS) settings are crucial for your domain’s functionality. They control how users access your website. Namecheap’s DNS settings panel offers various options. You can configure these settings to match your needs. Start by accessing your Namecheap account dashboard. Then, locate the ‘Domain List’ section. From here, select the domain you wish to manage. You’ll find the ‘Advanced DNS’ tab. This tab holds the key to customizing your DNS settings.Understanding Redirection Options
Redirection changes how users reach your domain. Namecheap provides several redirection choices. The most common is URL forwarding. This method directs visitors from one URL to another. Another option is domain aliasing. It allows different domains to point to the same site. Subdomain redirection is also available. It redirects traffic from subdomains to specific pages. Choose the option that best suits your needs. Always test your settings after configuring them. Ensure your domain works as intended.Setting Up Domain Redirect
Setting up a domain redirect with Namecheap is straightforward. It helps direct visitors from one domain to another. This is useful for rebranding or consolidating web presence. Namecheap offers tools to manage this efficiently.
Choosing Redirect Type
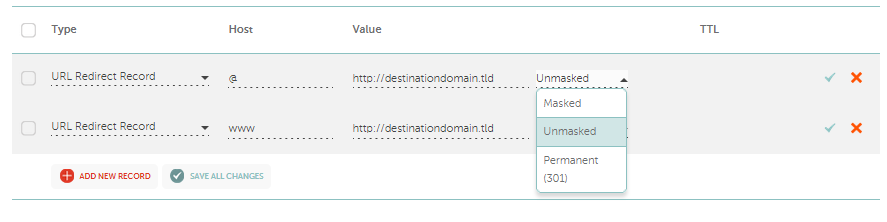
Different redirect types serve different purposes. A 301 redirect is permanent. It tells search engines that a site has moved. A 302 redirect is temporary. It indicates a temporary change. Pick the type based on your needs. Ensure it aligns with your goals.
Configuring Redirect Url
Enter the destination URL carefully. This is where visitors will land. Double-check for typos. Incorrect URLs can lead to errors. Ensure the path is valid and accessible. Use Namecheap’s interface for easy setup. Follow their step-by-step guide.
Credit: www.namecheap.com
Testing Domain Redirection
Setting up domain redirection on Namecheap involves accessing your account’s dashboard. Navigate to the Domain List, select your domain, and click on the “Manage” button. Choose the “Redirect Domain” option and input the desired URL for redirection.
Testing domain redirection is a crucial step after setting up your domain’s new path. Imagine you’ve just redirected your domain using Namecheap and now it’s time to ensure that everything is working as expected. You wouldn’t want visitors to land on a 404 error page or get lost in cyberspace, right? Let’s dive into the essentials of testing your domain redirection effectively.Verifying Redirect Accuracy
After setting up a redirect, it’s important to confirm that your domain is pointing exactly where you want it to. Type your old URL into the browser and see if it seamlessly takes you to the new destination. An instant redirect without delay is a good sign that everything is in place. Using online tools can also help. Websites like Redirect Checker let you enter your URL and see the redirection path. This ensures there are no unexpected hops or misdirection. Have you considered mobile access? Test the redirect on different devices to ensure a consistent experience. Sometimes, what works on a desktop might not on a smartphone.Troubleshooting Common Issues
What if things don’t go as planned? It’s common to encounter issues during the redirection process. If your redirect doesn’t work, check your DNS settings. Ensure that your domain’s nameservers are correctly pointed to Namecheap. Have you cleared your browser cache? Sometimes, outdated cache data can show old information. Try refreshing your browser or using incognito mode for a fresh start. Encountering a redirect loop? This happens when your domain keeps redirecting in a circle without reaching the destination. Double-check the redirect settings for any errors or conflicting rules. Remember, technology isn’t always perfect. Patience and troubleshooting can go a long way. Have you faced any redirection challenges? Share your experience in the comments! Your insights could help others on the same journey.Managing Redirects
Easily redirect your domain using Namecheap’s straightforward process. Access the control panel, select your domain, and modify the redirect settings. This simple method enhances your site’s navigation and user experience efficiently.
Managing redirects is an essential aspect of maintaining an effective online presence. If you have a domain with Namecheap and need to redirect it, understanding how to manage redirects can enhance your site’s usability and SEO performance. Redirects help guide your visitors to the correct pages, ensuring they land exactly where they need to be. Let’s dive into some key actions you can take when managing redirects.Updating Redirects
Sometimes, the destination of your redirect needs to change. Maybe you’ve launched a new product page or updated a blog post. To update a redirect in Namecheap, log into your account and navigate to the Domain List. Once there, find the domain you need to update and click on the ‘Manage’ button. Under the ‘Redirect Domain’ section, you can modify the existing URL. Simply enter the new destination URL and click ‘Save Changes’. Always double-check the new link to ensure it works correctly. Have you ever clicked a link only to find a broken page? Avoid this by validating your updates.Removing Redirects
There are times when you no longer need a redirect. Maybe a promotion is over, or a page is permanently deleted. To remove a redirect, go back to your Namecheap account and find the domain in question. In the ‘Redirect Domain’ section, locate the redirect you wish to remove. Click the ‘Delete’ or ‘Remove’ button next to it. It’s that simple. Removing unnecessary redirects can help declutter your settings and improve website performance. Have you assessed which redirects are truly necessary for your site recently? Redirects are a powerful tool, but they require careful management. By updating and removing redirects as needed, you can keep your website running smoothly and efficiently.Security Considerations
Redirecting a domain with Namecheap is a straightforward process. Yet, ensuring its security is crucial. Protecting your domain from malicious activities keeps your online presence safe. Let’s explore some security considerations.
Secure Redirection Practices
Always use HTTPS for domain redirection. This encrypts the data sent between your website and users. It protects sensitive information and builds trust. Check your SSL certificate regularly. Ensure it is valid and up-to-date.
Use strong passwords for your Namecheap account. This prevents unauthorized access. Change your passwords regularly to enhance security. Enable two-factor authentication for an extra layer of protection.
Monitoring For Unwanted Changes
Regularly monitor your domain settings. Look for unauthorized changes. Unwanted changes can lead to security breaches or website downtime. Set up alerts for any modifications to your domain settings.
Check your redirection logs frequently. This helps identify suspicious activities. If you notice unusual patterns, investigate immediately. Quick action can prevent potential threats to your domain.
Common Mistakes To Avoid
Redirecting a domain on Namecheap can be tricky for beginners. Mistakes can lead to website downtime or poor user experience. Understanding common pitfalls helps ensure a smooth redirect process. Avoid these errors to keep your website accessible and functional.
Misconfigured Settings
Misconfigured settings are a frequent issue during domain redirection. Double-check every step in the process. Incorrect DNS settings can lead to your site being unreachable. Ensure that the DNS records are correctly set for the new destination. Use Namecheap’s DNS panel for easy configuration.
Another mistake is forgetting to update the CNAME records. This can cause errors or failed redirections. Always verify each DNS entry after making changes. Use Namecheap’s support resources if unsure about any step.
Ignoring Redirect Impact
Ignoring redirect impact can harm your website traffic. Search engine rankings may drop if redirects are not properly handled. Always use 301 redirects for permanent moves. This informs search engines about the change, preserving your SEO value.
User experience can be affected by improper redirects. Slow or broken redirects frustrate visitors. Test your redirects to ensure they work smoothly. Ensure the new site is fully operational before completing the redirect. Plan carefully to minimize disruption to users and search engines.
Frequently Asked Questions
How To Redirect A Domain On Namecheap?
Log in to Namecheap account. Go to “Domain List” and select your domain. Click “Manage”, then “Advanced DNS”. Under “Redirect Domain”, enter destination URL and save changes.
How Do I Redirect A Domain To Another Domain?
Use a 301 redirect in your server settings or hosting platform. Update DNS settings to point to the new domain. Ensure both domains are verified in Google Search Console for SEO continuity. Check all links and update them to prevent broken paths.
How Do I Redirect A Domain To A Path?
Use an. htaccess file for Apache servers to redirect a domain to a path. Add: `Redirect 301 / http://example. com/newpath`. For Nginx, update the server block with: `rewrite ^/$ /newpath permanent;`. Ensure server configuration is accessible for edits.
How To Redirect Domain Name To Ip Address?
To redirect a domain name to an IP address, update DNS A records. Access your domain registrar’s control panel, find DNS settings, then edit the A record to point to the desired IP address. Save changes, and allow DNS propagation, which may take a few hours.
Conclusion
Redirecting a domain with Namecheap is straightforward. Follow the steps for success. Start by logging into your account. Then, locate the domain you want to redirect. Use the “Redirect Domain” feature. Enter the destination URL. Save your changes. Check to ensure the redirect works correctly.
Remember, patience is key. Changes may take some time to update. Keep this guide handy for future reference. With practice, it gets easier. Enjoy a smoother online presence with Namecheap. Happy redirecting!


