Are you looking to boost your website’s SEO but don’t know where to start? Adding meta tags is one of the simplest yet most effective ways to improve your site’s visibility on search engines.
If you use WordPress and the Yoast SEO plugin, you’re in the right place. This guide will show you exactly how to add meta tags quickly and easily, so your pages get noticed by more visitors. Keep reading, and you’ll learn the step-by-step process to make your content stand out and attract the traffic your site deserves.
Why Add Meta Tags
Meta tags play a key role in how search engines read and display your website. They offer important information about your page’s content. Adding meta tags helps search engines understand what your page is about. This makes your website easier to find and more attractive to visitors.
Impact On Seo
Meta tags influence your site’s ranking in search results. Search engines use these tags to decide how relevant your page is. Clear and accurate meta tags can improve your position in search listings. This leads to more visitors and better traffic for your site.
Enhancing Search Appearance
Meta tags control what text appears under your page title in search results. A well-written meta description grabs attention and encourages clicks. It gives users a quick summary of your page content. This can increase the number of people who visit your site from search engines.
Setting Up Yoast Seo
Setting up Yoast SEO is the first step to improve your website’s search presence. The plugin helps you manage important SEO tasks easily. It guides you through optimizing your site for search engines. This section shows how to install and configure Yoast SEO quickly.
Installing The Plugin
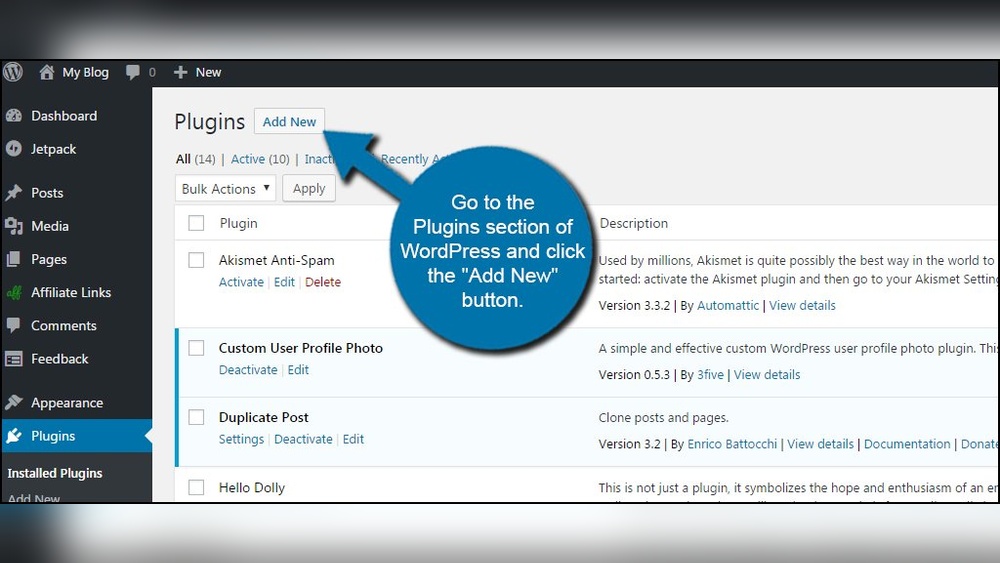
Log in to your WordPress dashboard. Go to the “Plugins” menu and click “Add New.” Type “Yoast SEO” in the search bar. Find the Yoast SEO plugin and click “Install Now.” After installation, click “Activate” to enable the plugin on your site.
Configuring Basic Settings
After activation, open the “SEO” menu on the dashboard. Click “General” to start the configuration wizard. Follow the steps to set your site type and company or person details. Choose your website’s visibility preferences for search engines. Save your settings to complete the basic setup.
Adding Meta Tags In Yoast
Adding meta tags in Yoast helps improve your website’s SEO. Meta tags give search engines information about your pages. This information can boost your page rankings and attract more visitors. Yoast SEO plugin makes adding meta tags simple and quick. Follow these steps to add custom meta tags easily.
Accessing The Meta Tag Section
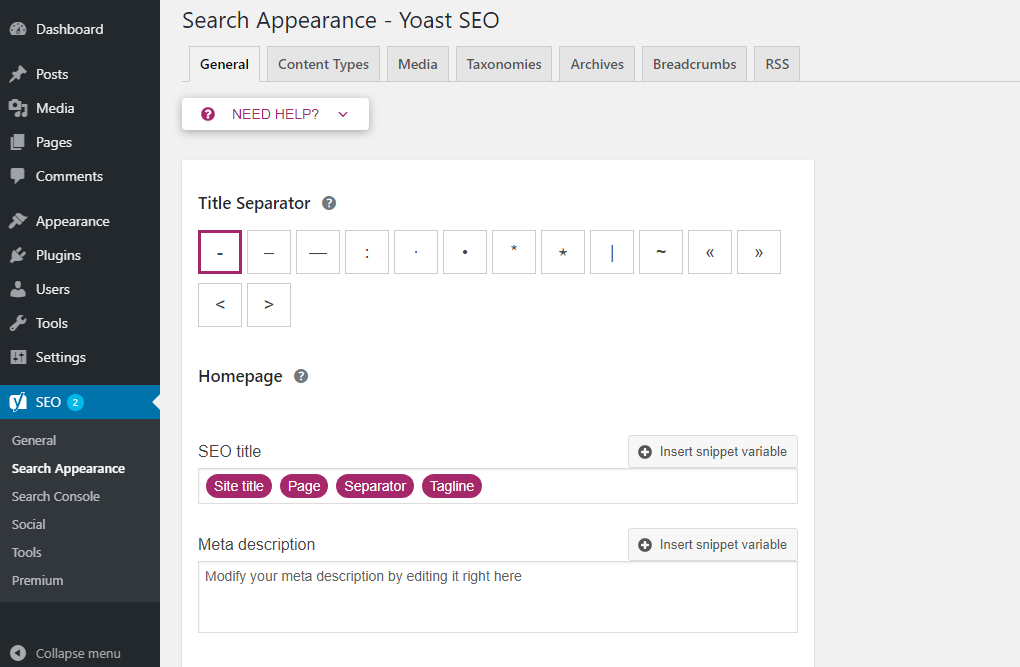
First, log in to your WordPress dashboard. Find the Yoast SEO plugin in the left menu. Click on “SEO” to open the Yoast settings. Next, select “Search Appearance” from the options. Here, you will see different tabs. Choose the “Content Types” tab to add meta tags to posts and pages.
Scroll down to the “Meta Description” box. This area allows you to write meta tags for each content type. You can also access meta tags for individual posts or pages below the editor. Look for the Yoast SEO box on the editing screen.
Inserting Custom Meta Tags
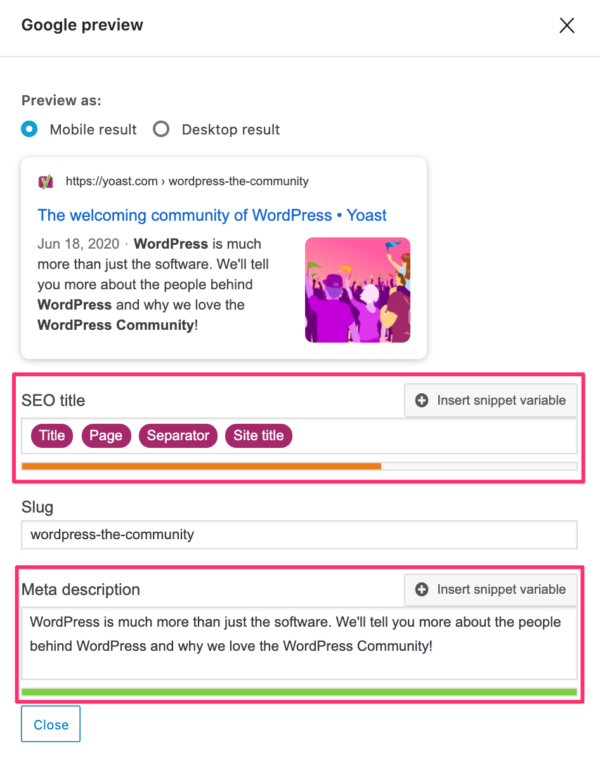
To insert a custom meta tag, open the post or page editor. Scroll to the Yoast SEO box below the content. Click the “Edit Snippet” button to customize meta title and description. Type your meta description carefully. Keep it clear and relevant to your content.
If you want to add other meta tags, use the “Advanced” tab in Yoast SEO box. Here, you can add meta robots tags or canonical URLs. Make sure your tags follow SEO best practices. Save your changes and update the post or page.

Credit: docs.metabox.io
Verifying Meta Tags
Verifying meta tags is an important step after adding them to your WordPress site using Yoast. It helps ensure search engines see the correct information. This process confirms that your meta tags appear as you intended in your site’s code. Without verification, errors may go unnoticed, affecting your SEO.
There are simple ways to check meta tags. You can use tools built into your web browser or free online services. These methods show your meta tags clearly. They also help you spot any mistakes quickly.
Using Browser Tools
Your web browser can reveal meta tags easily. Right-click on your webpage and select “View Page Source” or “Inspect”. This opens the HTML code of your page. Search for the meta tags by typing in the search box. You will see all meta tags listed in the header section. This method is fast and needs no extra software.
Online Meta Tag Checkers
Online meta tag checkers offer a simple way to verify tags. Enter your website URL into the tool and run the check. The tool scans your site’s HTML and lists all meta tags found. It highlights missing or incorrect tags too. Some popular free checkers are easy to use and give detailed reports. These services work well for quick, reliable verification.
Troubleshooting Tips
Troubleshooting tips help solve problems with adding meta tags in Yoast SEO. Meta tags improve your site’s SEO and visibility.
Sometimes, issues arise that stop meta tags from showing correctly. Knowing common problems and quick fixes saves time.
Common Issues
Meta tags do not appear on your website pages. This issue happens if Yoast settings are wrong or conflict with other plugins.
Another problem is that meta tags show old or empty content. This can happen when caching plugins store outdated data.
Sometimes, users forget to enable the meta tag option in Yoast. Without activation, meta tags will not add to your site.
Quick Fixes
Clear your site cache and browser cache after changing meta tags. This refreshes the content and shows updates immediately.
Check Yoast SEO settings to ensure meta tags are enabled for all pages. Review each page’s Yoast section for proper input.
Disable other SEO or caching plugins temporarily. Conflicts with these plugins may block meta tags from working.
Update Yoast SEO and WordPress to the latest versions. Updates fix bugs and improve compatibility with your theme.
Credit: yoast.com
Credit: vixencomposites.com
Frequently Asked Questions
How Do I Add Meta Tags Using Yoast Seo?
To add meta tags in Yoast SEO, go to the post or page editor. Scroll to the Yoast SEO section, click on “Edit snippet,” and enter your meta title and description. Save your changes to update the meta tags easily.
Can I Customize Meta Tags For Each WordPress Page?
Yes, Yoast SEO allows you to customize meta tags for every page or post. Simply edit the snippet in the Yoast box while editing the content. This helps improve SEO by targeting specific keywords per page.
Why Are Meta Tags Important For WordPress Seo?
Meta tags improve search engine rankings by providing relevant information about your page. They help search engines understand your content and influence click-through rates by displaying attractive titles and descriptions in search results.
Is Yoast Seo Free For Adding Meta Tags?
Yes, Yoast SEO’s basic version is free and supports adding meta tags. The premium version offers advanced features, but the free plugin is sufficient for most users to manage meta titles and descriptions.
Conclusion
Adding a meta tag in WordPress Yoast helps improve your site’s visibility. It is simple and quick to do. Just follow the steps, and you will see better search results. Keep your meta tags clear and relevant to your content.
This small change can make a big difference for your website. Start using meta tags today to help search engines understand your pages. Your site will attract more visitors over time. Stay consistent and update tags when needed. Easy to manage, yet effective for SEO success.