
You’re ready to take your website to the next level, but there’s one key step you need to tackle first: pointing your domain to an IP address using Namecheap. This might sound a bit technical, but don’t worry.
You’ve got this, and we’re here to guide you through every step. Imagine the feeling of satisfaction when your domain is perfectly aligned with your server, opening the door for your website to reach audiences far and wide. By the end of this article, you’ll not only know how to point your domain to an IP address, but you’ll also feel empowered and in control of your online presence.
Let’s dive in and demystify the process, making it as straightforward and rewarding as possible. Your website’s success is just a few clicks away.
Understanding Domain And Ip
Connecting a domain to an IP address is essential for website visibility. Knowing how these elements work is crucial. This guide explains the basics of domain names and IP addresses. It helps you understand their roles in the digital world.
Domain Name Basics
A domain name is your website’s unique address. It is what users type to visit your site. Domains are easy to remember. They replace complex numerical addresses. This makes browsing the internet more user-friendly. For example, instead of typing a long IP address, users type a domain name. Domain names end in extensions like .com, .net, or .org.
Choosing a good domain name is vital. It should be simple and memorable. A good domain reflects your brand and business. It helps users find your site easily. Domains can include letters, numbers, and hyphens. They should be kept short for easy recall.
Ip Address Fundamentals
An IP address is a series of numbers. It identifies devices on a network. Every device connected to the internet has an IP address. Think of it like a phone number. It directs data to the correct destination. Computers use IP addresses to communicate.
IP addresses come in two versions: IPv4 and IPv6. IPv4 addresses are shorter and widely used. They look like this: 192.168.1.1. IPv6 addresses are longer and newer. They offer more combinations. This helps accommodate more devices. Understanding IP addresses is important for domain pointing.
Linking a domain to an IP address ensures proper functioning. It allows users to access your website easily. Knowledge of both domains and IPs is key. It helps in maintaining a reliable web presence.

Credit: wpindigo.com
Preparing To Point Domain
Setting up your domain with Namecheap involves directing it to a specific IP address. Start by logging into your Namecheap account and locating your domain. Use the DNS settings to enter the desired IP address, ensuring your domain points correctly to your server.
Preparing to point your domain to an IP address with Namecheap is a straightforward process, but like any technical task, it’s best to go in prepared. Whether you’re setting up a new website or redirecting traffic to a different server, getting everything ready is crucial. This preparation ensures a smooth transition and minimizes downtime, saving you from potential headaches down the line.Gathering Necessary Information
Before you begin, gather all the information you’ll need to point your domain to an IP address. This includes the IP address of your server, which is typically provided by your web hosting provider. Ensure you have access to your Namecheap account, as you’ll be making changes there. Double-check the IP address for any errors. A simple mistake can lead to your domain pointing to the wrong location. If you’re unsure where to find this information, reach out to your hosting provider’s support team. They’re usually more than happy to help clarify details, making your task easier.Checking Domain Status
Before making any changes, check your domain’s current status. Is it active and not expired? A domain that isn’t active won’t reflect any changes you make. Log into your Namecheap account to verify this. Look for any notifications or alerts regarding your domain. Ensure the domain is unlocked and ready to be updated. Sometimes, domains can be locked to prevent unauthorized changes, so you’ll need to unlock it temporarily. Have you ever made changes to a domain only to realize it was locked? It can be frustrating, but taking a moment to ensure everything’s set can prevent such issues. By preparing thoroughly, you set yourself up for success. What steps do you find most critical when preparing to point a domain? Share your experiences!Accessing Namecheap Account
To point your Namecheap domain to an IP, access your account. Navigate to the Domain List. Select your domain. Change the A Record to the desired IP address in the DNS settings. Save changes. This directs your domain traffic to the specified server.
Accessing your Namecheap account is the first step in pointing your domain to an IP address. This process might seem daunting at first, but it’s actually quite straightforward. With a few clicks, you’ll be on your way to managing your domain like a pro. ###Logging Into Namecheap
Start by visiting the Namecheap website. Look for the “Sign In” button at the top right corner of the page. Enter your username and password, then click “Sign In.” If you’ve forgotten your password, don’t worry. Simply click on “Forgot Password?” and follow the prompts to reset it. Remember to use a strong, unique password to keep your account secure. ###Navigating The Dashboard
Once logged in, you’ll find yourself on the dashboard. Here, you can see an overview of your domains and services. Look for the “Domain List” on the left-hand side. This section shows all the domains you own. Click on the domain you want to point to an IP. The domain management page offers various options. To change the IP, head to the “Advanced DNS” tab. This is where you can update your DNS settings and point your domain to a new IP address. Have you ever wondered how easy it could be to manage your domain settings with just a few clicks? With Namecheap, it’s all about simplicity and control right at your fingertips.Locating Dns Settings
Locating DNS settings on Namecheap is a straightforward task. It’s essential for pointing your domain to an IP address. This process involves accessing your domain’s control panel. First, you need to find where the DNS settings are located. Here’s a step-by-step guide to help you.
Finding The Domain List
Start by logging into your Namecheap account. Once logged in, head to the dashboard. Look for the “Domain List” on the left-hand menu. This section displays all your registered domains. Click it to proceed.
Selecting The Correct Domain
After accessing the domain list, find the domain you want to update. Scan through your list carefully. Click on “Manage” next to the appropriate domain. This action will open the settings page for that specific domain.
Configuring Domain To Ip
Configuring your domain to point to an IP address is a crucial step. It ensures visitors find your website. Using Namecheap makes this process straightforward. This guide will walk you through updating the necessary settings. You’ll learn to update A records and verify changes.
Updating A Record
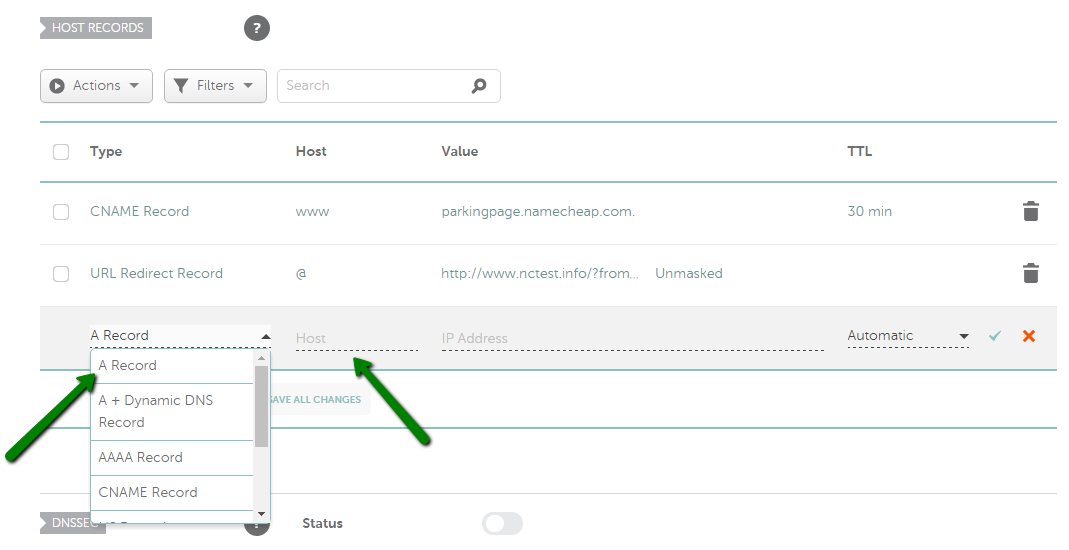
First, log into your Namecheap account. Navigate to the “Domain List” section. Click “Manage” next to your domain. Find the “Advanced DNS” tab. Locate the section for A records. You might see existing records here. Click the “Add New Record” button. Select “A Record” from the dropdown menu. Enter the IP address in the “Value” field. Set the “Host” to “@”. This directs the domain to the IP. Save your changes once complete.
Verifying Changes
After updating the A record, verify the changes. Use online tools to check DNS propagation. These tools confirm if the domain points to the correct IP. You can also test by visiting the domain. See if the website loads as expected. DNS changes can take time. Be patient if results are not immediate. Usually, it takes a few hours. Ensure the IP address entered is correct. Double-check for any typing errors. This avoids misdirection.
Credit: www.namecheap.com
Testing Domain Connection
Learn how to point your Namecheap domain to an IP address effortlessly. Update DNS settings to ensure a smooth connection. Follow simple steps to link your domain to your server’s IP.
Testing your domain connection is crucial to ensure your website is accessible to users across the globe. Once you’ve pointed your domain to an IP address using Namecheap, you’ll want to verify that everything is functioning correctly. You don’t need to be a tech guru to do this; simple tools and commands can help you ensure your domain is correctly connected.Using Ping Command
The ping command is a straightforward way to check if your domain is properly linked to the IP address. Open a command prompt or terminal on your computer and type `ping yourdomain.com`. If your domain is correctly pointed, you will see response times from the server. This indicates that the connection is solid. It’s like sending a quick text and getting an instant reply. If there’s no reply, something might be amiss with your connection.Checking Website Accessibility
After confirming the IP connection with the ping command, it’s time to check your website accessibility. Simply open a web browser and type your domain name into the address bar. If your website loads as expected, congratulations! Your domain is successfully pointed to the right IP. Imagine it like opening a book and finding the story you expected. However, if the site doesn’t load, consider checking your DNS settings or contacting Namecheap’s support for assistance. Testing your domain connection is not just about technical success; it’s about ensuring visitors can reach you effortlessly. Have you ever faced issues accessing a website? It’s frustrating, right? You don’t want your audience to feel that way. Ensure your connection is rock solid, and your site is always accessible.Troubleshooting Common Issues
Pointing your domain to an IP on Namecheap involves accessing the DNS settings. First, log into your Namecheap account. Then, navigate to the “Domain List” and select “Manage” next to your domain. In the “Advanced DNS” tab, add or edit an A Record with your server’s IP address.
When you’re trying to point your Namecheap domain to an IP address, things don’t always go smoothly. You might face some common issues that can cause frustration. Let’s dive into these problems and explore how to solve them effectively. ###Resolving Dns Propagation Delays
DNS propagation delays are like waiting for a slow train to arrive. You’ve made changes, but they don’t seem to reflect immediately. This is normal and can take anywhere from a few minutes to 48 hours. Ensure that your DNS settings are correct and give them some time. You can use online tools to check if the DNS changes are propagating worldwide. Patience is key here, but if it’s been over 48 hours, you might need to recheck your settings. ###Fixing Incorrect Configurations
Incorrect configurations can leave you scratching your head, wondering why your site isn’t accessible. Double-check your DNS records to ensure everything is set up correctly. Look for common mistakes like a missing ‘A record’ or incorrect IP address. A personal mishap: I once entered the wrong IP address and spent hours troubleshooting. It was a simple typo, but it taught me the importance of checking every detail. Always verify your entries to avoid unnecessary headaches. If you’re unsure about your configuration, Namecheap’s support team is just a chat away. They can guide you through your settings and help identify any errors. Don’t hesitate to seek help if you’re stuck. These troubleshooting steps can save you time and prevent frustration. Have you ever encountered these issues while managing your domain? Share your experiences and let’s learn together.
Credit: m.youtube.com
Tips For Effective Domain Management
Managing your domain effectively is crucial for online presence. It ensures that your website remains accessible and secure. With Namecheap, pointing a domain to an IP is simple. But maintaining control over your domain requires ongoing effort. Here are some tips to help you manage your domain efficiently.
Regular Domain Maintenance
Check your domain settings regularly. This helps avoid unexpected issues. Keep your contact details updated. Renew your domain before expiration. Set reminders for important dates. Regularly review your DNS records. Confirm they point to the correct IP address. This prevents downtime for your website.
Keeping Information Secure
Protect your domain information from unauthorized access. Use strong, unique passwords. Enable two-factor authentication for added security. Be cautious of phishing emails. They can trick you into revealing sensitive information. Regularly update your registrar account details. Secure your account with security questions. Consider using WHOIS privacy protection. It hides your personal information from the public. This helps keep your domain safe from spammers.
Frequently Asked Questions
How Do I Point My Domain To A Specific Ip Address?
To point your domain to a specific IP, access your domain’s DNS settings. Add an A record, entering the desired IP address. Save changes for them to take effect. DNS propagation may take up to 48 hours.
How Do I Redirect A Domain To An Ip?
To redirect a domain to an IP, modify the DNS settings. Set an A record pointing the domain to the desired IP address. Ensure DNS propagation by checking settings and verifying changes. Consult your hosting provider if needed for specific instructions.
This process makes your domain resolve to the IP efficiently.
How Do I Point A Domain To Namecheap?
Log in to your Namecheap account. Navigate to Domain List. Select your domain. Click on “Manage. ” Set DNS to Namecheap’s servers by choosing “Namecheap BasicDNS. ” Save changes. Your domain now points to Namecheap.
How To Convert Domain Name Into Ip Address?
Use a DNS lookup tool to convert a domain name into its IP address. Simply enter the domain, and the tool will provide the corresponding IP address. Popular tools include the command prompt’s “nslookup” or online services like What’s My DNS.
Conclusion
Successfully pointing your domain to an IP is crucial. It helps visitors find your site easily. With Namecheap, the process is simple and direct. Follow the steps carefully for success. Double-check details to avoid mistakes. Remember, patience is key while waiting for changes to take effect.
If issues arise, seek support from Namecheap’s help resources. Mastering this task enhances your web management skills. Your online presence becomes more professional. Stay informed and keep learning. Your efforts will pay off.


