
Imagine having a website that stands out, loads quickly, and keeps visitors coming back for more. One crucial step in achieving this is ensuring your domain’s nameservers are correctly set up.
If you’re using Namecheap, you might wonder how to change those nameservers smoothly and efficiently. You’ve come to the right place. Whether you’re looking to improve your site’s performance or switch hosting providers, understanding how to change your nameservers is essential.
In this guide, you’ll learn the simple steps to update your nameservers on Namecheap, ensuring your site runs seamlessly. Don’t miss out on optimizing your website’s potential; continue reading to empower yourself with the knowledge to make these important changes.
Why Change Nameservers?
Nameservers play a crucial role in managing your domain’s DNS settings. They act as a bridge between the domain name and its IP address. Changing nameservers might seem technical, but it’s often necessary. It ensures your domain points to the right hosting provider.
One common reason is switching hosting providers. If your current host doesn’t meet your needs, a change is essential. Updating nameservers allows your domain to connect to the new host.
Improve Website Performance
Changing nameservers can enhance site speed. Some hosts offer faster DNS resolution. This leads to quicker page loading times. Visitors appreciate a smooth experience.
Enhance Security
Security is vital for any website. Some nameservers provide better protection against cyber threats. Updating nameservers can safeguard your data. Keep your website safe from attacks.
Access Advanced Features
Some hosting providers offer advanced features. These might include load balancing or CDN integration. Changing nameservers can give access to these benefits. Enhance your site’s functionality.
Ensure Reliability
Reliable nameservers ensure uptime. Downtime can affect your business. By changing to a reliable provider, you minimize risks. Keep your site accessible to users.
Enable Custom Dns Management
Custom DNS management offers flexibility. Some providers allow tailored DNS settings. This can help with specific requirements. Adjust DNS settings as needed.
Preparing For Nameserver Change
Changing nameservers with Namecheap requires careful preparation. Start by accessing your Namecheap account and locating the domain management area. Follow the straightforward instructions to update nameservers, ensuring your website points correctly to the new server.
Changing nameservers might sound intimidating, but with the right preparation, it’s a straightforward process. Whether you’re tweaking your website’s settings for improved performance or migrating to a new host, getting ready for a nameserver change is crucial. You’ll want to ensure a smooth transition with minimal downtime and avoid any potential hiccups. Before you dive into the technicalities, let’s explore the essential steps you need to take.Backup Important Data
Before making any changes, it’s vital to secure your website’s data. Imagine losing valuable content or configurations because of a minor oversight. Consider exporting your current website settings and files. Many hosting platforms offer easy backup options that you can utilize. Think of it like packing for a move: you wouldn’t leave behind your prized possessions. Similarly, safeguarding your digital assets is a must.Check Domain Status
Your domain’s status is another key element to review. Is it active and in good standing? A domain that is due for renewal can complicate the nameserver change process. Ensure your domain registration is up-to-date and not expired. This step prevents unexpected surprises during the transition. Have you ever tried to make a call with a disconnected line? Checking your domain status ensures your website remains reachable. Preparing for a nameserver change involves careful planning and attention to detail. Are you ready to make the switch seamlessly?Accessing Namecheap Account
Accessing your Namecheap account is simple. To change nameservers, log in, navigate to your domain list, and select the domain. Find the “Nameservers” section. Input the new nameserver details and save changes. This quick process ensures your domain points to the correct server.
Accessing your Namecheap account is the first step in changing your nameservers. This process is straightforward and can be completed in just a few minutes. Whether you’re a seasoned web administrator or a beginner, understanding how to navigate your Namecheap account is essential. Let’s break down the steps to ensure you can access your account without any hitches.Login Process
Start by visiting the Namecheap website. You’ll see the “Sign In” button located at the top right corner of the homepage. Click on it. Enter your username and password. If you’ve forgotten your login details, use the “Forgot your password?” link. This will guide you through the process of resetting your password. Once logged in, you’ll be directed to your account dashboard. This is your control center for managing your domains and services.Locate Domain Settings
From your dashboard, find the “Domain List” on the left sidebar. Click on it to view all the domains associated with your account. Next to each domain, you’ll see a “Manage” button. Click on the “Manage” button for the domain you want to update. Within the domain management page, locate the “Nameservers” section. This is where you can change the nameservers to point to your desired hosting provider. Have you ever noticed how easy it is to get lost in a sea of settings? Focusing on the right sections helps streamline the process. You’ll be surprised at how much more efficient you become with practice. By understanding these steps, you’re ensuring a smoother experience when managing your domains. Do you feel more confident about accessing your Namecheap account now? Take the plunge and explore, knowing you have the basics covered.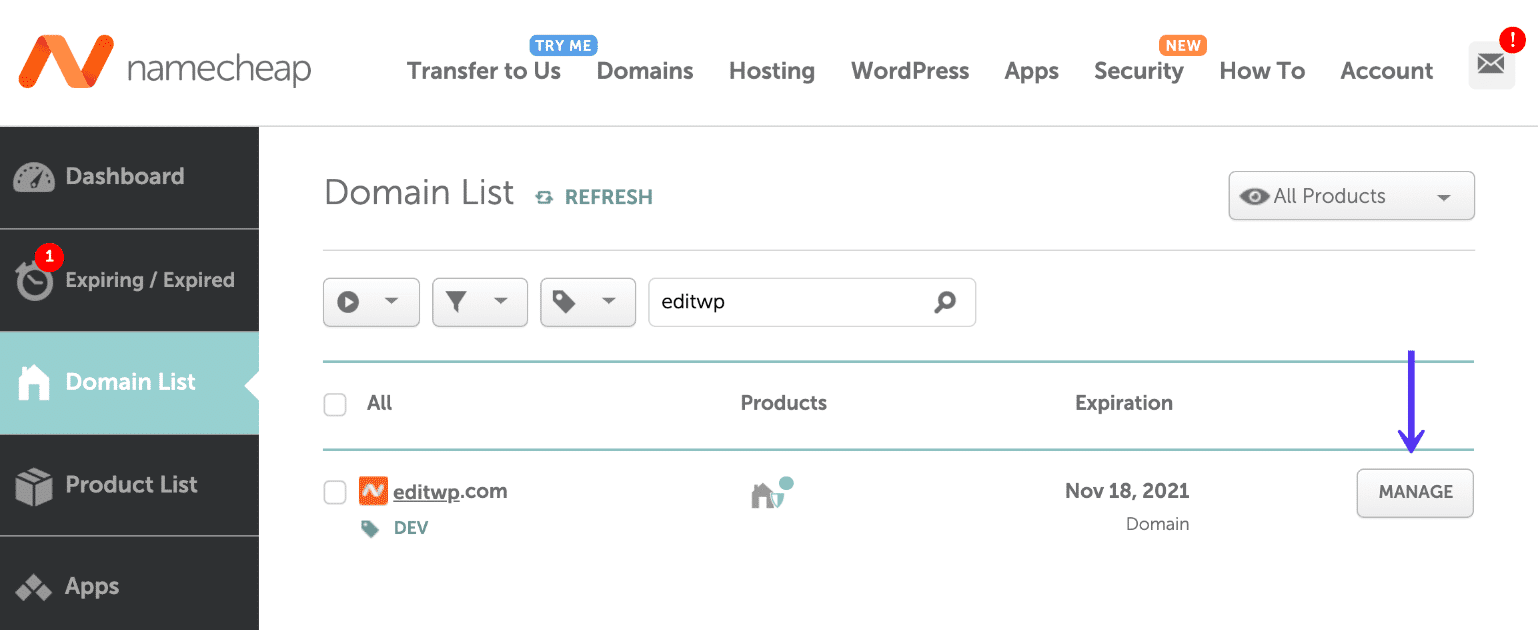
Credit: kinsta.com
Navigating To Nameserver Settings
Changing nameservers on Namecheap is a simple process. It involves navigating to the right settings. This guide will help you through the steps. Follow each section carefully. Let’s start with navigating to the nameserver settings.
Find Dns Section
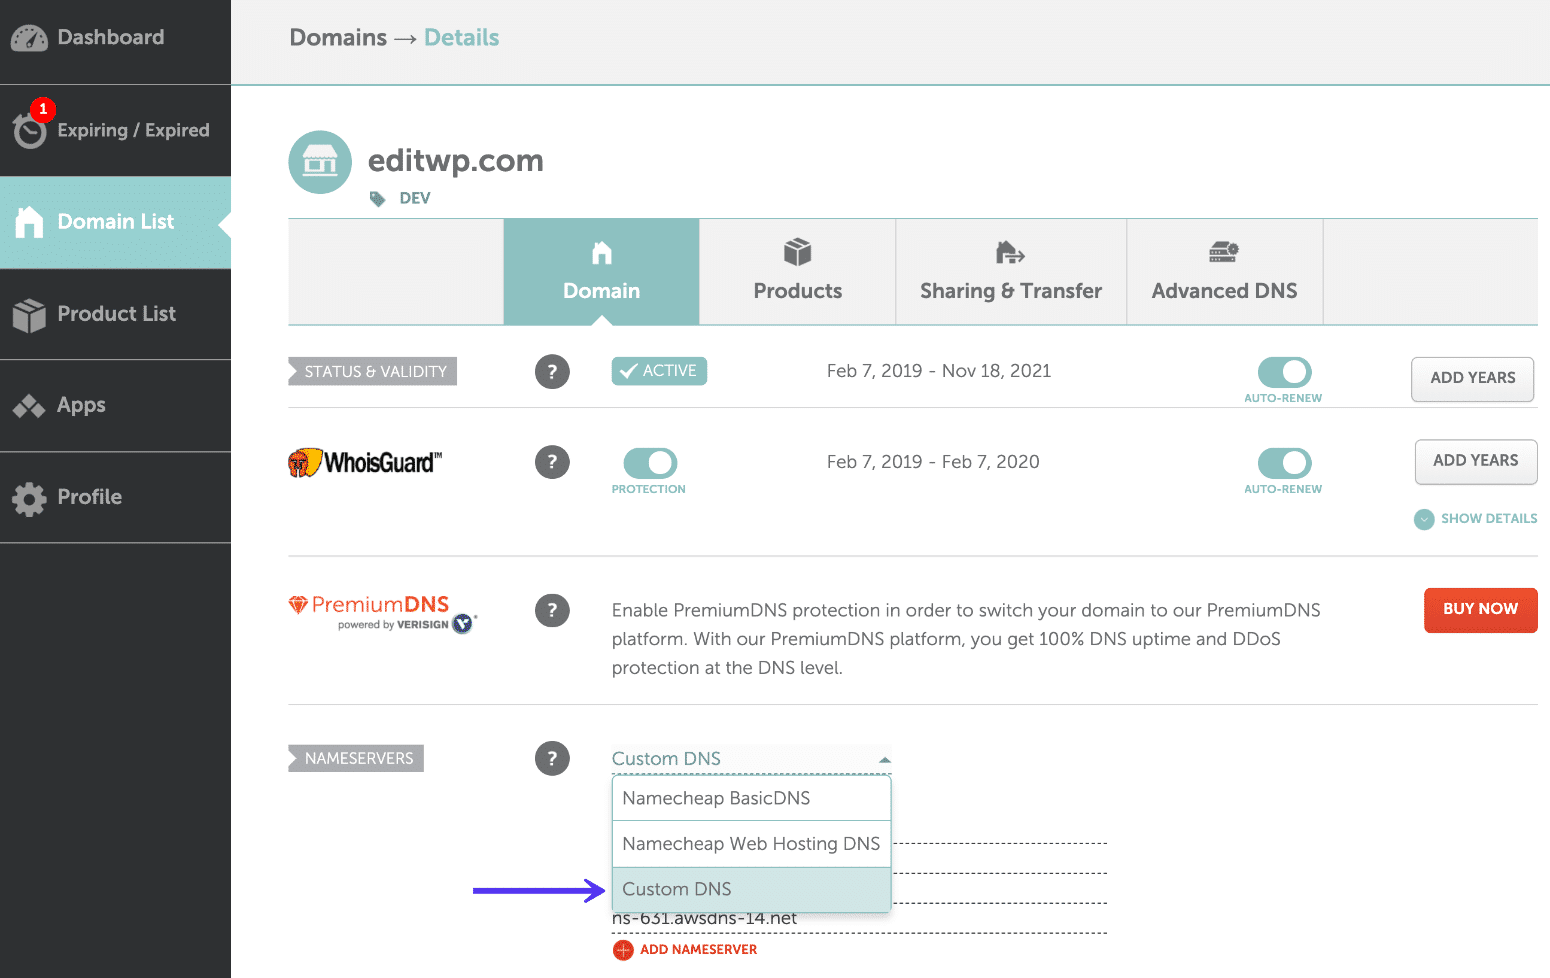
First, log in to your Namecheap account. Once logged in, click on the “Domain List” tab. It is located on the left sidebar. Find the domain you want to change. Next to it, click on “Manage.” This opens the domain management page. Look for the “DNS” or “Domain” tab. It is typically near the top of the page. Click on it to proceed.
Select Nameserver Option
In the DNS section, scroll down. Find the “Nameservers” option. There are different settings available. Choose “Custom DNS” to enter your own nameservers. Enter the new nameserver addresses. Ensure you input them correctly. Double-check for any typos. Once done, click on the green checkmark. This saves your changes.
It may take some time for changes to update. Be patient and check back later. Your domain will soon point to the new nameservers.
Updating Nameservers
Updating nameservers is a crucial step in managing your domain. It’s like giving your website a new address to ensure it points to the correct hosting provider. Whether you’re switching hosts or setting up your domain for the first time, knowing how to update nameservers on Namecheap can save you time and potential headaches.
I’ve been there myself, staring at the Namecheap dashboard, unsure of what to do next. But once you know the steps, it’s straightforward. Let’s dive into the process and make it as seamless as possible for you.
Enter New Nameserver Details
First, log in to your Namecheap account. Navigate to the “Domain List” on the left-hand side of the dashboard. Click “Manage” next to the domain you wish to update.
Scroll down to the “Nameservers” section. Here, you’ll see a drop-down menu. Choose “Custom DNS” from the list.
You’ll see fields where you can enter your new nameserver details. Typically, these look something like ns1.yourhostingprovider.com. Ensure you enter each nameserver correctly.
Save Changes
After entering the new nameserver details, the next crucial step is to save your changes. Look for the green checkmark or a similar option to confirm your entries.
Your changes may take a few minutes to propagate across the internet. It’s a good time to grab a coffee or stretch your legs while the magic happens.
It’s exciting to see your website point to the new server, knowing you did it yourself. Have you ever had a moment where a small task felt like a big win? Updating nameservers can be one of those moments.
Keep in mind that DNS changes might take up to 48 hours to fully propagate. Checking your website periodically can help you see the changes in action.
Are you ready to tackle your nameserver update? It’s simpler than it seems, and now you’re equipped with the knowledge to do it yourself. Take charge and make your website work just the way you want it to!
Credit: kinsta.com
Verifying Nameserver Change
After updating your nameservers on Namecheap, verification is crucial. This ensures your domain points to the correct server. Changes may take time, but verification is essential for a smooth transition. You want to confirm everything is set up correctly.
Check Propagation Status
Nameserver changes need time to propagate across the internet. This can take up to 48 hours. Use online tools to check propagation status. They show if the changes have spread globally. These tools provide updates from various locations. It’s a handy way to track progress.
Troubleshoot Common Issues
Sometimes, nameserver changes face issues. If changes haven’t propagated, clear your browser cache. This might resolve the issue. Ensure you’ve entered nameservers correctly. Even small typos can cause problems. Double-check your entries.
DNS changes might be slow in some regions. Patience is key here. If issues persist, contact Namecheap support. They can offer guidance and solutions. Verifying nameserver changes ensures everything runs smoothly.
Benefits Of Updated Nameservers
Changing nameservers with Namecheap ensures your website runs smoothly. Updated nameservers enhance site performance, improve security, and provide faster load times. This simple adjustment can lead to a better user experience.
Updating your nameservers is more than just a technical task; it opens up a world of benefits for your website. Whether you’re a small business owner or a seasoned blogger, keeping your nameservers current ensures your site runs smoothly and efficiently. Imagine your website as a physical store; if your store’s address is outdated, customers can’t find you. Updating your nameservers is like giving your website a clear and accurate address on the internet.Improved Website Performance
An updated nameserver can significantly boost your website’s performance. Faster DNS resolutions mean your site loads quicker, keeping visitors engaged. No one likes waiting for a page to load; speed can make all the difference in retaining visitors.Enhanced Security
Security is a top priority for any website owner. Updated nameservers help protect your site from various cyber threats. By ensuring your DNS settings are current, you reduce the risk of attacks like DNS spoofing.Reliable Uptime
Nobody wants their site to be down. Updated nameservers contribute to better uptime, ensuring your site is accessible to users 24/7. This reliability builds trust with your audience and helps maintain your site’s reputation.Seamless Transition During Hosting Changes
If you’ve ever switched hosting providers, you know the stress of keeping everything running smoothly. Updated nameservers make transitions seamless, minimizing downtime and disruptions. This allows you to focus on what you do best—providing great content or services to your audience.Better Seo Rankings
Did you know that search engines consider site speed and uptime when ranking websites? Updated nameservers can improve both, boosting your SEO efforts. This means more visibility and potential traffic for your site.Personal Experience: A Lesson Learned
I once neglected to update my nameservers after switching hosts, resulting in a few hours of downtime. That experience taught me the importance of keeping them up to date. Now, it’s one of the first things I check whenever I make changes to my hosting setup. Have you ever experienced issues with outdated nameservers? It’s a small step that can have a big impact on your website’s success. Don’t let something so simple hold your site back.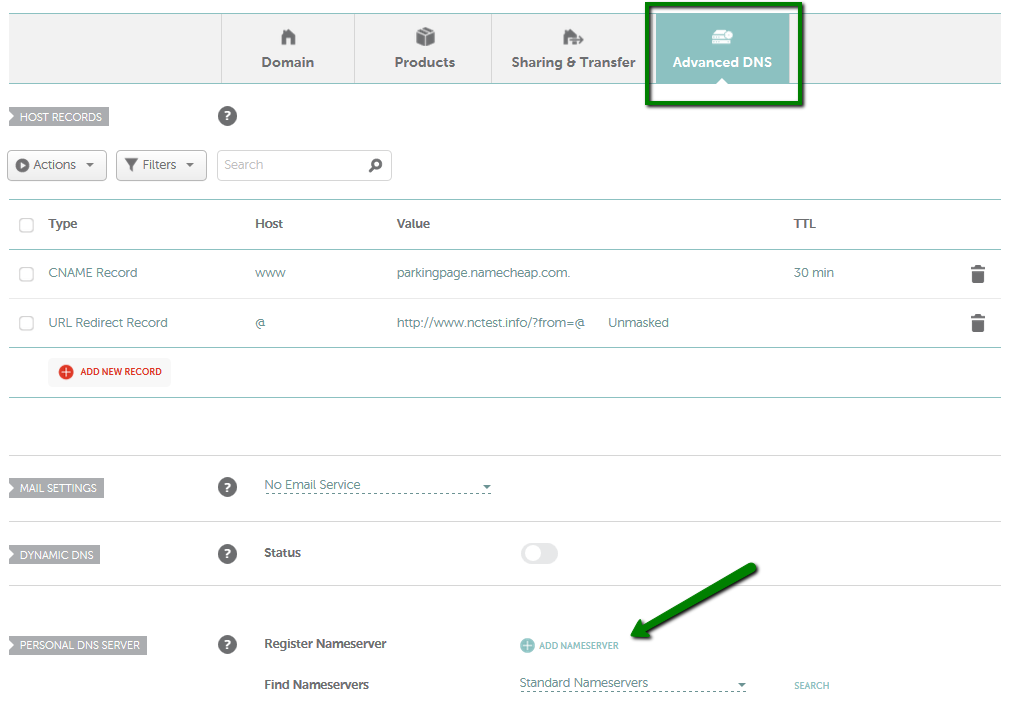
Credit: www.namecheap.com
Frequently Asked Questions
How Do I Change The Nameservers On Namecheap?
Log in to your Namecheap account. Go to “Domain List” and select your domain. Click “Manage. ” Under the “Nameservers” section, choose “Custom DNS” and enter the new nameserver details. Click the checkmark to save changes.
How Do I Change My Nameserver?
Access your domain registrar account. Navigate to DNS settings. Select the option to change nameservers. Enter the new nameserver details. Save changes to update nameservers.
How To Find Nameservers In Namecheap?
Log into your Namecheap account. Go to the “Domain List” section. Click “Manage” next to your domain. Find nameservers under the “Domain” tab.
How To Edit Dns Zone Namecheap?
Log into your Namecheap account. Navigate to “Domain List” and click “Manage” next to your domain. Select “Advanced DNS. ” Edit your DNS zone records by clicking the “Add New Record” button or modifying existing entries. Save changes to update your DNS settings.
Conclusion
Changing nameservers with Namecheap is simple and straightforward. Follow the steps outlined, and your domain will point correctly. Always double-check your entries for accuracy. This ensures your website runs smoothly. Need assistance? Namecheap’s support team is available to help. Remember, managing your domain settings is crucial.
It affects your website’s performance. Stay informed, and regularly review your settings. This helps avoid potential issues. With practice, you’ll become more confident in managing your domain. Keep learning and exploring to enhance your online presence. Your website’s success depends on it.


