
Are you struggling to add a TXT record to your Namecheap domain? You’re not alone.
Many find this task a bit daunting, especially if they’re new to domain management. But don’t worry—this guide is here to help. By learning how to add a TXT record, you can improve your domain’s security, verify ownership, and ensure seamless email delivery.
Imagine the peace of mind knowing your domain is set up correctly. You’ll discover simple steps to add a TXT record in Namecheap, making the process straightforward and stress-free. So, let’s dive in and make sure your domain is optimized, secure, and ready to go!
Credit: www.alphr.com
Setting Up Namecheap Account
To add a TXT record on Namecheap, log into your account and access the Domain List. Next, find your domain and click ‘Manage’. In the Advanced DNS tab, select ‘Add New Record’, then choose ‘TXT Record’. Enter the required details and save changes.
Setting up your Namecheap account is your first step towards managing your domain effectively. Whether you’re a seasoned website owner or a newcomer, starting with a well-structured account can make the process smoother and more efficient. Let’s dive into the essentials of setting up your Namecheap account, where you’ll learn how to register or log in and access your domain list. ###Register Or Log In
To begin, you need to create an account or log in to your existing one. If you don’t have an account yet, registration is simple. Visit Namecheap’s homepage and click on ‘Sign Up’. You’ll be prompted to enter your email, password, and a few personal details. If you already have an account, just click ‘Login’ and enter your credentials. Make sure your password is strong to protect your domain assets. This step is crucial because it gives you access to all Namecheap features. Having a secure and accessible account sets a solid foundation for managing your domain. ###Access Domain List
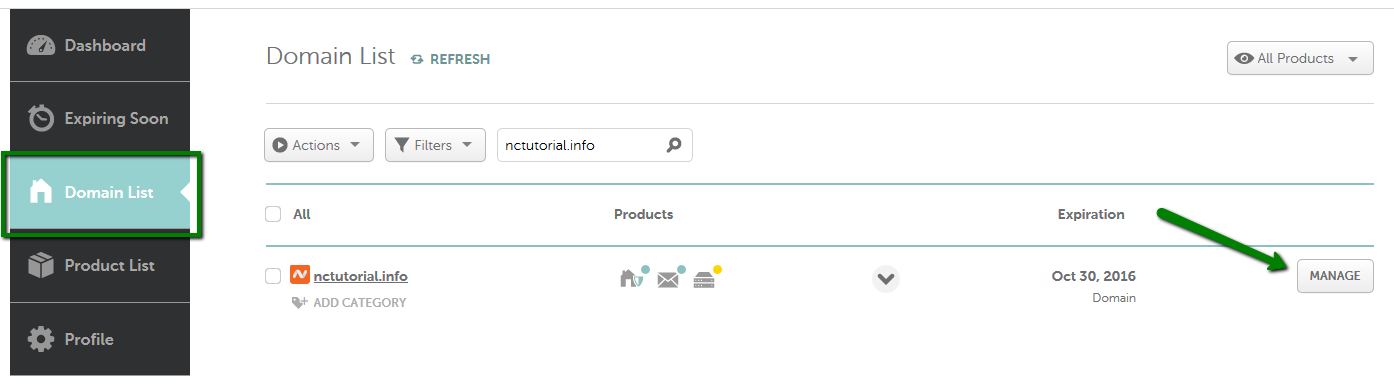
Once logged in, head over to your dashboard. You’ll see various options, but focus on the ‘Domain List’ tab. This is where all your registered domains are listed. Click on ‘Domain List’, and you’ll find a catalog of your domains with detailed information. This view is essential for managing settings, including adding TXT records. Navigating this list efficiently allows you to make changes quickly. It’s like having a control panel for your website, enabling you to optimize your site’s settings without hassle. Isn’t it empowering to know you can manage your digital presence with just a few clicks? You have the reins to modify, update, and enhance your domain settings anytime.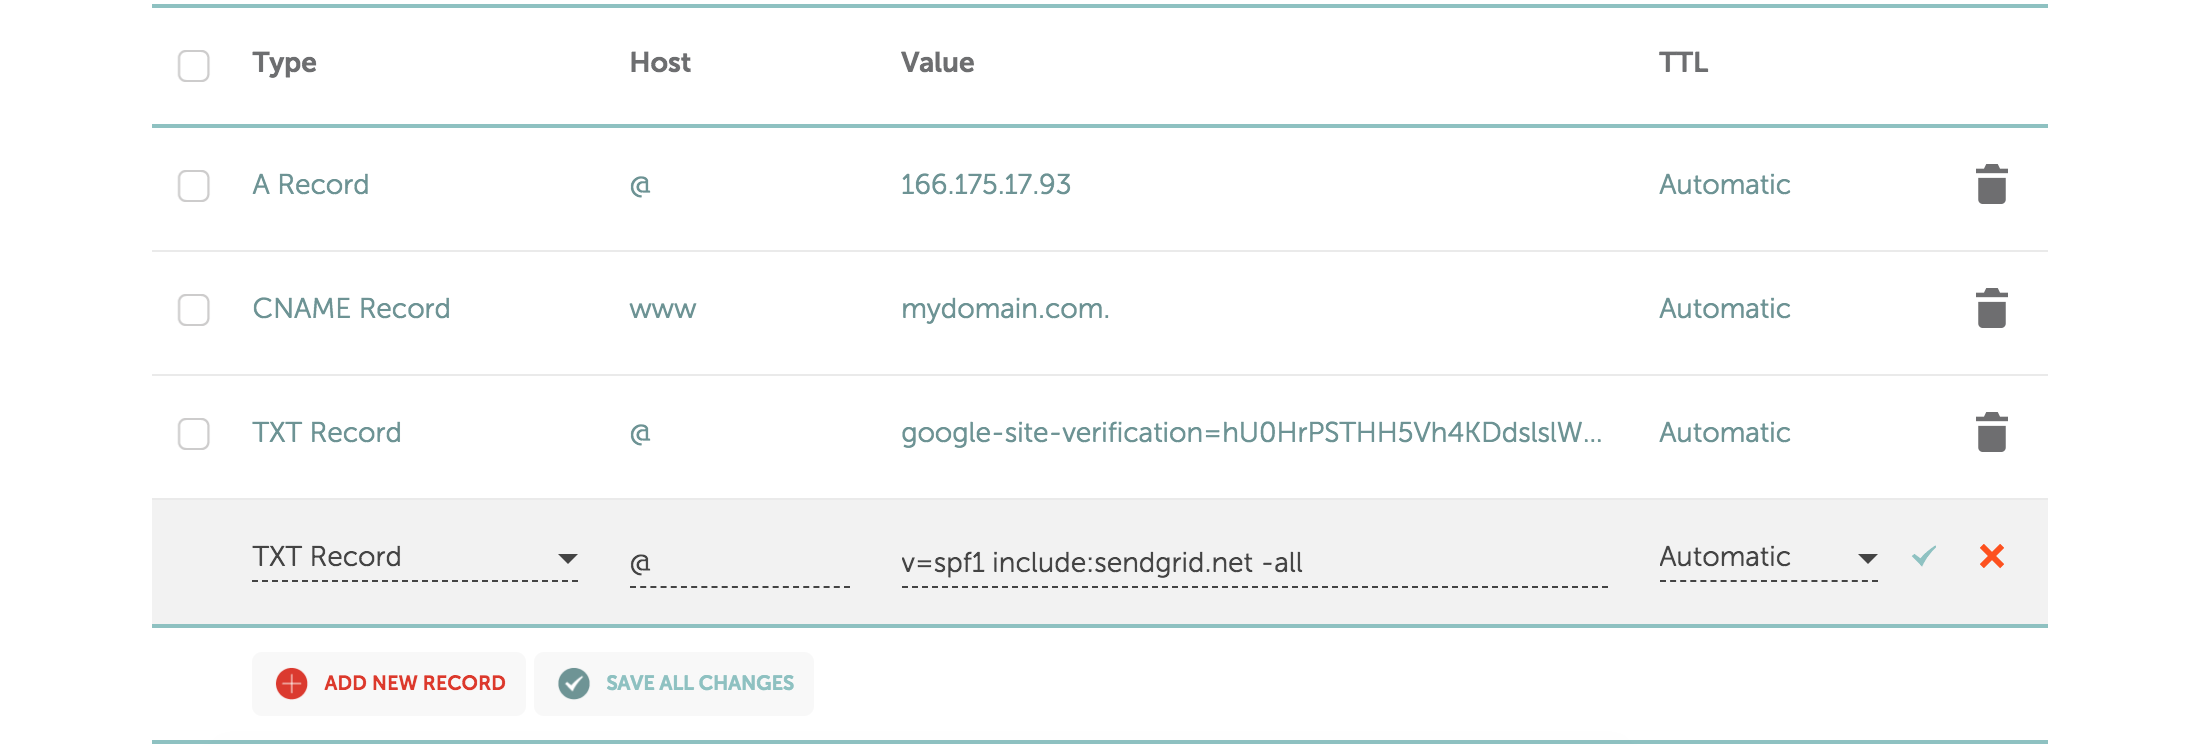
Credit: dmarcly.com
Navigating To Dns Settings
Adding a TXT record to your domain is essential for various reasons. It can help with email verification, security, and other technical settings. For Namecheap users, navigating to DNS settings is a straightforward process. This guide will walk you through the steps, ensuring you can manage your DNS with ease.
Select Domain
Start by logging into your Namecheap account. Once logged in, head to the dashboard. Here, you will see a list of all your domains. Identify the domain where you want to add the TXT record. Click on the domain name to open its management panel. This step is crucial as it leads you to the specific settings for that domain.
Open Advanced Dns
After selecting your domain, you will be directed to the domain management page. Look for the “Advanced DNS” tab. This tab is usually located at the top of the page. Click on it to access advanced DNS settings. Now, you are ready to add or modify DNS records, including TXT records, for your domain.
Adding Txt Record
Adding a TXT record to your domain on Namecheap can be a straightforward process if you know where to look. Whether you’re setting up email verification, configuring SPF, or integrating with other web services, TXT records play a crucial role. Understanding the steps involved can save you time and ensure your website functions smoothly. Let’s dive into the process of adding a TXT record, focusing on the key steps involved.
Choose Record Type
When you first access your domain settings on Namecheap, you’ll be presented with various record types. It’s essential to select the correct type to avoid any configuration errors. After navigating to the DNS settings, look for the option to add a new record. You’ll see choices like A, CNAME, MX, and TXT. Ensure you choose TXT, as this is crucial for tasks like email verification or service integration.
Input Record Details
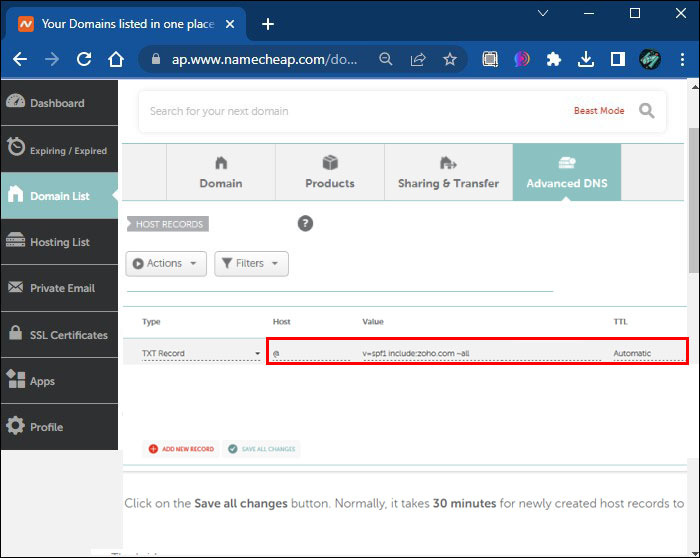
Once you’ve selected TXT, it’s time to input the specific details. This step requires precision because any mistake could lead to service issues. Enter the hostname, which is often ‘@’ for root domain or a specific subdomain if required. Next, input the TXT value. This might be a string of characters provided by a service you’re integrating with. Keep the TTL (Time to Live) as default unless instructed otherwise by your service provider.
Save Changes
After filling in the details, saving changes is the final step. This is where your attention to detail pays off. Double-check everything: hostname, TXT value, and TTL. Once verified, click the save button. Your changes may take a few minutes to propagate across the internet. During this time, you might wonder: Did I do everything correctly? If your service requires verification, check their dashboard to confirm success.
Adding a TXT record on Namecheap doesn’t have to be daunting. With careful attention and following these steps, you can achieve seamless integration. Have you ever faced challenges with DNS settings? Share your experience and let’s learn from each other.
Verifying Txt Record
Adding a TXT record in Namecheap is straightforward. Navigate to your domain settings and locate the DNS management section. Input the desired TXT record details, then save changes to verify it successfully.
Adding a TXT record to your domain’s DNS settings is an essential step for various verifications, like confirming domain ownership or enabling email security features. Once you’ve added the TXT record on Namecheap, the next crucial step is to verify that it’s correctly implemented. This verification process ensures that everything is set up accurately, preventing potential issues down the line.Check Propagation Status
After you add your TXT record, you’ll want to check if it’s propagated across the DNS. Propagation can take some time, typically ranging from a few minutes to 48 hours. Open a DNS propagation checker online and enter your domain name to see if your new TXT record is visible worldwide. Seeing inconsistent results? Don’t panic. It’s normal for different locations to update at different speeds. You might need to wait a bit longer if some servers haven’t updated yet.Confirm With External Tools
Using external tools can provide an additional layer of confirmation. Tools like MXToolbox or DNSChecker are user-friendly options that help you verify TXT records. Simply input your domain and let the tool do the work. What if the tool shows no record? Double-check the spelling and syntax of your TXT record in Namecheap. Errors here are more common than you think. Ensuring accuracy can save you a lot of troubleshooting later. Have you ever faced delays or errors while verifying TXT records? Share your experience or any tips in the comments below. Your insights could help someone else facing the same challenge!Troubleshooting Common Issues
Adding a TXT record in Namecheap can sometimes be tricky. You might face a few hiccups along the way. Troubleshooting common issues helps ensure a smooth process. Let’s explore some of the problems you might encounter. We’ll also provide solutions to get you back on track.
Incorrect Record Format
An incorrect record format is a common error. Ensure you input the exact text as provided by your service. Double-check for unnecessary spaces or typos. Use the correct record type. Mistakes here can prevent your record from validating correctly. A quick review can save time and frustration.
Propagation Delays
Propagation delays can test your patience. DNS changes might not reflect immediately. It can take up to 48 hours for changes to update. During this time, your TXT record may not function as expected. Be patient and allow some time for the update to complete. If the delay persists, check with Namecheap support.
Credit: www.namecheap.com
Additional Tips
Adding a TXT record in Namecheap is a straightforward task. Yet, a few additional tips can make the process smoother. These tips ensure your DNS settings are optimized and secure. Follow these guidelines to enhance your Namecheap experience.
Optimizing Dns Settings
Ensure your DNS records are up-to-date. Check for any outdated entries. These can cause conflicts or delays. Regularly review your DNS settings. This practice helps maintain optimal website performance. Use a reliable DNS management tool. It simplifies the process and reduces errors.
Choose the correct TTL (Time to Live) value. A lower TTL value updates changes faster. This is useful during website migrations or updates. Ensure your records have descriptive names. Descriptive names make future updates easier.
Ensuring Security
Security is crucial for DNS records. Enable DNSSEC if available. DNSSEC protects your website from DNS spoofing attacks. Regularly audit your DNS settings. Look for unauthorized changes or entries. Use strong passwords for your Namecheap account. Update them regularly.
Enable two-factor authentication (2FA). 2FA adds an extra layer of security. Be cautious of phishing emails. Verify emails claiming to be from Namecheap. Never share your login details.
Frequently Asked Questions
How Do I Add A Txt Record To My Domain Host?
Log into your domain host account. Locate the DNS management section. Select “Add Record” and choose “TXT Record. ” Enter the required details, then save the changes. Confirm the record is active by checking your domain’s DNS settings.
How Do I Add A Txt Record?
Log in to your domain registrar or DNS hosting provider. Locate the DNS settings. Add a new TXT record with the required information. Save changes and allow time for propagation.
How Do I Add A Record In Namecheap?
To add a record in Namecheap, log into your account, go to “Domain List,” select your domain, and click “Manage. ” Navigate to “Advanced DNS,” click “Add New Record,” choose the record type, fill in the details, and save. Ensure all information is correct before saving changes.
How To Create Txt Record Cpanel Namecheap?
Log into cPanel through Namecheap. Navigate to “Zone Editor” and select your domain. Click “Manage” and then “Add Record. ” Choose “TXT” from the dropdown, enter the necessary details, and save. Ensure DNS propagation by checking the record after a few hours.
Conclusion
Adding a TXT record in Namecheap is straightforward. Start by logging into your account. Navigate to the domain list. Select the domain you want. Go to the DNS settings. Choose to add a new record. Select TXT from the dropdown.
Enter the required details. Save the changes. Wait for the propagation. It usually takes up to 48 hours. Check if the record is active. Your TXT record should now be working. Practice helps you get familiar with the process. Keep these steps handy for future changes.
You’ll find managing DNS records gets easier.


