
Are you finding it difficult to access your Namecheap cPanel? You’re not alone, and I’m here to help you navigate this essential aspect of managing your website.
Imagine having full control over your site’s files, databases, and email accounts, all at your fingertips. Sounds empowering, right? With cPanel, that’s exactly what you get. In this guide, I’ll walk you through the simple steps to access your Namecheap cPanel.
Whether you’re looking to update your site’s content, tweak your settings, or troubleshoot issues, mastering cPanel will save you time and reduce frustration. Let’s unlock the potential of your website together and make sure you’re always ahead of the game. Ready to dive in?

Credit: www.namecheap.com
Accessing Your Namecheap Account
Accessing your Namecheap account is the first step to managing your web presence. This platform offers a user-friendly interface, making it simple for anyone. Whether you’re a beginner or have experience, navigating it is straightforward.
Logging Into Namecheap
Start by visiting the Namecheap homepage. Look for the login button on the top right corner. Click it to proceed to the login page. Enter your username and password. If you have forgotten your password, use the ‘Forgot Password’ link.
After entering your credentials, hit the ‘Login’ button. You will gain access to your account. Ensure your internet connection is stable for a smooth login process.
Navigating The Dashboard
Once logged in, you will see your dashboard. This area provides a snapshot of your account activities. Look at the menu on the left side. This menu gives access to different sections like domains, billing, and settings.
Click on ‘Domains’ to view your registered domains. Select ‘Billing’ to check payment histories and invoices. Explore ‘Settings’ to manage account preferences and security. Each section is designed for easy access.
The dashboard is intuitive. Spend a few minutes exploring it. This will help you understand where everything is located. Familiarity with the dashboard is essential for efficient account management.
Credit: www.namecheap.com
Locating Cpanel In Namecheap
Managing your website can sometimes feel like a daunting task, especially if you’re new to web hosting. Yet, once you get familiar with the tools at your disposal, like cPanel, everything becomes much simpler. If you’re using Namecheap, finding cPanel is your first step toward smooth website management. This guide will walk you through the process, ensuring you know exactly where to look and what to do.
Finding The Cpanel Link
Once you log into your Namecheap account, your dashboard is your starting point. It’s like the control room where you can manage everything from domains to hosting packages. Look for the ‘Hosting List’ tab—this is where the magic happens.
After clicking on the ‘Hosting List’ tab, you’ll see a list of your hosting packages. Each package will have a ‘Manage’ button beside it. Click on it to reveal more options, and this is where you’ll find the cPanel link. It’s usually labeled clearly to avoid any confusion.
Identifying Your Hosting Package
Not every hosting package is the same, and knowing which one you have is crucial. If you ever find yourself wondering, “Do I even have cPanel access?”—rest assured, you’re not alone. It’s a common question, especially among first-time users.
To identify your hosting package, go back to the ‘Hosting List’ tab. Here, you’ll see the name of your package and its details. If you see words like ‘Shared Hosting’ or ‘WordPress Hosting’, it’s a good sign you have cPanel access.
Once you’ve found your package, it’s helpful to make a quick note of any specifics. This can include the package name, renewal date, or any special features. Keeping track of these details can save you time and hassle in the future.
Accessing cPanel through Namecheap is a straightforward process, but it requires a little navigation. Have you ever found yourself lost in a sea of tabs and options? With this guide, you’ll know exactly where to click, ensuring you spend less time searching and more time managing your site effectively.
Logging Into Cpanel
Accessing cPanel is essential for managing your website. It offers tools for website management, email accounts, and databases. For Namecheap users, logging into cPanel is straightforward. Follow these steps to gain access and manage your site efficiently.
Using Cpanel Credentials
To access cPanel, use your login credentials. These are usually provided by Namecheap. Go to the Namecheap website. Click on the “Login” button. Enter your username and password. Navigate to the “Dashboard” section. Find the “Hosting List”. Click on “Manage” next to your domain. You will see the “cPanel Login” button. Click it to access your cPanel account.
Troubleshooting Login Issues
Sometimes, you may face login issues. Ensure your credentials are correct. Check for typing errors. If the issue persists, reset your password. Go to the Namecheap login page. Click on “Forgot Password?”. Follow the instructions to reset it. Ensure cookies are enabled in your browser. This can also affect login. If problems continue, contact Namecheap support. They can assist with further issues.
Exploring Cpanel Features
Discover how to access cPanel through Namecheap effortlessly. Navigate the user-friendly interface to manage your website, emails, and databases effectively. Enhance your online presence with cPanel’s powerful tools and features at your fingertips.
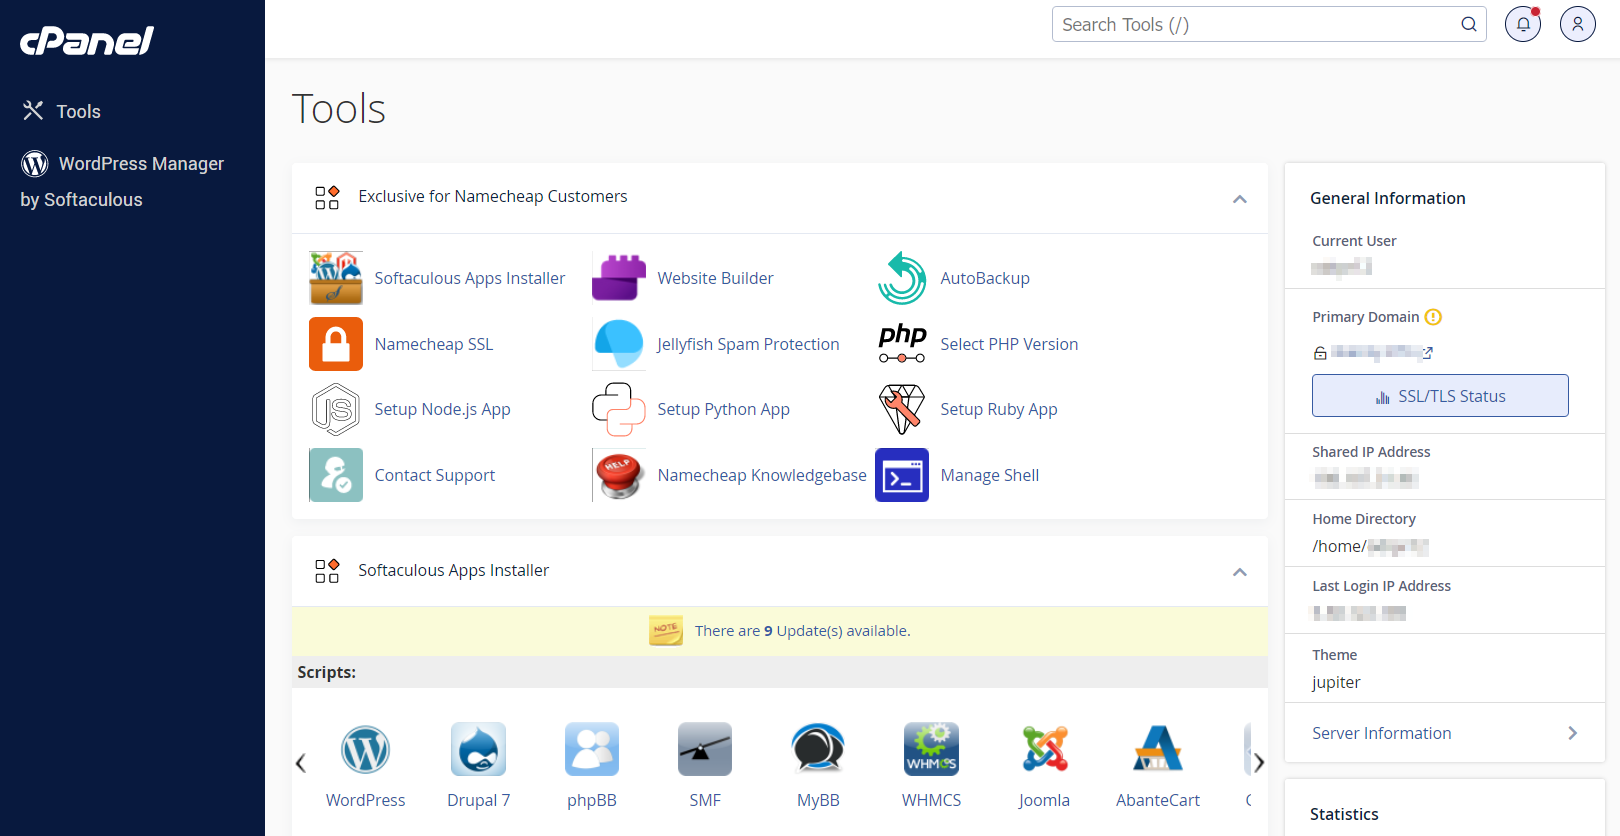
Navigating through Namecheap’s cPanel can feel like opening a treasure chest of tools for managing your website. Every feature is designed to simplify tasks that might otherwise seem daunting. Whether you’re a seasoned webmaster or just starting out, getting to know the ins and outs of cPanel can enhance your website’s functionality and security. Let’s dive into some of the key features you’ll find within cPanel.Managing Domains
Managing domains is crucial for maintaining an organized web presence. In cPanel, you can easily add new domains or subdomains. This means you can host multiple websites under one account, which is both cost-effective and convenient. You can also redirect domains, which is useful if you want to guide visitors from one URL to another. Have you ever thought about setting up a parked domain? It’s a great way to reserve a domain name for future use without actively hosting a website.Email Account Setup
Creating professional email accounts is a breeze with cPanel. You can set up an email account that aligns with your domain name, giving your communications a polished look. Decide how much storage each email account should have, ensuring your inbox doesn’t fill up too fast. Also, cPanel provides options to forward emails to another address, so you won’t miss important messages. Have you tried using email autoresponders? They can be a lifesaver when you’re out of the office or on vacation. Setting them up is straightforward and helps maintain communication with your contacts.Security Settings
Security should be a top priority for every website owner. cPanel offers a range of features to help keep your site secure. With just a few clicks, you can install SSL certificates to encrypt data and protect your users’ information. Another important feature is the IP blocker, which allows you to prevent specific IP addresses from accessing your website. This can be particularly useful if you’re experiencing unwanted traffic. Have you checked out the password protection for directories? It’s an excellent way to add an extra layer of security to sensitive parts of your website. Keeping your site secure not only protects your data but also builds trust with your visitors. Exploring these cPanel features can transform the way you manage your website. Which feature are you excited to try out?Using Cpanel For Website Management
Using cPanel for website management can transform the way you handle your online presence. This powerful tool, accessible through Namecheap, allows you to easily manage every aspect of your website. Whether you’re a newbie or a seasoned webmaster, cPanel can streamline your tasks, making website management a breeze.
File Management
Managing your website’s files is straightforward with cPanel’s File Manager. It lets you upload, download, and organize files with a few clicks. Imagine needing to update a document on your site; with cPanel, you simply drag and drop your file. You can also set permissions for different files, ensuring only authorized users can access them. Have you ever accidentally deleted a crucial file? cPanel’s backup options can save the day.
Database Access
Do you need to manage your website’s database? cPanel makes it simple with phpMyAdmin. This tool lets you create, modify, and delete databases with ease. You can perform tasks like importing data and running SQL queries without needing a computer science degree. If you’ve ever felt overwhelmed by database jargon, cPanel’s intuitive interface makes it accessible to everyone.
Installing Applications
Want to add a new feature to your website? cPanel’s application installer can help. With tools like Softaculous, you can install applications like WordPress, Joomla, and Magento in minutes. This feature is perfect for setting up a blog, an online store, or a forum. Have you ever wondered how some websites offer such smooth user experiences? Often, it’s the power of well-chosen applications, easily installed through cPanel.
cPanel is not just a tool; it’s a gateway to effective website management. It simplifies tasks that might otherwise feel daunting. What new feature will you add to your website today using cPanel?
Tips For Efficient Cpanel Usage
When you access cPanel through Namecheap, you unlock a powerful set of tools to manage your website effortlessly. But to make the most out of this control panel, you need more than just basic knowledge. Here are some practical tips to ensure you’re using cPanel efficiently and effectively.
Optimizing Performance
Your website’s performance directly impacts user experience. To keep things running smoothly, regularly clean out unnecessary files. You can do this by removing unused themes, plugins, and old backups. These files take up space and can slow down your site.
Consider enabling caching through cPanel’s built-in options. Caching stores parts of your website, so it loads faster for repeat visitors. Are there plugins that can make your site faster? Look for those that are lightweight and have good reviews.
Regular Backups
Never underestimate the importance of backups. Imagine losing all your data overnight – a nightmare you can easily avoid. Set up automatic backups in cPanel to ensure you always have a recent copy of your site.
You should also download backups to your local computer periodically. This adds an extra layer of security. How often do you make manual backups? Regular checks can save you from irreversible data loss.
Monitoring Resource Usage
Keeping an eye on your resource usage helps you prevent your website from going down unexpectedly. cPanel provides valuable insights into CPU and memory usage. Are you close to your limits? Knowing this helps you make informed decisions about upgrades or optimizations.
Set up alerts to notify you when you’re nearing resource limits. This proactive approach allows you to address issues before they impact your visitors. What steps do you take when resource usage spikes? Being prepared can make all the difference.
By following these tips, you can enhance your cPanel experience, ensuring your website remains fast, secure, and reliable. Take action today to optimize your management processes, and watch as your site thrives under your efficient care.

Credit: www.youtube.com
Frequently Asked Questions
How Do I Access My Cpanel On Namecheap?
Log in to your Namecheap account. Click on “Hosting List. ” Find your domain and click “Go to cPanel. “
How Do I Access My Cpanel?
Access your cPanel by entering “yourdomain. com/cpanel” in your browser. Log in using your username and password. If unsure, check your hosting provider’s welcome email for details. Ensure secure login practices by updating passwords regularly and using two-factor authentication if available.
Does Namecheap Come With Cpanel?
Yes, Namecheap provides cPanel with its shared hosting plans. It offers an intuitive interface for website management. Users can easily manage domains, emails, and files. Namecheap’s cPanel also includes various tools for better website performance and security. It’s user-friendly, making hosting tasks easier for beginners and experts alike.
How To Access Terminal In Cpanel Namecheap?
Log into your Namecheap cPanel account. In the dashboard, find “Advanced” and click “Terminal”. This opens the terminal interface.
Conclusion
Accessing cPanel with Namecheap is straightforward. Follow the steps outlined to manage your website easily. Keep your login details secure to protect your site. With cPanel, you can handle emails, databases, and files efficiently. Explore the features and customize settings as needed.
Remember, consistent updates ensure optimal performance. If stuck, Namecheap’s support can guide you. Use cPanel tools to enhance your online presence. Practice makes perfect; familiarity grows with use. Take control of your site today and enjoy a seamless web hosting experience.


