
Are you trying to verify your domain ownership through DNS records on Namecheap? You’re in the right place!
Whether you’re setting up a new website or managing an existing one, verifying your domain is a crucial step. It ensures that you have full control and can make necessary adjustments for your online presence. In this guide, we’ll walk you through the process with simple, easy-to-follow steps.
You won’t need to be a tech expert to understand or implement these tips. By the end, you’ll feel confident in managing your domain, unlocking potential opportunities and keeping your website secure. Stay tuned to learn how you can quickly and efficiently verify your domain with Namecheap, and take control of your digital space!
Credit: www.namecheap.com
Domain Ownership Verification
Verifying domain ownership is a crucial step when managing your online presence. It’s like having the keys to your digital kingdom, ensuring that your domain is truly under your control. If you’re using Namecheap, confirming your ownership via DNS records is both essential and straightforward. In this section, we’ll delve into why verification matters and explore various methods, focusing on practical steps you can follow.
Importance Of Verification
Why is domain ownership verification so vital? Imagine losing access to your website because someone else claims it. Verification safeguards against that risk, ensuring you have authority over your domain. It also builds trust with users and service providers, confirming your domain’s legitimacy.
Additionally, a verified domain is often required to set up services like custom email addresses or SSL certificates. Without proper verification, these services may be inaccessible, limiting your site’s functionality and security. So, ask yourself: can you afford to leave your domain unchecked?
Common Methods For Verification
There are several ways to verify domain ownership. One popular method is through DNS records. By adding a specific DNS TXT record, you signal to the registrar that you are the rightful owner of the domain. This method is quick and efficient, and Namecheap provides clear instructions to guide you.
Another approach involves uploading an HTML file to your website’s root directory. This proves ownership by demonstrating access to the server hosting the domain. While effective, it requires some technical know-how and access to your site’s backend.
Alternatively, you can verify through email. Namecheap may send a confirmation email to the registered domain contact, allowing you to approve ownership. This method, however, depends on having accurate contact details on file.
Each method has its pros and cons. Consider your technical skills and resources before choosing the best fit. How comfortable are you with DNS settings or server access?
To wrap it up, domain ownership verification is a fundamental task for any domain owner. Whether you’re setting up a new website or managing an existing one, ensuring your ownership through DNS records at Namecheap is a step you shouldn’t skip. How will you verify your domain today?
Dns Records And Their Role
Understanding how DNS records work is crucial for domain verification. They serve as the backbone of the internet’s domain name system. Each record holds vital data about your domain. It tells web browsers where to find your website. Without DNS records, connecting domain names with IP addresses is impossible.
Understanding Dns Records
DNS records are database entries. They inform the DNS server about a domain’s location. These records contain essential information. They help direct internet traffic correctly. DNS records are key for domain ownership verification.
Types Of Dns Records
There are various types of DNS records. Each serves a specific purpose. A records link domain names to IP addresses. CNAME records allow domain aliasing. MX records direct email traffic. TXT records provide text-based information. Each record plays a unique role. Understanding their function is important. It ensures proper domain management.
Preparing For Verification
Preparing for domain verification is crucial. It ensures a smooth process. You need to gather specific information. This helps verify your domain ownership through DNS records. Proper preparation saves time and avoids errors. Follow these steps for seamless verification.
Gathering Necessary Information
Start by collecting essential data. Know your domain name and DNS provider. This information is key for verification. Also, have your Namecheap account details ready. Write down any DNS records related to your domain. Keep this information handy. It will be useful soon.
Accessing Namecheap Account
Log into your Namecheap account. Use your username and password. Navigate to the dashboard. This is where you manage domains. Locate your domain from the list. Click on it for more options. You can now access DNS settings. This is where verification happens.
Locating Dns Settings In Namecheap
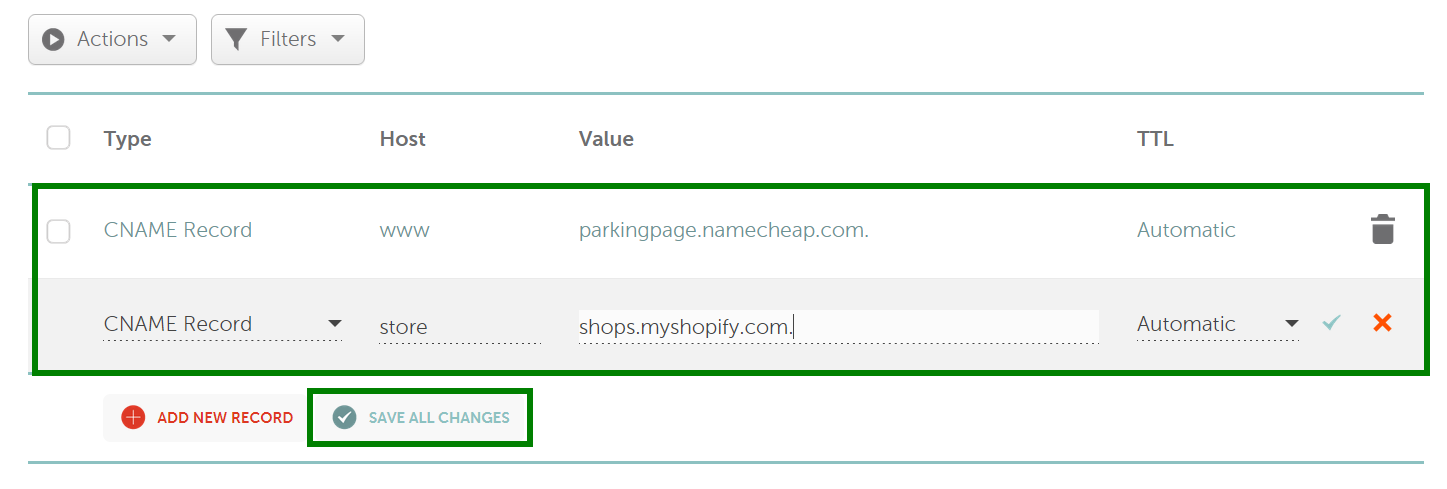
Access Namecheap’s dashboard to find DNS settings easily. Select your domain and navigate to the “Advanced DNS” tab. Add the required DNS record to verify your domain ownership.
Locating DNS settings in Namecheap is crucial for domain verification. It’s a simple process. With a few clicks, you can access DNS settings. Follow the steps below to locate these settings easily. This guide simplifies the process for beginners.Navigating The Dashboard
First, log in to your Namecheap account. The dashboard is your starting point. You’ll see several options and menus. Focus on the navigation bar at the top. It has everything you need. Look for the “Dashboard” link. Click it to proceed. This takes you to your main account area. Here, you manage all your domains and settings.Finding Domain List
After reaching the dashboard, find the “Domain List” section. It’s on the left side menu. Click on it to view your domains. You’ll see a list of all domains you own. Each domain has its own settings. Locate the domain you want to verify. Click the “Manage” button next to it. This opens the domain’s settings page. Here, you can access DNS settings. You’re now ready to verify domain ownership.Adding A Dns Record For Verification
Verifying domain ownership through Namecheap is simple. Add a DNS record to prove control over your domain. Access the DNS settings, input the verification details, and save changes. This ensures secure confirmation of your domain ownership.
Adding a DNS record for verification is a crucial step. It confirms your domain ownership in Namecheap. This method is reliable and straightforward. It involves adding specific DNS records. These records serve as proof of control over the domain. Follow the step-by-step guide below. This ensures a seamless verification process.Selecting The Correct Record Type
Choose the right DNS record type. This is essential for verification. TXT records are commonly used. They store text information. Ensure you select “TXT” from the dropdown menu. This is in your Namecheap control panel. This choice is vital for the verification process.Entering Verification Details
Enter the exact verification details. These details are provided by your service provider. They usually include a unique text string. Input this string in the value field. Double-check for accuracy. Any error can lead to verification failure. Save changes after entering the details. This updates your DNS settings. Each step is critical for successful domain verification. Ensure all information is correct. This guarantees your domain ownership is verified swiftly.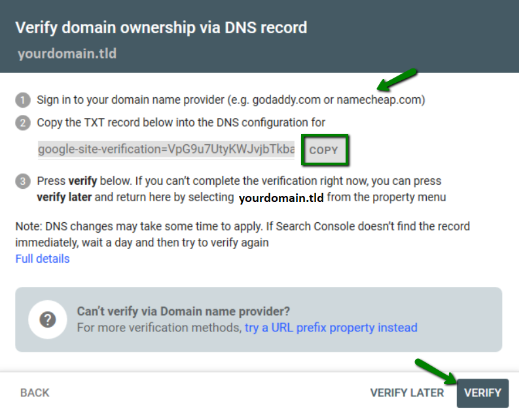
Credit: www.namecheap.com
Checking Propagation Status
Checking propagation status is crucial for verifying domain ownership via DNS records. It ensures the DNS changes are reflected worldwide. Once you update DNS settings, they don’t take effect immediately. Understanding when and how they propagate is key. This section will guide you through the essentials of checking propagation status.
Understanding Propagation Time
Propagation time varies based on several factors. DNS servers around the world need to update their records. This process can take a few minutes to 48 hours. It depends on your domain registrar and the network’s responsiveness. Knowing the expected time helps manage your expectations.
Tools For Checking Dns Records
Several online tools help check DNS records easily. They provide real-time data on propagation status. One popular tool is DNS Checker. It checks DNS records across multiple servers worldwide. Another useful tool is WhatsMyDNS. It shows how DNS changes are propagating globally. These tools are user-friendly and deliver results quickly.
Troubleshooting Common Issues
Verifying domain ownership via DNS records with Namecheap can sometimes be tricky. Many face common issues that hinder the verification process. Addressing these problems is crucial for smooth domain management. Understanding potential pitfalls helps resolve issues faster.
Below, we tackle frequent challenges. We provide solutions to ensure successful verification.
Incorrect Record Entries
Incorrect record entries often cause verification failures. Double-check each DNS entry. Ensure accuracy in every detail. A typo in the domain name or record type can lead to errors. Confirm that the record type matches the required specifications.
Check the hostname and value fields. They must align with the instructions provided by Namecheap. Misplaced or missing characters can disrupt the process.
Propagation Delays
Propagation delays can frustrate users waiting for DNS changes. These delays occur when DNS updates take time to spread across servers. Patience is key, as this process might take up to 48 hours. During this period, verification may not succeed.
To monitor propagation, use online DNS check tools. They show the status of DNS updates globally. If propagation issues persist, contact Namecheap support for guidance.
Confirming Domain Ownership
Confirming domain ownership is a crucial step when managing your digital assets. Whether you’re setting up a new website, transferring a domain, or resolving technical issues, verifying ownership through DNS records is a straightforward process. Namecheap provides a user-friendly interface to help you achieve this with ease. Let’s break down the steps to ensure you’re on the right track.
Final Steps For Verification
Once you’ve accessed your Namecheap account, navigate to the DNS settings of your domain. Here, you’ll need to add a specific DNS record that proves your ownership. This could be a TXT record or a CNAME, depending on the requirements of the service you’re using.
Take a moment to double-check the accuracy of the record. A simple typo can lead to delays. Think of it like sending a letter to the wrong address—your message won’t get delivered. Make sure the record corresponds exactly to what is needed.
After adding the record, save your changes. This step might seem trivial, but failing to save can undo all your efforts. Always confirm that the record appears correctly in the list of DNS entries.
Ensuring Successful Confirmation
Give it some time for the DNS changes to propagate. Typically, this takes a few hours, but it can vary. Refresh your DNS settings and check if the record is visible on public DNS lookup tools.
Wondering if you’re doing it right? Check the TTL (Time to Live) setting on your DNS record. A lower TTL means changes will take effect quicker, but a higher TTL can add stability. Adjust according to your needs.
If you’re still facing issues, reach out to Namecheap’s support team. They have a wealth of experience and can guide you through any hiccups. Don’t hesitate to ask questions—clarity is crucial.
Have you ever struggled with domain verification? It’s common, but with precise steps, you can avoid pitfalls. Take control of your digital assets with confidence and ensure your domain ownership is verified correctly.

Credit: www.youtube.com
Frequently Asked Questions
How Do I Verify Domain Ownership Via Dns Record?
To verify domain ownership via DNS, add the provided TXT record to your DNS settings. Access your domain registrar’s DNS management tool, enter the TXT record, and save changes. Verification can take up to 48 hours.
How To Verify Domain Ownership On Namecheap?
Log in to Namecheap. Navigate to your domain list. Click “Manage” next to your domain. Access the “Advanced DNS” tab. Add a TXT record with the verification code provided by your service. Wait for propagation, then verify ownership through your service’s platform.
How Do I Confirm Ownership Of A Domain Name?
Verify domain ownership by accessing your domain registrar account. Check registration details and ensure they match your information. Use WHOIS lookup to confirm ownership details publicly. Update records if needed to reflect accurate ownership.
How To Verify Domain Ownership By Adding Spf Records To Your Dns?
Add SPF records by accessing your DNS settings. Insert the SPF record string provided by your email service. Save changes. Verify ownership through your email service’s domain verification tool. Ensure proper DNS propagation.
Conclusion
Verifying domain ownership via DNS records on Namecheap is simple. Follow the outlined steps carefully. Ensure your DNS settings are updated correctly. This process helps secure your website. It also builds trust with users and search engines. A verified domain can lead to better online visibility.
Take time to understand each step. It ensures accuracy and efficiency. With these tips, you can confidently manage your domain settings. Keep your domain secure and trustworthy. Happy website managing!


