
Are you looking to update your website’s nameservers in Namecheap but not quite sure where to start? You’re in the right place.
Whether you’re launching a new site or simply making changes, knowing how to update your nameservers is crucial for your online presence. It’s a straightforward process, but getting it right is essential to ensure that your website functions smoothly and is accessible to your audience.
In this guide, we’ll walk you through each step with clear, easy-to-follow instructions. You’ll discover how simple it can be to manage your domain settings and keep your site running optimally. By the end of this article, you’ll feel confident and in control of your domain, ready to make any necessary changes. Let’s dive in and demystify the process!
Accessing Your Namecheap Account
Easily update nameservers in your Namecheap account by logging in and navigating to the Domain List. Select your domain, then click on ‘Manage’ to access the nameservers settings. Enter the new nameservers and save changes to ensure your domain points to the right server.
Accessing your Namecheap account is the first step to managing your domain settings, including updating nameservers. Think of it as the gateway to your online presence. By logging in, you gain control over your domain’s DNS settings, which is crucial for directing traffic to the right server.Step-by-step: Logging Into Your Namecheap Account
Start by visiting the Namecheap website. Look for the login button, usually located at the top right corner of the homepage. Click on it to proceed. Enter your username and password. If you’ve forgotten your login details, use the ‘Forgot Password’ link to reset them. It’s a straightforward process that ensures your account remains secure.Why Secure Access Matters
Securing your account is not just about having a strong password. Consider enabling two-factor authentication. This adds an extra layer of security, protecting your domain from unauthorized access. Are you aware that your online assets are as valuable as physical ones? Treat your account details with the same care as you would your banking information.Dashboard: Your Control Center
Once logged in, you’ll be greeted by the dashboard. This is where the magic happens. Here, you can view your domains, check their status, and initiate changes. The dashboard is user-friendly. Take a moment to familiarize yourself with its layout. You’ll find quick links to manage your domains, billing, and support. Find the ‘Domain List’ section in your dashboard. This is where all your registered domains are listed. Click on the domain you want to update. This list is your domain portfolio. Each entry is a digital property you own. Keep it organized to ensure seamless management.What If You Encounter Issues?
Sometimes, login issues can arise. Don’t panic. Check your internet connection, or try accessing your account from a different browser. Have you ever considered reaching out to support? Namecheap offers robust customer support to help resolve any account access problems. They’re just a call or message away. Remember, managing your domain effectively begins with accessing your Namecheap account securely. Are you ready to take control of your online presence today?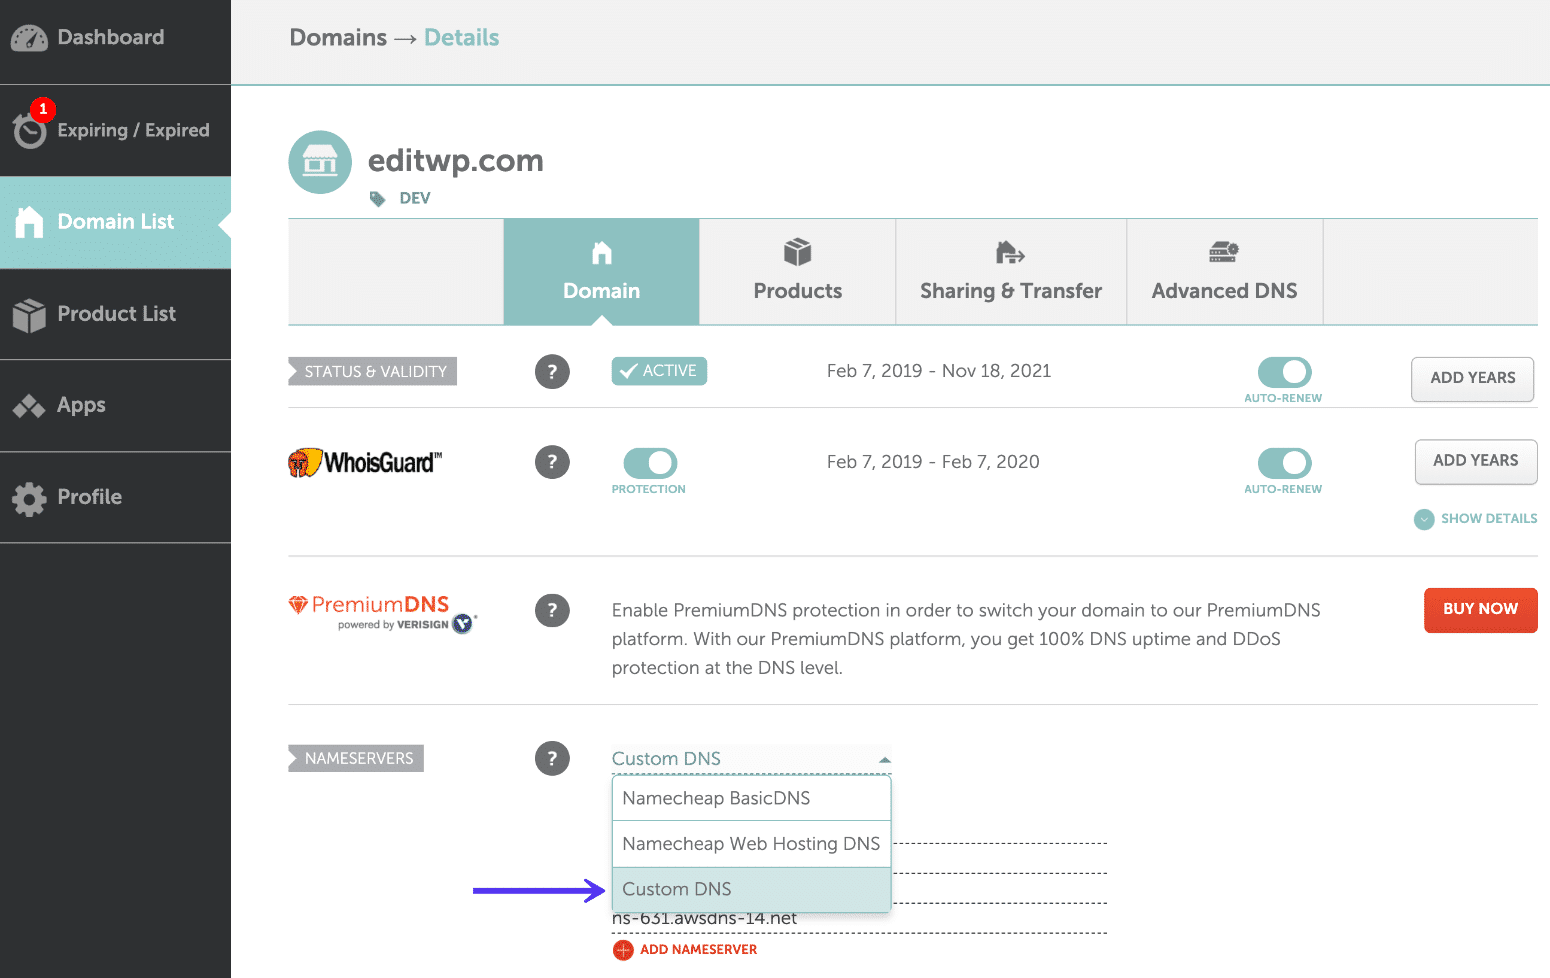
Credit: kinsta.com
Navigating To Domain List
Begin by accessing your Namecheap account to locate the Domain List. This is the first step in updating nameservers. Once there, select the domain you wish to modify, and proceed to adjust the nameserver settings as required.
Navigating to the Domain List is a crucial step when you want to update nameservers on Namecheap. This is where all your domains are listed, making it the central hub for managing your domain settings. Knowing how to access this list quickly can save you time and streamline your workflow. ### First things first, log in to your Namecheap account. Use your credentials to access your dashboard. If you haven’t visited in a while, reset your password if needed. It’s always a good practice to keep your login information secure. ###Finding The Dashboard
Once logged in, you will be greeted by the dashboard. This is where you can see a snapshot of your account’s activity. Look for the “Domain List” section; it’s typically located on the left side of the screen. If you’re not seeing it, try refreshing the page or checking the menu options. ###Locating The Domain List
Click on “Domain List” from the dashboard menu. This action will lead you to a page displaying all the domains you own. Each domain is listed with essential details like expiration date and status. ###Identifying The Right Domain
Scroll through your domain list to locate the domain you wish to update. If you have multiple domains, use the search function to speed up the process. This feature is a real time-saver, especially if your domain portfolio is extensive. ###Understanding The Domain Interface
Once you’ve found your domain, click on it to access its settings. Here, you’ll find various options like DNS settings, contact information, and more. Familiarize yourself with this interface, as it will be your go-to for managing your domain. Navigating to the Domain List doesn’t have to be daunting. Once you master these steps, it becomes second nature. What strategies do you use to keep your domain management organized? Share your tips in the comments!Selecting The Domain
Updating nameservers in Namecheap is a simple task. Selecting the correct domain is the first step. This ensures your DNS settings change as intended. Let’s explore how to select your domain in Namecheap.
Log Into Your Namecheap Account
Start by visiting the Namecheap website. Enter your username and password. Click “Sign In” to access your dashboard. Ensure you have the correct account credentials.
Access The Domain List
Once logged in, navigate to the left-hand menu. Click on “Domain List.” This will show all domains registered in your account. You can scroll through to find the desired domain.
Find Your Domain
Look through the list for the domain needing updates. Use the search bar for quicker results. Enter the domain name to filter the list instantly. This saves time and ensures accuracy.
Select The Domain
Once you locate your domain, click on it. This action opens the domain management page. Here, you can manage DNS settings and other features. Ensure you select the correct domain.
Verify Domain Details
Double-check the domain details displayed. Confirm the domain name and expiration date. This step prevents mistakes during the update process. Accurate information is crucial for seamless changes.
Locating Nameservers Settings
Updating nameservers in Namecheap is essential for managing domain settings. To begin, you must locate the nameserver settings within your Namecheap account. This process is straightforward, but each step is crucial for success.
Access Your Namecheap Account
Start by logging into your Namecheap account. Use your username and password. Ensure you have access to the correct account. This is the first step toward updating your nameservers.
Navigate To The Domain List
Once logged in, find the “Domain List” on the dashboard. This section contains all your registered domains. It’s a central hub for domain management. Make sure you select the correct domain from this list.
Select Manage Next To Your Domain
In the domain list, locate your specific domain. Click “Manage” next to it. This action will take you to the domain settings page. Here, you can make necessary changes.
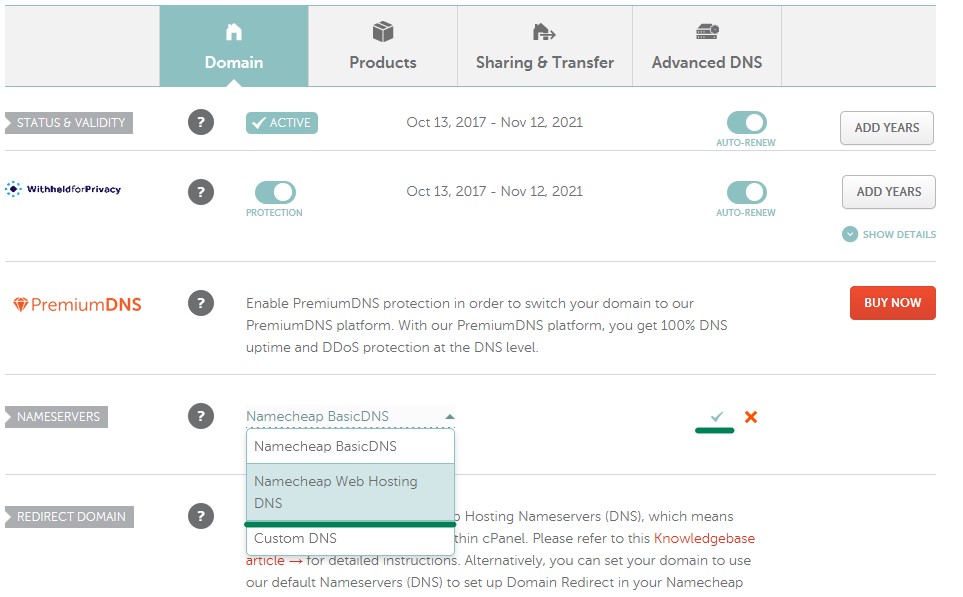
Find The Nameservers Section
On the domain settings page, scroll to the “Nameservers” section. This area allows you to modify DNS settings. It’s crucial for directing your domain to the correct server.
Choose Your Nameservers
In the nameservers section, decide which nameservers to use. You can select from default, custom, or third-party options. Make sure your choice aligns with your hosting provider’s requirements.
Choosing The Nameserver Option
Updating nameservers in Namecheap is a straightforward process. The first step is to choose the correct nameserver option for your domain. This decision depends on your specific needs and hosting situation. Namecheap offers two primary options: default Namecheap nameservers and custom nameservers. Each option serves different purposes. Understanding these can help you make the right choice.
Default Namecheap Nameservers
Default Namecheap nameservers work well for those using Namecheap’s hosting services. They automatically connect your domain to Namecheap’s hosting. This option is ideal for beginners. It simplifies the setup process. You don’t need technical expertise. With default settings, your domain is ready to use quickly. It’s the easiest route for most users.
Custom Nameservers
Custom nameservers offer flexibility for advanced users. You can point your domain to external hosting providers. This is useful if you use specialized hosting services. Custom nameservers require manual configuration. You need to input specific server addresses. This setup offers more control over DNS settings. It’s essential for users with unique hosting needs.
Entering Custom Nameservers
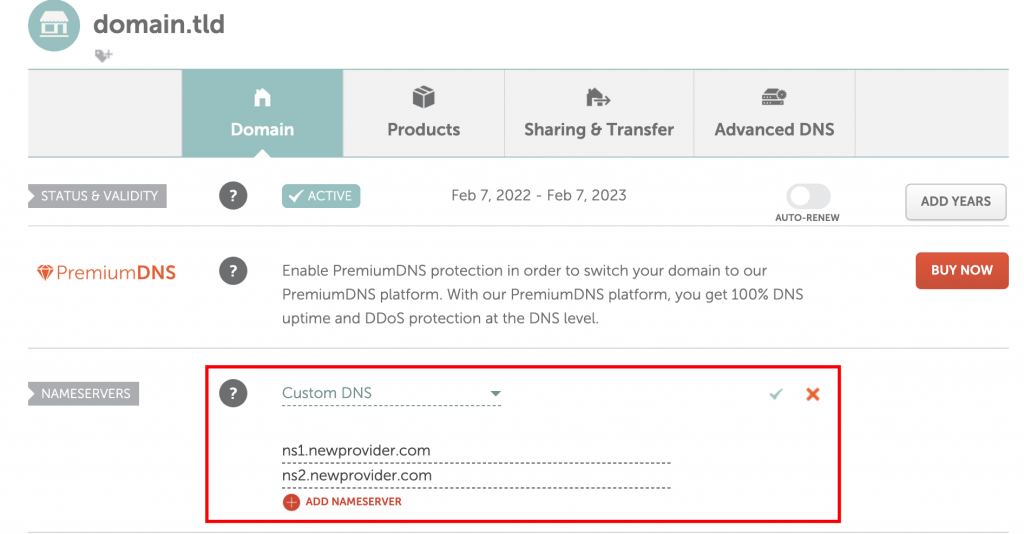
Updating nameservers in Namecheap involves accessing your account and selecting the domain to modify. Click ‘Manage’ beside the domain, then choose ‘Custom DNS’ under the nameservers section. Enter your desired nameserver addresses, save changes, and allow time for DNS propagation.
Updating nameservers in Namecheap is a straightforward process, but entering custom nameservers can feel daunting if you’re new to domain management. Custom nameservers are essential when you want your domain to point to a specific server or hosting provider. Whether you’re setting up a new website or migrating an existing one, understanding how to enter custom nameservers is crucial for seamless online presence.Understanding Custom Nameservers
Custom nameservers allow you to direct your domain’s traffic to the server of your choice. This is especially useful if you have specific hosting requirements. With custom nameservers, you’re in control of where your domain points, giving you flexibility and autonomy.Accessing The Domain List
To begin, log into your Namecheap account and navigate to the “Domain List” section. This area lists all your registered domains. Click “Manage” next to the domain you wish to update.Locating The Nameservers Section
Once in the domain management area, scroll down to find the “Nameservers” section. It’s usually located below the domain details. Here, you’ll see the current nameserver settings, which you can modify.Entering Your Custom Nameservers
Switch the dropdown menu to “Custom DNS” to enter your custom nameservers. This action will enable the fields where you can input the new nameserver addresses. Enter the nameservers one by one, typically starting with “ns1” followed by your domain or hosting provider’s name.Saving And Verifying Changes
After entering the custom nameservers, hit the “Save” button to apply the changes. It’s important to confirm that the new settings are saved correctly. Double-check the nameserver entries for any typos, as these can lead to connectivity issues.Waiting For Propagation
Once updated, nameserver changes can take up to 48 hours to propagate across the internet. During this period, your domain might not resolve correctly. It’s perfectly normal, so be patient while the changes take effect. Have you ever wondered why propagation takes so long? It’s because DNS records need to update globally, and that can take time. If your website remains inaccessible after 48 hours, consider reaching out to Namecheap support for assistance. Updating nameservers might seem technical, but with Namecheap’s user-friendly interface, you can complete the task with confidence. What custom nameserver setup has been most challenging for you? Share your experiences and tips in the comments below.Saving Changes
Updating nameservers in Namecheap is a crucial step for domain management. After making changes, saving them properly ensures your website functions smoothly. Let’s explore how to save changes effectively in Namecheap.
Click The Save Button
Once changes are made, find the “Save” button. It’s usually located at the bottom of the page. Clicking it is essential to apply your updates. Double-check your entries before saving.
Verify Changes
After saving, verify the changes. Check if the new nameservers appear correctly. This step ensures your updates are recorded properly.
Clear Cache
Sometimes, changes might not show immediately. Clear your browser cache. This helps display the most recent data on your site.
Wait For Propagation
Nameserver updates might take time to propagate. This can take up to 48 hours. Be patient while the changes spread across the internet.
Check Website Functionality
Once propagation is complete, check your website’s functionality. Ensure everything works as expected with the new settings. This confirms successful nameserver updates.
Credit: www.hostinger.com
Verifying Nameserver Update
Updating nameservers in Namecheap involves a straightforward process. First, log in to your Namecheap account and navigate to Domain List. Select your domain, click on Manage, then Nameservers. Enter the new nameserver details and save changes. Ensure the update reflects by checking DNS settings.
Verifying that your nameserver update has been successful is a crucial step in managing your domain. It ensures that your website is pointing to the correct server, allowing your audience to access your site seamlessly. Skipping this verification process can lead to unexpected downtime and lost visitors, which no website owner wants to experience. When I first updated my nameservers, I underestimated the importance of verification. It led to a stressful few hours of troubleshooting. Ensuring you confirm your updates can save you from similar headaches. ###How To Check Your Dns Settings
To verify your nameserver update, start by checking your DNS settings. You can do this through an online DNS lookup tool. Enter your domain name into the tool and examine the results. The nameservers listed should match those you set in Namecheap. If not, you may need to update your settings again. ###Using Whois Lookup For Confirmation
Another method to verify your nameserver update is to perform a WHOIS lookup. This will show you the current nameserver information associated with your domain. Several websites offer free WHOIS lookup services. Use these to ensure the nameservers reflect the changes you’ve made. ###Understanding Propagation Time
Be aware of DNS propagation time, which can take up to 48 hours. This means your changes might not be visible immediately. During this period, some visitors might see your old site while others see the new one. Patience is key here, as this delay is completely normal. ###Checking Website Accessibility
Once your nameservers have propagated, test your website’s accessibility. Try loading your site from different devices and networks. If your site loads correctly, your nameserver update is successful. If not, it may be time to revisit your DNS settings or contact support. ###Seeking Help When Issues Arise
If you encounter problems while verifying your nameserver update, don’t hesitate to seek assistance. Namecheap’s support team is available to help with any issues. You can also find solutions in online forums and communities. Learning from others’ experiences can be incredibly valuable. Have you ever faced challenges with updating nameservers? Share your experience in the comments below. Your insights could help fellow readers who might be navigating the same process.Troubleshooting Common Issues
Updating nameservers in Namecheap can sometimes present challenges. Users often face issues that disrupt the process. Identifying these common problems is crucial. Solutions can often be simple. With the right guidance, issues can be resolved quickly.
Incorrect Nameserver Entries
Nameserver entries must be accurate. A single mistake can cause problems. Double-check each entry before saving. Spelling errors or wrong sequences are common mistakes. Ensure the correct format is used. Consult Namecheap’s guidelines for reference.
Propagation Delays
Changes in nameservers don’t reflect immediately. This delay is called propagation. It may take up to 48 hours. Be patient during this time. Avoid making repeated changes. It can prolong the process. Check status periodically to track progress.
Credit: www.namecheap.com
Frequently Asked Questions
How To Change Nameservers At Namecheap?
Log in to Namecheap, go to “Domain List”, select your domain, click “Manage”, then choose “Custom DNS” under “Nameservers”. Enter your new nameservers and save changes.
How Do I Update My Domain Nameservers?
Log into your domain registrar account. Navigate to the DNS management section. Enter your new nameservers. Save changes to update. Changes may take up to 48 hours to propagate.
How To Find Nameservers In Namecheap?
Log in to your Namecheap account. Go to the “Domain List” tab. Click “Manage” next to your domain. Find “Nameservers” under the “Domain” tab.
How To Edit Dns Zone Namecheap?
To edit DNS zone in Namecheap, log into your account. Go to “Domain List” and click “Manage. ” Select the “Advanced DNS” tab. Make changes to DNS records as needed, then save. Changes may take up to 48 hours to propagate globally.
Conclusion
Updating nameservers on Namecheap is straightforward. First, log into your account. Navigate to the domain list. Select the domain you want to update. Choose “Custom DNS” and enter the new nameservers. Click “Save” to finalize changes. Changes might take 24 to 48 hours.
Patience is key. This process helps manage your domain’s settings efficiently. Keep your nameservers updated for better site performance. With practice, it becomes easier. Stay informed and regularly check for updates. This simple task ensures your website stays connected and running smoothly.
Happy updating!


