
Transferring a domain can feel like a daunting task, especially if you’re not familiar with the process. But with Namecheap, it’s easier than you might think.
Whether you’re looking to consolidate all your domains under one registrar, or perhaps seeking better pricing and services, transferring your domain to Namecheap can be a smart move. Imagine having all your digital properties neatly organized in one place, with an interface that’s user-friendly and support that’s ready to help when needed.
This guide will walk you through each step, ensuring that you feel confident and in control. Ready to make your domain transfer seamless and stress-free? Let’s dive in and explore how you can do this efficiently with Namecheap.
Credit: www.namecheap.com
Preparing For Domain Transfer
Preparing for a domain transfer with Namecheap is crucial. It ensures a smooth and hassle-free process. Before beginning, make sure your domain is eligible for transfer. Also, ensure necessary settings and information are correctly updated. This preparation sets the stage for a seamless transition.
Check Domain Eligibility
First, confirm your domain is eligible for transfer. Domains usually cannot be transferred within 60 days of registration. Also, ensure it’s not locked or involved in disputes. Namecheap requires these conditions met before proceeding.
Unlock Your Domain
Next, unlock your domain. Domains are often locked to prevent unauthorized changes. Visit your current registrar’s website. Navigate to the domain management settings. There, you can unlock the domain. This step is essential for a successful transfer.
Verify Contact Information
Accurate contact information is vital. Ensure your current registrar has updated details. This includes email addresses and phone numbers. Notifications about the transfer process will be sent here. Keeping this information current avoids unnecessary delays.
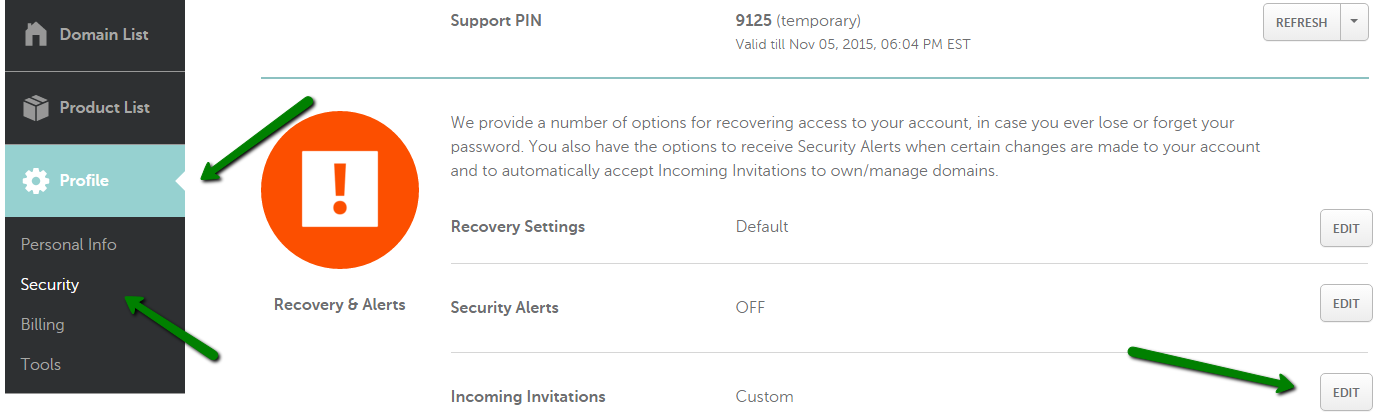
Obtaining Authorization Code
Obtaining the authorization code is crucial for transferring a domain from Namecheap. This code acts as a security measure, ensuring the transfer is legitimate. Access your Namecheap dashboard, find the domain in question, and request the code to begin the transfer process seamlessly.
Transferring a domain name can feel daunting, but it’s a necessary step for many website owners seeking better services or pricing. Obtaining an authorization code is a crucial part of this process, as it unlocks the ability to transfer your domain from one registrar to another, such as Namecheap. This code ensures security and control over the transfer, making it essential to understand how to request and use it effectively.Request Authorization Code
The authorization code is like a password for your domain transfer. Most registrars require this code to confirm that you have permission to move your domain. To get started, log into your current domain registrar account. Navigate to the domain management section. Here, you’ll typically find an option to request the authorization code. This code may be sent to the email address associated with your domain registration. Be sure to check your spam folder if you don’t see it right away. If you face any delays or issues, don’t hesitate to contact your registrar’s support team for assistance.Understanding Epp Code
The EPP code, also known as the authorization code, is critical for domain security during transfer. It acts as a key that ensures only authorized individuals can initiate the domain transfer process. Think of it as a unique identifier for your domain. It prevents unauthorized transfers, keeping your domain safe from hijackers. This code is usually a combination of letters, numbers, and special characters. Before initiating a transfer, ensure that your domain isn’t locked. A locked domain might prevent you from accessing or using your EPP code. You can easily unlock your domain in your registrar’s settings, if necessary. Do you recall any time when a simple security measure saved you from a potential hassle? The EPP code serves a similar purpose in domain transfers, safeguarding your online assets.Initiating Transfer In Namecheap
Transferring a domain in Namecheap is straightforward. Start by unlocking your domain and obtaining the transfer code. Follow the steps on Namecheap’s platform to initiate the transfer process seamlessly.
Initiating a domain transfer in Namecheap is a straightforward process that can be accomplished with a few simple steps. Whether you’re managing a personal blog or a business website, transferring your domain to Namecheap can offer you more control and potentially better pricing. This guide will walk you through the necessary steps to ensure a smooth transition. ###Access Namecheap Account
First, you’ll need to access your Namecheap account. Visit the Namecheap website and log in using your credentials. If you don’t have an account, you’ll need to create one. It’s a quick process requiring basic information such as your email and a secure password. Once logged in, navigate to the dashboard. Here, you’ll find all the tools you need to manage your domains. This is your command center for initiating transfers and handling domain settings. ###Enter Domain Details
Now that you’re in your dashboard, it’s time to enter the domain details. Look for an option that says “Transfer” and click on it. This will take you to a page where you can input the domain you wish to transfer. You’ll need to provide the domain name and its current registrar. Make sure your domain is unlocked at your current registrar. Without this step, the transfer cannot proceed. You may need to enter an authorization code, known as an EPP code, which you can get from your current registrar. Have you ever wondered why so many people choose Namecheap for domain transfers? It could be the user-friendly interface or competitive pricing. Whatever your reason, following these steps will ensure your domain transfer is seamless and efficient.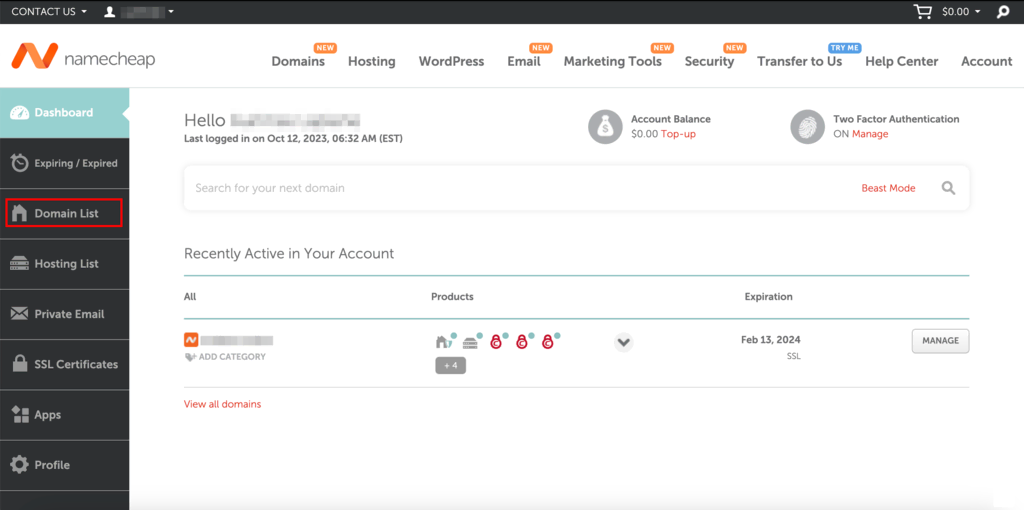
Credit: www.hostinger.com
Completing The Transfer Process
Transferring a domain in Namecheap involves a few simple steps. Start by unlocking your domain and obtaining the transfer code. Then, initiate the transfer by providing the code and confirming the process in your Namecheap account.
Completing the domain transfer process on Namecheap can seem daunting, but with the right steps, you can ensure a smooth transition. Once you’ve initiated the transfer, you’re on the home stretch. Now, it’s time to focus on confirming and monitoring the process to ensure everything goes as planned.Confirm Transfer Request
After initiating the transfer, you’ll need to confirm the request. This step is crucial and often involves verifying your email. Watch out for an email from your current registrar. It might land in your spam folder, so check there if you don’t see it in your inbox. The email typically contains a link or a button asking you to approve the transfer. Click it promptly to avoid any delays. Have you ever missed an important email and wished you’d checked your spam folder sooner? It’s a common oversight, so be vigilant.Monitor Transfer Status
Once you’ve confirmed the transfer, you’ll want to monitor its progress. Log in to your Namecheap account to keep tabs on the status. Namecheap provides a user-friendly interface where you can track each stage of the transfer. The process usually takes a few days, but checking regularly ensures you catch any potential issues early. Are you the type who constantly checks their pizza delivery status? Monitoring your domain transfer is similar, and just as rewarding when completed successfully. Keeping an eye on the transfer allows you to act swiftly if something seems amiss. If the status hasn’t changed in a while, don’t hesitate to contact Namecheap support for help. They’re there to assist you, and a quick call or chat could resolve any hiccups you encounter.Troubleshooting Common Issues
Transferring a domain in Namecheap involves a few straightforward steps. Start by unlocking your domain and obtaining the transfer code. Follow the prompts on Namecheap to initiate the transfer process smoothly.
Transferring your domain in Namecheap can seem like a straightforward task, but sometimes unexpected issues arise, causing frustration and delays. It’s crucial to know how to troubleshoot common problems effectively. Understanding these issues not only saves time but also ensures a seamless transfer process. Let’s dive into some of these common hiccups and how to handle them.Handling Transfer Denials
Facing a transfer denial can be bewildering. Often, this happens due to incorrect authorization codes or locked domains. Double-check that your domain is unlocked and the authorization code is accurate. Namecheap provides clear instructions on how to unlock your domain and obtain the correct code. Still stuck? Reach out to their support team—sometimes, a quick chat can resolve issues faster than you think. Have you ever felt like you’re doing everything right, yet the transfer is denied? It’s often a small detail that needs correction. Check all details meticulously; you’d be surprised how frequently this resolves the issue.Resolving Pending Transfers
A domain stuck in a pending transfer status can feel like it’s lost in limbo. This usually indicates that the current registrar hasn’t completed the transfer process. Make sure you’ve confirmed all necessary emails from your existing registrar. Did you miss an email? It’s a common oversight that can halt the transfer. Ensure your email address is up-to-date and check spam folders regularly. Do you often wonder why a pending transfer takes so long? It’s usually due to waiting periods imposed by registrars. However, most transfers should complete within five days. If it’s been longer, contact Namecheap support for assistance. Remember, patience and attention to detail are your best tools during domain transfers. What strategies have worked for you in resolving these issues? Share your insights in the comments below!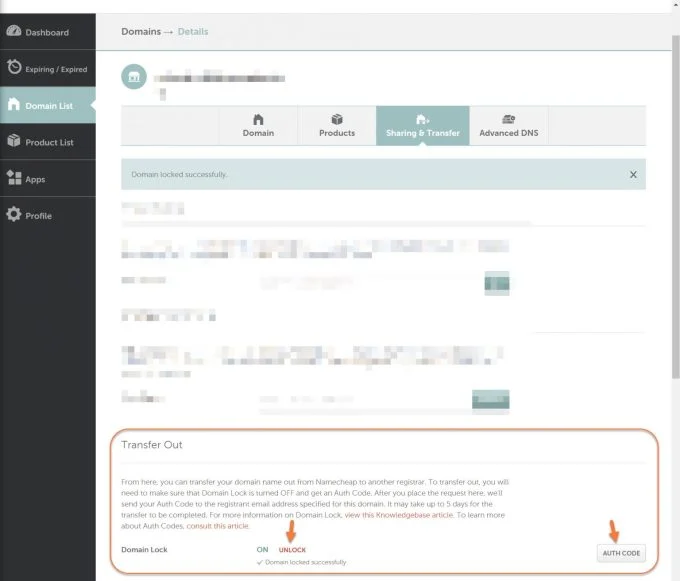
Credit: chemicloud.com
Post-transfer Actions
After transferring a domain to Namecheap, update your contact details for accurate information. Ensure DNS settings are configured correctly. Check domain status to confirm successful transfer.
After transferring your domain to Namecheap, certain tasks await. These tasks ensure your domain functions smoothly and remains secure. Let’s explore these essential post-transfer actions.Updating Dns Settings
Your domain’s DNS settings control where your domain points. After a transfer, they might need adjustments. Log into your Namecheap account. Navigate to the “Domain List.” Select your domain. Click on “Manage.” Here, update your DNS settings as needed. Ensure they match your hosting provider’s requirements. This step is crucial. It ensures your website stays live and reachable.Renewing Domain Registration
Renewing your domain registration is vital. It prevents losing your domain. Check your domain’s expiration date in Namecheap. Set reminders for renewal. Better yet, enable auto-renewal. This feature secures your domain without manual intervention. Always keep your payment details updated. This avoids failed renewals. Protect your domain from unexpected expirations.Frequently Asked Questions
Can You Transfer Domains On Namecheap?
Yes, you can transfer domains on Namecheap. Ensure the domain is unlocked and obtain the EPP code. Follow Namecheap’s transfer process to complete it smoothly.
How Do I Transfer One Domain To Another?
Start by unlocking your domain at the current registrar. Obtain the transfer authorization code. Initiate the transfer at your new registrar, providing the code. Confirm the transfer via email. Wait for completion, which typically takes a few days. Ensure DNS settings are updated post-transfer for seamless operation.
How Can I Transfer Ownership Of A Domain?
To transfer domain ownership, unlock the domain and obtain an authorization code. Initiate the transfer with the new registrar, providing the code. Follow any confirmation steps from both registrars. Ensure the domain is not close to expiration and verify current contact information.
How Much Does It Cost To Transfer A Domain To Another Host?
Domain transfer costs vary by registrar. Typically, it ranges from $0 to $20. Some registrars offer free transfers, while others charge a fee. Ensure you check for any hidden costs or renewal fees before transferring. Always review your current domain’s expiration date to avoid extra charges.
Conclusion
Transferring a domain with Namecheap is straightforward and user-friendly. Follow the steps carefully to ensure a smooth transition. Double-check all details before initiating the transfer. This will help avoid any errors. Remember, patience is key during this process. The transfer might take some time to complete.
Keep track of emails for confirmation and updates. Once done, your domain will be ready for new opportunities. Enjoy the flexibility and control Namecheap offers. Happy transferring!


