
Are you looking to transfer your domain from Squarespace to Namecheap but unsure of where to start? You’re in the right place.
Moving your domain might seem like a daunting task, but it doesn’t have to be. Imagine the peace of mind you’ll have once your domain is successfully transferred, allowing you to manage it with ease on Namecheap’s user-friendly platform. In this guide, we’ll walk you through each step of the process, making it simple and straightforward.
By the end, you’ll feel confident in your ability to complete the transfer smoothly. Let’s dive in and get started on ensuring your domain is exactly where you want it to be.
Credit: www.namecheap.com
Preparation Steps
Start by unlocking your domain on Squarespace. Obtain the transfer authorization code. Access your Namecheap account, enter the code, and initiate the domain transfer.
Transferring your domain from Squarespace to Namecheap might seem daunting at first, but with the right preparation steps, it can be a smooth and straightforward process. Just like packing for a trip, laying the groundwork is essential to ensure everything goes smoothly. Let’s dive into the preparation steps that will set you up for a successful domain transfer. ###Check Domain Eligibility
Before you start, make sure your domain is eligible for transfer. Domains cannot be transferred if they were registered or recently transferred within the last 60 days. This is a standard restriction that applies to most registrars. To check your domain’s eligibility, log in to your Squarespace account. Navigate to your domain settings and confirm that your domain is older than 60 days. If it’s eligible, you’re ready to proceed. Have you ever prepared for a task only to find out you missed a key step? Avoid that frustration by verifying eligibility right at the start. ###Unlock Domain
Once you’ve confirmed eligibility, the next step is unlocking your domain. Think of it as finding the right key to open a door. Your domain is usually locked to protect it from unauthorized transfers. In your Squarespace account, access the domain settings. Locate the domain lock option—it’s often a simple toggle or switch. Once unlocked, make a note of the unique authorization code provided. This code is crucial for the transfer. Did you know that unlocking your domain is a bit like letting your domain take a deep breath? It’s freeing up to move to a new home. Without unlocking, your domain will stay put, unable to make the journey to Namecheap. By preparing thoroughly, you pave the way for a smooth domain transfer. What’s your next step in ensuring your domain is ready to move?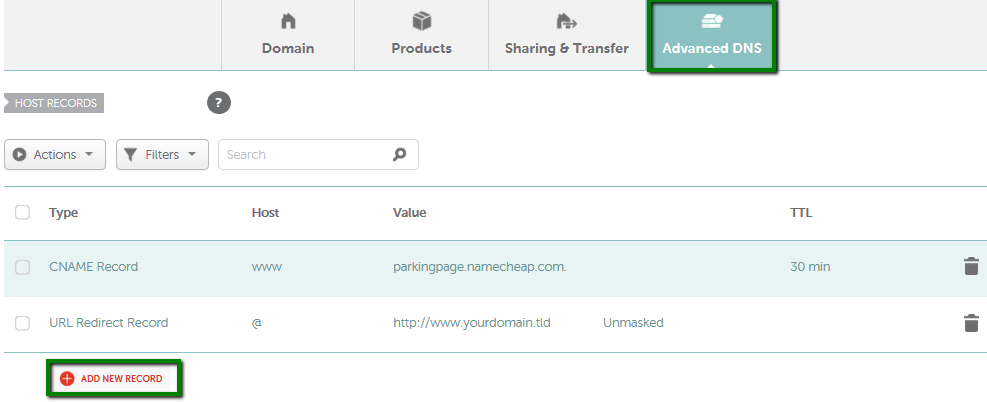
Credit: www.namecheap.com
Gather Domain Information
Transferring a domain from Squarespace to Namecheap requires gathering crucial information. This step ensures a smooth transition. You need to locate specific details within your Squarespace account. It’s essential to understand the process and follow it step-by-step.
Locate Domain Settings
Begin by logging into your Squarespace account. Navigate to the Home Menu. Click on ‘Settings’. Here, you’ll find ‘Domains’. Select the domain you wish to transfer. This section contains vital information for the transfer.
Retrieve Authorization Code
Once you’re in the domain settings, search for the ‘Authorization Code’. This code is necessary for transferring your domain. Squarespace calls it the ‘transfer key’. Make sure to copy it accurately. You’ll need it when initiating the transfer at Namecheap.
Initiate Transfer On Namecheap
Transfer your domain from Squarespace to Namecheap with ease. Begin by unlocking your domain at Squarespace. Then, obtain the EPP code and initiate the transfer at Namecheap.
Transferring your domain from Squarespace to Namecheap can seem daunting. But with the right steps, it becomes straightforward. Namecheap provides an intuitive platform to facilitate this process. Whether you’re switching for better pricing or additional features, initiating a transfer is easy. This guide will help you navigate the process with confidence. ###Access Namecheap Account
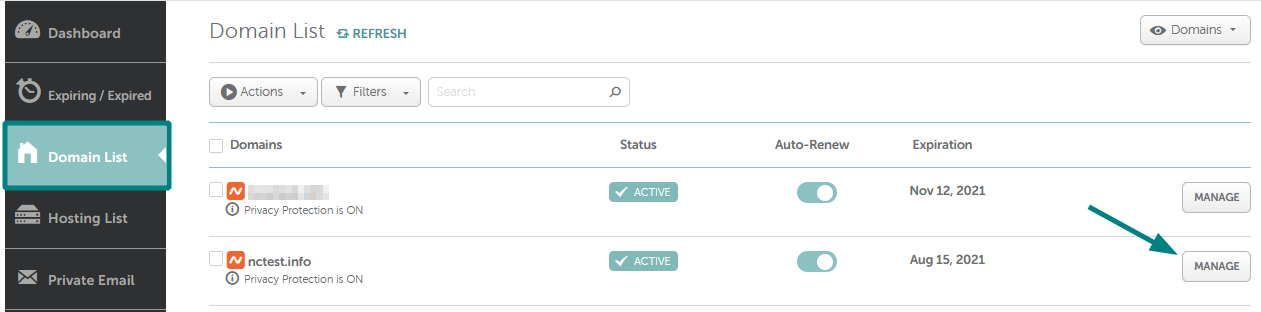
Start by logging into your Namecheap account. If you don’t have one, create it. It’s simple and quick. Once logged in, go to the dashboard. This is your control center. Here, you manage all your domains and services. ###Enter Domain Details
Next, locate the “Transfer” section in your account. Enter the domain you wish to transfer. Ensure the domain is unlocked at Squarespace first. This step is crucial for a successful transfer. After entering the domain, follow the on-screen instructions. Namecheap will guide you through the process. It’s designed to be user-friendly.Complete Domain Transfer
Transferring a domain from Squarespace to Namecheap involves a few simple steps. Begin by unlocking your domain on Squarespace and obtaining the authorization code. Then, initiate the transfer on Namecheap by entering the code and following the prompts to complete the process smoothly.
Transferring a domain from Squarespace to Namecheap might seem daunting at first, but with the right steps, it’s a straightforward process. This transfer can give you more control over your domain settings and often save you money on renewals. Let’s break down the steps to ensure a smooth transition. ###Confirm Transfer Request
Start by unlocking your domain in Squarespace. This step is crucial as locked domains can’t be transferred. Once unlocked, you’ll need to get the EPP code. Think of this as your domain’s password, which you’ll provide to Namecheap to initiate the transfer. After obtaining the EPP code, log in to your Namecheap account. Navigate to the domain transfer page and enter the domain name along with the EPP code. This action confirms your transfer request. Make sure to double-check the details, as any error can delay the process. ###Monitor Transfer Progress
Keep an eye on your email for any notifications from Squarespace or Namecheap. These emails often contain important updates or additional steps you might need to take. You can also monitor the transfer status in your Namecheap account dashboard. Transfers generally take about 5-7 days, so patience is key. During my first domain transfer, I checked obsessively, only to find everything was progressing smoothly. It’s a good reminder to trust the process. Have you ever been in a similar situation, where waiting was the hardest part? Ensure there are no hiccups, like expired payment methods or incorrect contact details. These small details can sometimes derail a perfectly good transfer.Post-transfer Actions
Ensure domain settings are updated after transferring from Squarespace to Namecheap. Update DNS records for proper functioning. Check email configurations to maintain communication flow.
After successfully transferring your domain from Squarespace to Namecheap, you might feel a sense of accomplishment. However, the journey doesn’t end there. Post-transfer actions are crucial to ensuring that your domain functions smoothly and continues to serve your needs effectively. Let’s dive into some essential steps you should take next.Verify Dns Settings
Once your domain is with Namecheap, it’s critical to verify your DNS settings. Ensure they align with your current hosting and email needs. Log into your Namecheap account and navigate to the DNS settings page. Check if your website’s IP addresses and other DNS records are correctly configured. If you’re unsure, consult with your web host’s support or a tech-savvy friend. Remember, incorrect DNS settings can lead to downtime or inaccessible web pages. Have you ever experienced a website outage due to DNS misconfigurations? It can be frustrating, but a quick check can often resolve these issues. Make it a habit to periodically review your DNS settings to avoid any unexpected problems.Update Contact Information
Keeping your contact information up-to-date is vital for domain management. Head over to your Namecheap account and ensure your email address and phone number are current. This ensures you receive critical notifications regarding your domain. Updating your contact information might seem trivial, but it’s essential. Imagine missing a renewal notice due to an outdated email address. This small step can save you from potential downtime and other headaches. Have you ever missed an important email because you forgot to update your details? It’s a common mistake, but easily avoidable. Keep your information accurate to stay informed and in control of your domain.
Credit: www.youtube.com
Frequently Asked Questions
Can I Transfer My Domain Away From Squarespace?
Yes, you can transfer your domain from Squarespace. Unlock your domain and get the authorization code. Follow instructions from your new registrar to complete the transfer. Ensure your domain is eligible and not within 60 days of registration or transfer.
How Do I Connect My Squarespace Domain To Namecheap?
To connect your Squarespace domain to Namecheap, access your Squarespace settings, find “Domains,” then “Custom Domain. ” Enter Namecheap DNS records in Squarespace’s DNS settings. Save changes. Ensure Namecheap domain settings point to Squarespace IPs. Verify connection through Squarespace. This process links your domain seamlessly.
How Do I Transfer My Domain To Namecheap?
Start by unlocking your domain at the current registrar. Obtain the transfer code. Visit Namecheap’s website and initiate the transfer process. Enter the domain and code, then follow on-screen instructions. Confirm email verification to finalize the transfer. Check domain status in your Namecheap account.
How Do I Transfer Ownership Of A Squarespace Domain?
To transfer a Squarespace domain, unlock the domain in settings. Obtain the authorization code. Provide the code to the new owner. The new owner initiates the transfer at their registrar. Confirm the transfer via email.
Conclusion
Transferring a domain from Squarespace to Namecheap is simple. Follow the steps carefully. First, unlock your domain on Squarespace. Then, get the authorization code. Enter this code on Namecheap when asked. Make sure your WHOIS info is updated. Check email for confirmation.
Once transferred, manage everything on Namecheap. Easy, right? Remember to keep records of all changes. This ensures a smooth process. Enjoy managing your domain with Namecheap’s tools. With these steps, anyone can transfer domains easily. Happy transferring!


