
Transferring a domain can seem like a daunting task, especially when you’re moving it from one account to another on the same platform. But what if I told you that transferring a domain from Namecheap to Namecheap is actually simpler than you might think?
Whether you’re consolidating your domains, managing multiple accounts, or just need a fresh start, this guide is designed with you in mind. Imagine the peace of mind you’ll feel knowing your domain is exactly where it needs to be, without the usual stress or complications.
We’ll break down each step into easy-to-follow instructions, eliminating any guesswork. By the end of this article, you’ll be equipped with the knowledge to execute the transfer smoothly and efficiently. So, why wait? Let’s dive into the details and make this transfer process a breeze for you.
Credit: chemicloud.com
Domain Transfer Basics
Transferring a domain can seem challenging. Understanding the basics simplifies the process. A domain transfer involves moving your domain registration from one registrar to another. Namecheap offers an easy way to transfer domains within its platform. This guide will help you understand the essentials.
Reasons For Transferring Domains
Transferring a domain might be necessary for several reasons. You may need better customer support or lower renewal costs. Security features could be another factor. Some users seek a user-friendly interface. Namecheap provides competitive features and pricing. It is a popular choice for domain management.
Eligibility Criteria For Transfer
Not all domains are eligible for transfer. Domains must be at least 60 days old. This is a standard industry rule. Check if your domain meets this requirement. Also, ensure your domain is not locked. Domains should have no pending changes or disputes. Confirm the email address linked to your domain. You will receive important transfer notifications there.
Preparing For Domain Transfer
Preparing for a domain transfer is essential for a smooth process. Before you start, ensure your domain is ready for transfer. This involves unlocking your domain, disabling domain privacy protection, and retrieving an authorization code. These steps help facilitate a seamless transition.
Unlocking Your Domain
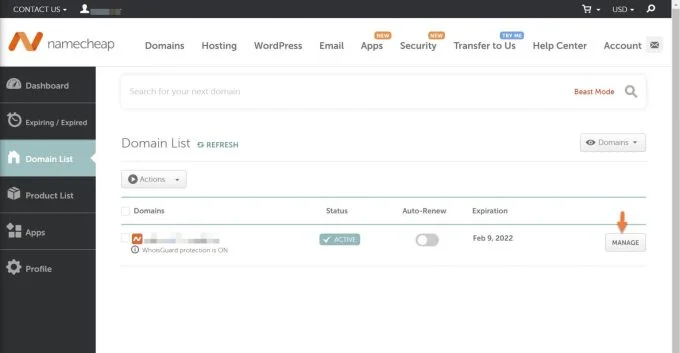
First, unlock your domain in your Namecheap account. This is crucial for transferring. Log into your account and select ‘Domain List’. Find the domain you want to transfer. Click ‘Manage’ next to it. Look for the ‘Domain Lock’ setting. Toggle it to ‘Off’. This action allows your domain to be transferred.
Disabling Domain Privacy Protection
Next, disable domain privacy protection. This reveals your contact details to the new registrar. Go to the ‘Domain List’ in your account. Click ‘Manage’ for your chosen domain. Locate the ‘Privacy Protection’ option. Set it to ‘Off’. Doing this makes your domain transfer-ready.
Retrieving Authorization Code
The final step is retrieving your authorization code. This code is vital for completing the transfer. Again, go to ‘Domain List’ and select ‘Manage’. Find the ‘Advanced Settings’ section. Click ‘Get EPP Code’. This code will be sent to your email. Keep it safe for the transfer process.
Initiating The Transfer Process
Starting a domain transfer within Namecheap involves a few simple steps. First, unlock your domain and get the transfer code. Next, initiate the transfer by entering the code in your Namecheap account.
Transferring a domain from Namecheap to another Namecheap account might sound redundant, but it’s a common need for businesses or individuals managing multiple accounts. Understanding the process can save you time and ensure a smooth transition. Are you ready to initiate the transfer process? Let’s dive into the steps involved. ###Logging Into Namecheap Account
First, you need to access your Namecheap account. Open your browser and go to the Namecheap website. Enter your credentials to log in. Once logged in, you’ll be greeted by your dashboard. This is your control center where all domain-related activities happen. Keep your login details handy for any future visits. ###Navigating To Transfer Section
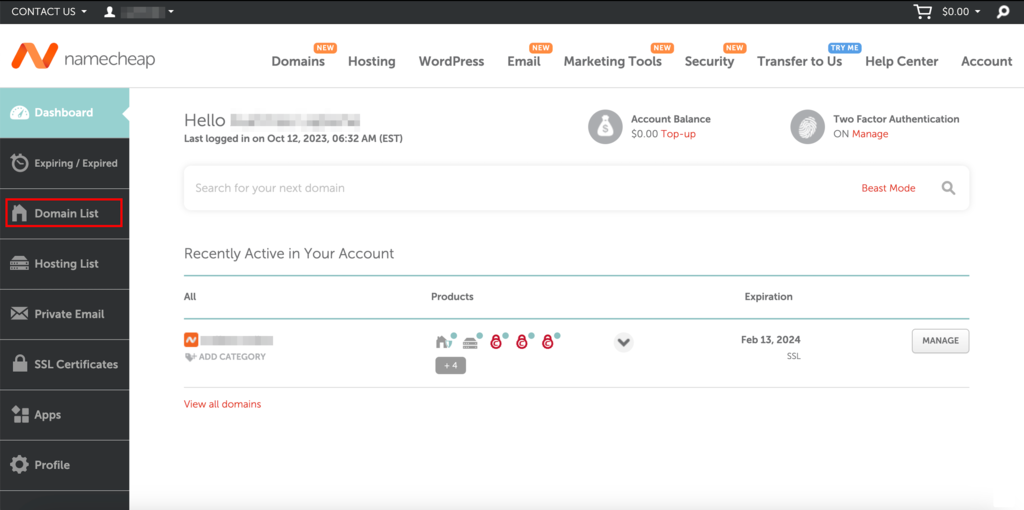
After logging in, it’s time to find the transfer section. Look for the “Domain List” on the left-hand side of your dashboard. Click on it. Here, you’ll see a list of all your domains. Can you spot the one you wish to transfer? If yes, you’re on the right track! Now, select the domain by clicking on the “Manage” button next to it. This will lead you to a new page. ###Entering Domain Details
On this new page, scroll down until you find the “Sharing & Transfer” tab. Click it to reveal more options. Here, you’ll see a section labeled “Transfer to another Namecheap account”. Click on the “Change” button next to it. Enter the recipient’s Namecheap username or email address. Double-check the details to avoid any mistakes. Once done, hit the “Change” button again to initiate the transfer. Congratulations! You’ve just set the wheels in motion for transferring your domain within Namecheap. Isn’t it fulfilling to manage your digital assets effectively? Now, all you need to do is wait for the recipient to accept the transfer.
Credit: www.namecheap.com
Completing The Transfer
Effortlessly transfer your domain within Namecheap by unlocking it and obtaining the EPP code. Navigate to the “Domain Transfer” page, enter your code, and follow the simple steps. Ensure your contact information is up-to-date for a smooth transition.
Completing the transfer of your domain from Namecheap to Namecheap is straightforward. This process ensures your domain stays secure and under your control. Follow these steps carefully to ensure a smooth transition.Verifying Domain Information
First, check your domain details. Ensure the domain name and contact information are correct. Log into your Namecheap account. Navigate to the domain list. Click on the domain you wish to transfer. Review all the information carefully. Make sure there are no errors. Correct any mistakes before proceeding.Confirming Transfer Request
Next, confirm your transfer request. Go to the transfer section in your account. Enter the domain name you want to transfer. Follow the prompts to initiate the transfer. You will receive a confirmation email. Click the link in the email to approve the transfer. This step is crucial to start the process.Monitoring Transfer Status
Finally, monitor the transfer status. Log back into your account. Check the transfer status regularly. It may take a few days to complete. Make sure your domain remains unlocked. Ensure no additional actions are required. Once completed, you will receive a notification. Your domain is now successfully transferred.Post-transfer Considerations
Transferring your domain from Namecheap to Namecheap is seamless, but the process doesn’t end there. Post-transfer considerations are crucial to ensure your domain functions flawlessly. It’s time to focus on the next steps for a smooth transition.
Updating Dns Settings
Once the transfer is complete, update your DNS settings. This ensures your domain points to the correct servers. Log into your Namecheap account. Go to your domain list. Click on the domain you transferred. Update the DNS settings to match your hosting requirements.
Checking Domain Functionality
Verify your domain functionality after updating DNS settings. Visit your website using the domain. Check for any loading issues or errors. Ensure all links and pages work as expected. It’s vital to confirm your domain is fully operational.
Contacting Support For Issues
If any issues arise, contact Namecheap support. They are available to assist with domain problems. Use the live chat or submit a ticket for quick help. Support can guide you in resolving any technical difficulties.
Credit: www.hostinger.com
Frequently Asked Questions
Can I Transfer A Domain From One Namecheap Account To Another?
Yes, you can transfer a domain between Namecheap accounts. Ensure both accounts meet Namecheap’s transfer requirements. Follow the domain transfer steps provided in your Namecheap account dashboard to complete the transfer process. This allows you to manage domains efficiently across different accounts.
Is Namecheap Domain Transfer Free?
Namecheap does not offer free domain transfers. A transfer fee applies, but it includes a one-year renewal. This ensures your domain stays active for an additional year after the transfer. Always check for any special promotions or discounts on their website for potential savings.
How Long Does It Take To Transfer A Domain Namecheap?
Transferring a domain to Namecheap typically takes 5-7 days. Ensure your domain is unlocked and obtain the EPP code from your current registrar. The process may vary based on your current registrar’s speed. You can track the transfer status in your Namecheap account.
How Do I Transfer A Domain From One Account To Another?
To transfer a domain, unlock it in your current account. Obtain the authorization code. Initiate the transfer in the new account using the code. Approve the transfer through email confirmation. Ensure both accounts support the transfer process.
Conclusion
Transferring a domain within Namecheap is straightforward. Just follow the steps. Begin by unlocking your domain. Then, obtain the EPP code. Access your Namecheap account, and initiate the transfer. Don’t forget to confirm your email. This process is smooth and secure.
It ensures your domain stays with you. Namecheap offers a user-friendly experience. You can manage everything in one place. This keeps your domain-related tasks simple. Feel confident knowing your domain is in good hands. Enjoy seamless management with Namecheap.


