Setting up a web hosting server on Ubuntu might sound like a daunting task, but it’s entirely manageable with the right guidance. Imagine having complete control over your website’s hosting environment, ensuring optimal performance and security.
You don’t need to be an IT expert to achieve this; with clear steps and your determination, you can have your server up and running in no time. This guide will walk you through the process, demystifying each step so you can focus on what matters most—your website.
By the end, you’ll have the confidence to manage your own web hosting, unlocking possibilities for customization and growth. Curious to see how straightforward it can be? Let’s dive in and get started!
Choosing The Right Hardware
Picking the correct hardware is crucial. A fast processor helps your server run smoothly. Look for at least a quad-core CPU. RAM is also important. 8 GB of RAM is a good start. This helps in handling multiple tasks. Storage space is where all your files go. Think about using an SSD. They are faster than regular hard drives.
Network speed matters too. A faster connection helps your website load quickly. A Gigabit Ethernet connection is ideal. Don’t forget about power supply. It should be reliable to keep your server running. Consider a UPS for backup power. This helps during power outages.
Installing Ubuntu
Visit the official Ubuntu website. Look for the latest version. Download the Ubuntu ISO file. Make sure your internet is stable. This file is large.
Use a USB stick or DVD. Install a tool like Rufus or UNetbootin. Follow the steps to make bootable media. Select the Ubuntu ISO file. Wait for the process to complete.
Restart your computer. Press the BIOS key. Common keys are F2, F10, or Delete. Change the boot order. Place USB or DVD first. Save the changes and exit.
Insert the bootable media. Restart the computer. Choose “Try Ubuntu” or “Install Ubuntu”. Follow the on-screen instructions. Select language and time zone. Complete the installation.
Network Configuration
A static IP address does not change. It is useful for servers. First, open the terminal. Type sudo nano /etc/netplan/01-netcfg.yaml. This opens the network configuration file. Find the line that starts with dhcp4. Change true to false. Under it, add your IP address details. Include addresses, gateway, and nameservers. Save the file. Run sudo netplan apply to make changes live.
DNS helps translate domain names to IP addresses. Open the terminal. Type sudo nano /etc/resolv.conf. Add your DNS server addresses. Use public DNS like 8.8.8.8 or 8.8.4.4. Save the file. Check by typing ping google.com. If it works, your DNS is set.
Firewalls protect your server. Open terminal. Type sudo ufw enable to activate the firewall. Allow web traffic by typing sudo ufw allow 80 and sudo ufw allow 443. Check the status with sudo ufw status. The firewall should show active. Your server is now protected.

Credit: www.youtube.com
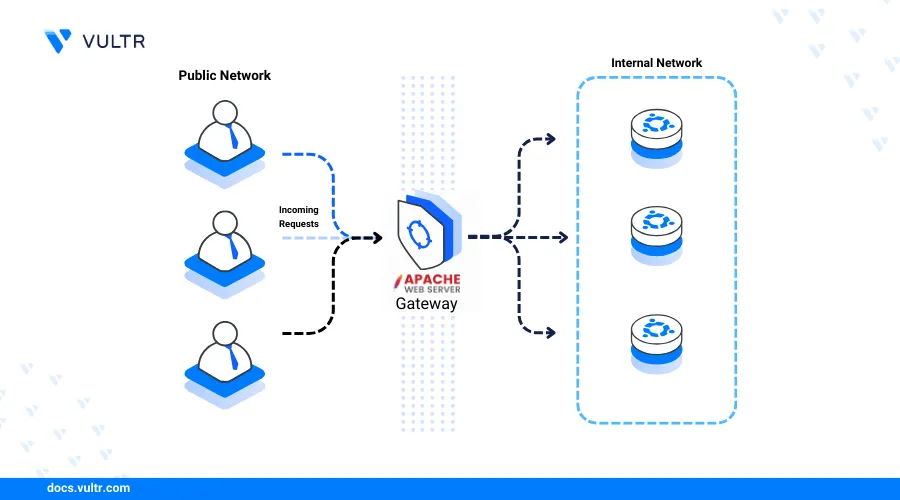
Installing Web Server Software
Apache is a popular web server software. Begin by updating the package lists. Use the command: sudo apt update. Next, install Apache with: sudo apt install apache2. This command will install the latest version. After installation, Apache will start automatically. Verify the installation with apache2 -v. It shows the version installed.
Apache stores configuration files in the /etc/apache2 directory. Open the main configuration file with: sudo nano /etc/apache2/apache2.conf. Edit as needed. Save changes by pressing CTRL + X, then Y, and Enter. Restart Apache with: sudo systemctl restart apache2. This applies your changes.
Open a web browser. Type http://localhost in the address bar. If Apache is working, the page shows “Apache2 Ubuntu Default Page”. This confirms your server setup. Ensure your server is running by typing: sudo systemctl status apache2. The output should indicate it’s active.
Securing The Server
Setting up a web hosting server on Ubuntu involves installing necessary software like Apache, MySQL, and PHP. Configuring security settings is crucial for protecting data and server integrity. Regular updates and monitoring help maintain a secure environment.
Installing Ssl Certificates
SSL certificates protect data online. They encrypt information between servers and browsers. This makes it harder for hackers to steal data. Install SSL with tools like Certbot. Certbot is free and easy to use. It supports many web servers. Follow simple steps to get your certificate. Keep your certificates updated. This ensures continuous security.
Setting Up Ssh Security
SSH allows secure server access. Use strong passwords for SSH accounts. Enable key-based authentication. This is safer than passwords. Disable root login. This reduces risk. Use a firewall to block unauthorized access. Keep SSH software updated. Updates fix security flaws.
Implementing Fail2ban
Fail2Ban helps prevent attacks. It blocks IPs after too many failed login attempts. Install Fail2Ban on your server. Set rules for your needs. Protect SSH, web, and email servers. Customize settings to match your security needs. Regularly monitor logs. This helps identify threats early.
Setting Up Database
Start by updating your server’s package list. Use the command sudo apt update. Then, install MySQL with sudo apt install mysql-server. For MariaDB, use sudo apt install mariadb-server. Follow the prompts to complete the installation. Ensure the database server is running. Use the command sudo systemctl status mysql or mariadb.
Secure the installation with mysql_secure_installation. Set a strong root password. Remove anonymous users and the test database. Reload the privilege tables to ensure all changes take effect. This keeps your database secure.
Log into MySQL or MariaDB with mysql -u root -p. Enter your root password. Create a new database using CREATE DATABASE command. For example, CREATE DATABASE mydatabase;. Always remember the semicolon. This command tells the server to make a new database.
Php Installation And Configuration
First, update your Ubuntu system. Open the terminal. Type sudo apt update. This ensures all packages are current. Next, install PHP by typing sudo apt install php. This command gets the PHP package from the server. You will see a progress bar. Once done, PHP is ready.
Locate the php.ini file. This file stores PHP settings. Use the command sudo nano /etc/php/7.4/apache2/php.ini. Edit values as needed. Set memory_limit and upload_max_filesize to suit your needs. Save changes and exit the editor. Your PHP settings are now configured.
Apache needs to work with PHP. Install the libapache2-mod-php module. Use the command sudo apt install libapache2-mod-php. This helps Apache process PHP files. After installation, restart Apache. Type sudo systemctl restart apache2. PHP and Apache are now integrated.

Credit: www.facebook.com
Testing The Web Server
Setting up a web hosting server on Ubuntu involves installing Apache, configuring settings, and testing the server. Check the server’s functionality using a web browser to ensure everything runs smoothly. This approach helps manage your website efficiently.
Checking Server Status
Ensure the server is running smoothly. Use the command systemctl status apache2 to check the server status. This command helps you know if the server is active or inactive. A green message means the server is working well. A red message shows a problem. Always aim for green.
Testing Web Page Loading
Open a browser to test the web page. Type localhost in the address bar. The default Apache page should appear. If the page loads, your server is working fine. No page means there’s an issue. Check your settings if it fails.
Troubleshooting Common Issues
Problems can occur, but solutions exist. Check your firewall settings first. Ensure the port 80 is open for web traffic. Restart the server using systemctl restart apache2. Recheck your configuration files for errors. Double-check file paths and permissions. Correcting these can solve most issues.
Monitoring And Maintenance
Setting Up Monitoring Tools is crucial. These tools keep your server healthy. Install software like Nagios or Zabbix. These help track server performance. Alerts warn you of issues. Monitoring ensures your server runs smoothly.
Regular Backups protect your data. Always backup your server files. Use tools like rsync or tar. Store backups in a safe place. Backups save you from data loss. Regular backups are vital for safety.
Software Updates keep your server secure. Always update Ubuntu packages. Use commands like apt-get update. Updates fix bugs and security holes. Up-to-date software performs better. Regular updates are important for security.
Credit: docs.vultr.com
Frequently Asked Questions
How To Host A Website In Ubuntu Server?
Install Apache, MySQL, and PHP on your Ubuntu server. Configure Apache to host your website files. Set up a domain and adjust firewall settings. Upload website files to the server’s web directory. Test your website in a browser to ensure it’s accessible.
Is Ubuntu Good For Server Hosting?
Ubuntu is excellent for server hosting. It offers reliability, strong security features, and extensive community support. Its regular updates ensure optimal performance. Compatibility with various server applications makes it versatile. Ubuntu’s ease of use and customization options make it a popular choice for many businesses.
Does Ubuntu Have A Web Server?
Yes, Ubuntu supports web servers. You can easily set up Apache, Nginx, or other web servers on it. Ubuntu’s compatibility with web server software makes it a popular choice for hosting websites and web applications. Users find it efficient and reliable for web hosting needs.
How To Setup A Server In Ubuntu?
Install Ubuntu Server from ISO. Update system using `sudo apt update && sudo apt upgrade`. Install necessary packages with `sudo apt install `. Configure firewall using `ufw enable`. Set up SSH with `sudo apt install openssh-server`. Verify installation and configurations.
Conclusion
Setting up a web hosting server on Ubuntu is straightforward. Follow the steps carefully. Ensure all software is up to date. Secure your server with firewalls and regular updates. Test your server to confirm everything works. Troubleshooting might be necessary, so stay patient.
Practice makes perfect in server management. Keep learning and exploring Ubuntu features. This knowledge empowers your hosting capabilities. Now, you’re ready to host websites confidently. Remember, a good setup ensures smooth operation. Happy hosting!