
Are you struggling to set up your Namecheap email on Outlook? You’re not alone.
Many users find themselves lost in the maze of email settings and configurations. But don’t worry, we’ve got you covered. Imagine having all your emails organized in one place, accessible at the click of a button. No more switching between tabs or missing important messages.
This guide will take you step-by-step through the process, ensuring you get it right the first time. By the end of this article, you’ll be able to manage your Namecheap emails seamlessly within Outlook, making your digital communication not just efficient, but effortless. So, are you ready to take control of your inbox? Let’s dive in and simplify your email setup.
Requirements For Setup
Setting up Namecheap Email on Outlook is straightforward. It requires several key elements to ensure a seamless process. Understanding these requirements is crucial for a smooth setup.
Hardware Requirements
A computer or device compatible with Outlook is essential. Ensure your device meets the minimum system specifications of Outlook. This includes sufficient memory and processing power.
Software Requirements
Install the latest version of Outlook on your device. Ensure regular updates for optimal performance. Outdated versions may cause issues during setup.
Internet Connection
A stable and reliable internet connection is necessary. Email setup requires data synchronization with Namecheap servers. Use a secure Wi-Fi connection for best results.
Namecheap Account Credentials
Have your Namecheap account details ready. This includes your email address and password. These credentials are essential for authenticating your email account.
Server Settings
Obtain the correct server settings from Namecheap. These include incoming and outgoing server details. Proper configuration ensures successful email delivery.
Security Settings
Enable necessary security settings for your email. This includes encryption protocols. They protect your email from unauthorized access.
Backup And Support
Consider creating a backup before setup. It safeguards your data. Contact Namecheap support if issues arise during setup.
Accessing Namecheap Email Settings
Setting up Namecheap email on Outlook involves accessing specific settings. Begin by navigating to your Namecheap account to find email settings. Use these details in Outlook to configure your email, ensuring correct server information for seamless communication.
Setting up your Namecheap email on Outlook might seem daunting at first. However, once you get familiar with accessing the Namecheap email settings, the process becomes straightforward. Understanding these settings is crucial to ensuring your emails sync correctly and your communication runs smoothly. ###Locate Your Namecheap Email Dashboard
Begin by logging into your Namecheap account. Navigate to the “Dashboard” where you can manage your domains and email accounts. Here, you’ll find an overview of all your Namecheap services. ###Access The Email Settings
Once on your dashboard, click on the “Email” section. This is where you can view and edit your email configurations. You’ll see options for setting up email forwarding, spam filters, and more. ###Find The Mail Settings
Look for the “Mail Settings” tab. This tab holds the information you need, such as incoming and outgoing server details. These settings are essential for configuring Outlook correctly. ###Gather Required Information
Make a note of your POP3 or IMAP server details. Also, ensure you have your SMTP settings handy. These include server addresses and port numbers. Without these, setting up Outlook will be challenging. ###Why Accuracy Matters
Have you ever wondered why emails sometimes don’t sync? Often, it’s due to incorrect server settings. Accurate information ensures seamless email delivery and receipt. Double-checking your settings now can save you a headache later. ###Test Your Knowledge
Before moving to Outlook, quiz yourself. Do you have all the details? If not, revisit the Namecheap dashboard. Being prepared with the correct settings will make the Outlook setup process smoother. Understanding these steps not only simplifies the setup but also empowers you to troubleshoot potential issues. By taking the time to familiarize yourself with the Namecheap email settings, you set the foundation for hassle-free email management in Outlook.Configuring Outlook Account
Setting up your Namecheap email on Outlook is essential for seamless communication. This guide helps you configure your Outlook account efficiently. Proper configuration ensures smooth email operations. Follow these steps to get started.
Launching Outlook Application
First, open the Outlook application on your device. Ensure you have the latest version installed. This provides a smooth setup process. Find the Outlook icon on your desktop or start menu. Double-click to launch the application.
Navigating To Account Settings
Once Outlook is open, go to the ‘File’ tab in the top menu. Click on it to access more options. Look for ‘Account Settings’ in the dropdown menu. Select ‘Account Settings’ to proceed. This is where you manage your email accounts.
In the ‘Account Settings’ window, select ‘New’ to add a new account. Enter your Namecheap email details. Follow the prompts to complete the setup. Ensure all information is correct. This ensures your emails are delivered properly.
Credit: truehost.com
Entering Email Account Details
Set up your Namecheap email on Outlook easily. Open Outlook, go to “File,” and select “Add Account. ” Enter your Namecheap email address, choose “Manual setup,” and input server details. Save settings to complete. Enjoy seamless email management.
Entering the correct email account details is essential for setting up your Namecheap email on Outlook. Accurate information ensures smooth email communication. Let’s guide you through the steps of entering your email account details.Inputting Namecheap Email Address
Start by opening Outlook. Go to the “File” tab at the top. Select “Add Account” to begin. Enter your Namecheap email address in the given field. Ensure there are no typos. Click “Connect” after entering the email.Configuring Incoming And Outgoing Servers
Next, configure the server settings. Choose “IMAP” or “POP” based on your preference. For IMAP, enter “mail.yourdomain.com” as the incoming server. For POP, use the same server name. Both require the default port. For outgoing servers, enter “smtp.yourdomain.com”. Set the port to 587. Select “TLS” as the encryption method. Enter your full Namecheap email address as the username. Input the correct password. These steps ensure your emails sync properly. Double-check each entry for accuracy. Proper configuration leads to a seamless experience.Adjusting Security And Port Settings
Setting up Namecheap email on Outlook requires adjusting security and port settings. Select the correct encryption type and input the recommended port numbers for seamless email communication. Ensure settings match Namecheap’s guidelines to avoid errors and maintain secure connections.
Adjusting security and port settings in Outlook can seem complex. Don’t worry. It’s simpler than it appears. Proper settings ensure your email runs smoothly. Let’s dive into the details.Selecting Security Protocols
Security protocols safeguard your email. Choose the right one. Namecheap recommends SSL or TLS. SSL encrypts your connection. TLS offers enhanced security. These keep your email private. Select the protocol in Outlook’s account settings. Secure settings prevent unauthorized access.Setting Port Numbers
Port numbers guide your email’s journey. Correct numbers ensure smooth delivery. For incoming mail, use port 993. It works with IMAP and SSL. For outgoing mail, opt for port 465. It pairs well with SMTP and SSL. Input these in Outlook. Accurate port numbers prevent errors. Ensure your email functions seamlessly.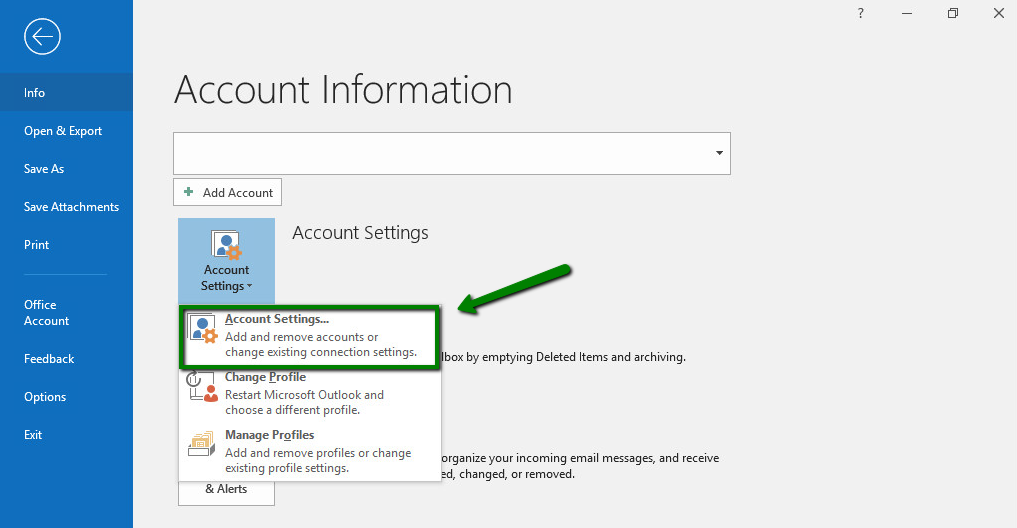
Credit: www.namecheap.com
Testing Email Setup
Setting up Namecheap email on Outlook is simple. Start by opening Outlook and selecting ‘Add Account’. Enter your Namecheap email and password, then follow the prompts to configure server settings. Ensure the correct incoming and outgoing server details are entered.
Finish by testing the connection.
Testing your email setup in Outlook is crucial. It ensures everything is working smoothly with your Namecheap email. This step helps you catch any errors before they cause issues. Let’s dive into testing your setup effectively.Sending A Test Email
Start by composing a new email in Outlook. Address it to your own Namecheap email account. Write something simple like, “Testing my Namecheap setup.” Click send. Check your inbox to see if the email arrives. If you receive it, your outgoing server settings are correct. Next, reply to that email. This checks your incoming server settings. If everything is in order, your setup is likely good to go.Troubleshooting Common Issues
What if something goes wrong? Don’t panic. Start by checking your server settings. Ensure your incoming and outgoing server details are accurate. A small typo can cause big headaches. Sometimes, Outlook might prompt for your password repeatedly. Double-check that you’re entering the correct password. Still facing issues? Consider disabling your firewall temporarily. Sometimes, it blocks email traffic. Remember, almost everyone hits a snag at some point. Each problem is a step closer to mastering your email setup. Have you ever struggled with email settings before? How did you resolve it? Share your experiences or questions in the comments below!Maintaining Email Functionality
Ensuring your Namecheap email functions smoothly on Outlook is crucial. Regular maintenance can prevent disruptions. Stay informed about updates and backup strategies. This will guarantee seamless email operations. Let’s explore how to maintain functionality effectively.
Regular Updates
Outlook frequently releases updates to improve performance. These updates fix bugs and enhance security. Always install the latest updates. This keeps your email functioning without issues. Set automatic updates to simplify the process.
Backup Strategies
Emails can contain important information. Losing them can be problematic. Regularly backup your emails to avoid data loss. Use Outlook’s built-in backup feature. It’s efficient and easy to use. Consider scheduling weekly backups. This ensures you always have a recent copy.
Credit: www.youtube.com
Frequently Asked Questions
Is Namecheap Email Pop Or Imap?
Namecheap email supports both POP and IMAP protocols. Choose IMAP for real-time syncing across devices. Opt for POP to download emails directly to one device. Ensure email client settings match your choice for seamless communication.
How Do I Setup My Domain Email In Outlook?
Open Outlook and go to “File” > “Add Account”. Enter your domain email and select “Manual setup”. Choose “IMAP” or “POP”, then input your email server settings. Complete the setup by clicking “Next” and “Finish”. Test your email to ensure everything works correctly.
What Is The Smtp Server For Namecheap Email?
Namecheap’s SMTP server for email is “mail. privateemail. com” with port 587 for outgoing mail. Ensure SSL/TLS is enabled for secure transmission.
How Can I Add My Company Email To Outlook?
Open Outlook, go to “File,” select “Add Account,” enter your email details, and follow the prompts to configure.
Conclusion
Setting up Namecheap email on Outlook is simple and easy. Just follow the steps mentioned and you’ll be connected in no time. Check your settings carefully to avoid errors. Enjoy the convenience of accessing emails directly through Outlook. This integration helps manage communications more efficiently.
No more switching between platforms. Everything in one place. Remember, practice makes perfect. If issues arise, recheck your steps or consult support. Stay organized and enhance productivity with this setup. Now, you’re ready to handle emails smoothly. Happy emailing with your new setup!


